You already know how to plan trajectories with MoveJ and MoveL. But sometimes you don't need a perfect plan — you just need to control the robot immediately, nudge it a little, see the response, then adjust. That's jogging and servo control.
Think of it like teaching someone to dance. Approach one: choreograph the entire routine before starting. Approach two: hold their hands and guide each movement in real time, adjusting as you go. MoveIt Servo is approach two.
What is MoveIt Servo?
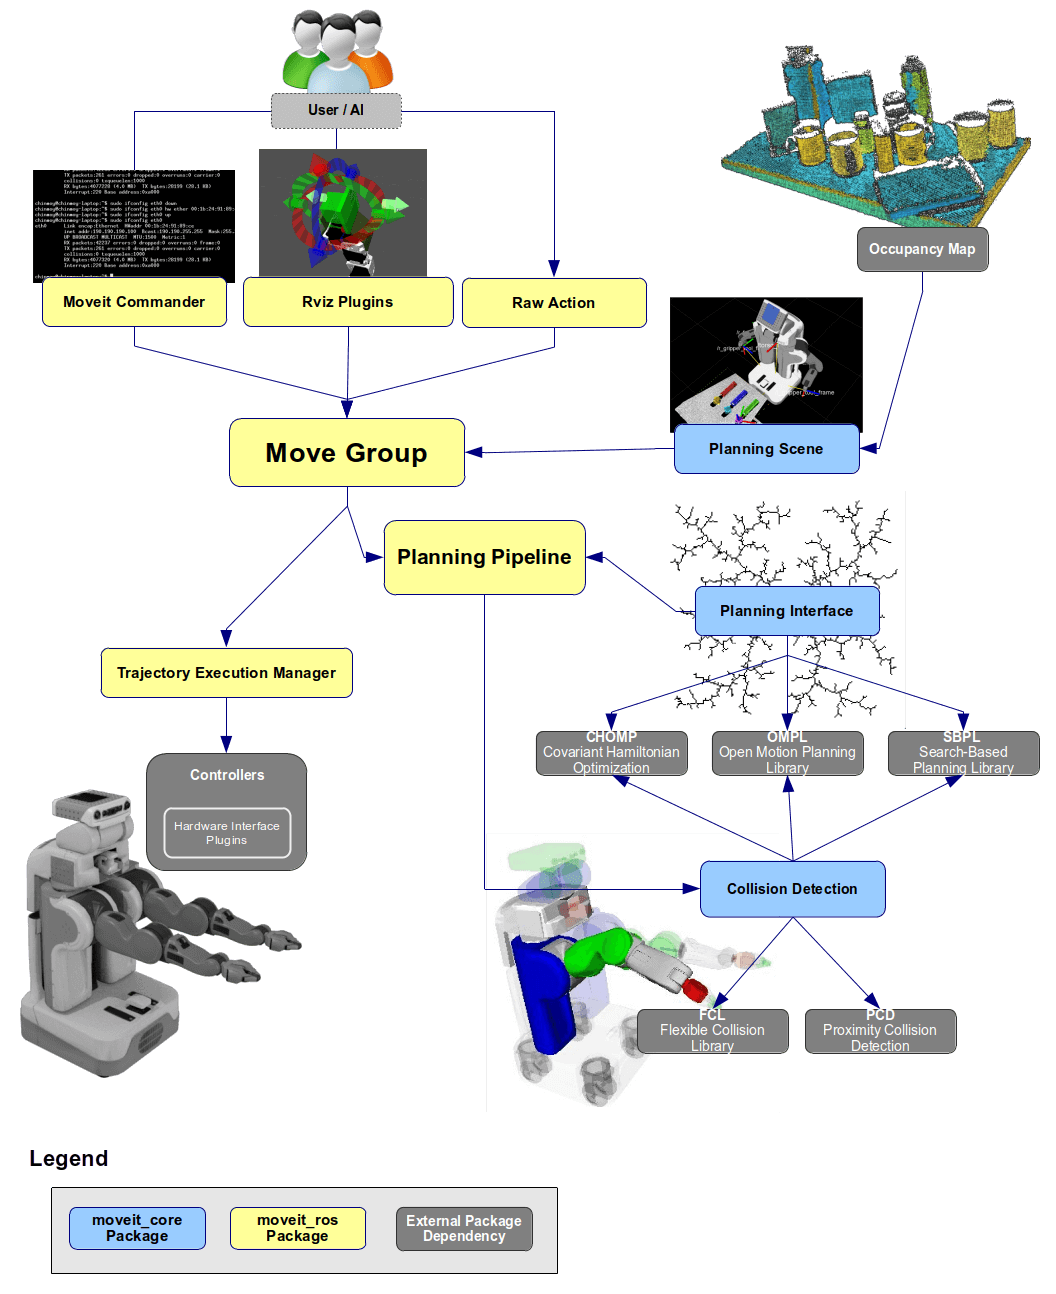
MoveIt Servo is a package in the MoveIt 2 ecosystem (ROS 2), designed for real-time jogging/teleoperation. Instead of planning a path and then executing it, Servo accepts continuous commands from the user (or an algorithm) and converts them into joint commands immediately — typically at 100 Hz.
Key differences:
| MoveIt Planning | MoveIt Servo | |
|---|---|---|
| Purpose | Compute optimal path | Real-time control |
| Latency | Several seconds (planning) | <10 ms |
| Input | Start + Goal pose | Continuous velocity/pose command stream |
| Safety | Collision-free path guarantee | Velocity scaling when danger detected |
| Use when | Precise automation | Teleop, teaching, visual servoing |
MoveIt Servo accepts 3 input command types:
- JointJog — velocity for each individual joint
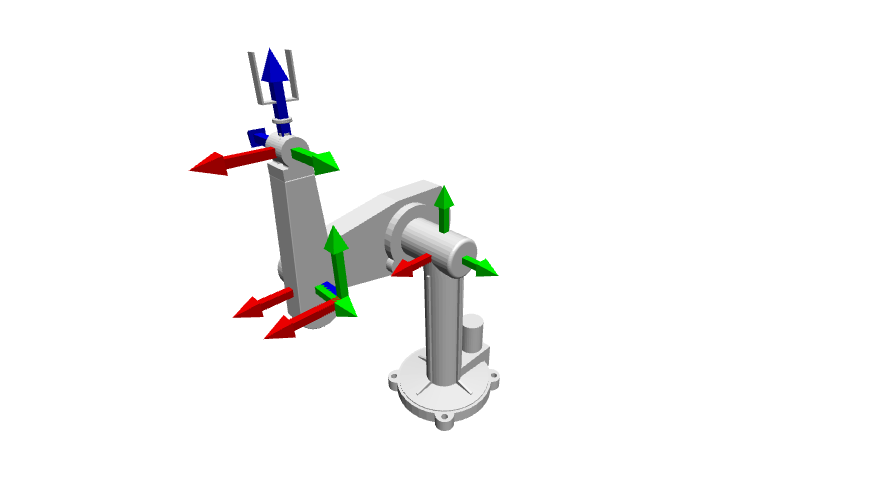
- TwistStamped — linear + angular velocity of the TCP (tool center point)
- PoseStamped — target pose for the TCP (pose tracking mode)
Core Architecture: Inverse Jacobian
The fundamental question: if the user wants the TCP to move in the X direction at 0.1 m/s, how fast must each joint rotate?
This is inverse velocity kinematics, solved using the Jacobian matrix:
v_tcp = J(q) × dq/dt

Where:
- v_tcp = [vx, vy, vz, ωx, ωy, ωz]ᵀ  (6D TCP twist)
- J(q) = 6×N Jacobian matrix (N = DOF, typically 6)
- dq/dt = [dq₁/dt, ..., dqN/dt]ᵀ (joint velocities)
To invert: dq/dt = J⁺(q) × v_command
In practice, MoveIt Servo uses the damped least-squares (Levenberg-Marquardt pseudo-inverse) to avoid division-by-zero near singularities:
dq/dt = Jᵀ × (J×Jᵀ + λ²I)⁻¹ × v_command
The damping factor λ increases as the robot approaches a singularity — smoothly reducing speed rather than suddenly stopping.
Servo updates the Jacobian every control cycle (100 Hz), always using the robot's current kinematics.
Setting Up MoveIt Servo
Package structure
Create a ROS 2 package for the servo controller:
cd ~/ros2_ws/src
ros2 pkg create my_servo_demo \
  --build-type ament_cmake \
  --dependencies rclcpp moveit_servo geometry_msgs sensor_msgs
CMakeLists.txt
cmake_minimum_required(VERSION 3.16)
project(my_servo_demo)

set(CMAKE_CXX_STANDARD 17)

# Find dependencies
find_package(ament_cmake REQUIRED)
find_package(rclcpp REQUIRED)
find_package(moveit_servo REQUIRED)
find_package(moveit_ros_planning REQUIRED)
find_package(moveit_ros_planning_interface REQUIRED)
find_package(geometry_msgs REQUIRED)
find_package(sensor_msgs REQUIRED)
find_package(control_msgs REQUIRED)
find_package(std_srvs REQUIRED)

# Library containing servo logic
add_library(servo_controller
  src/servo_controller.cpp
)
ament_target_dependencies(servo_controller
  rclcpp
  moveit_servo
  moveit_ros_planning
  geometry_msgs
  sensor_msgs
)
target_include_directories(servo_controller PUBLIC
  $<BUILD_INTERFACE:${CMAKE_CURRENT_SOURCE_DIR}/include>
  $<INSTALL_INTERFACE:include>
)

# Executable: C++ servo node
add_executable(servo_demo_node src/servo_demo_node.cpp)
target_link_libraries(servo_demo_node servo_controller)
ament_target_dependencies(servo_demo_node
  rclcpp
  moveit_servo
  moveit_ros_planning_interface
  std_srvs
)

# Install targets
install(TARGETS servo_controller servo_demo_node
  DESTINATION lib/${PROJECT_NAME}
)
install(DIRECTORY launch config
  DESTINATION share/${PROJECT_NAME}
)

ament_package()
package.xml
<?xml version="1.0"?>
<package format="3">
  <name>my_servo_demo</name>
  <version>0.1.0</version>
  <description>MoveIt Servo demo package</description>

  <buildtool_depend>ament_cmake</buildtool_depend>

  <depend>rclcpp</depend>
  <depend>moveit_servo</depend>
  <depend>moveit_ros_planning</depend>
  <depend>moveit_ros_planning_interface</depend>
  <depend>geometry_msgs</depend>
  <depend>sensor_msgs</depend>
  <depend>control_msgs</depend>
  <depend>std_srvs</depend>

  <export>
    <build_type>ament_cmake</build_type>
  </export>
</package>
Configuring servo_params.yaml
The config file is the heart of MoveIt Servo. Create config/servo_params.yaml:
moveit_servo:
# --- Input topics ---
joint_command_in_topic: ~/delta_joint_cmds
cartesian_command_in_topic: ~/delta_twist_cmds
pose_command_in_topic: ~/target_pose
# --- Robot frames ---
planning_frame: base_link
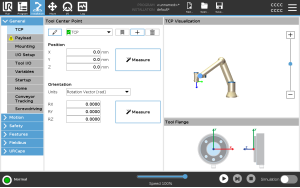
ee_frame_name: tool0
# --- Safety thresholds ---
# Singularity: condition number of Jacobian
lower_singularity_threshold: 17.0 # start slowing
hard_stop_singularity_threshold: 30.0 # full stop
# Collision checking
check_collisions: true
collision_check_rate: 10.0
self_collision_proximity_threshold: 0.01 # meters
scene_collision_proximity_threshold: 0.02
# Joint limits
joint_limit_margin: 0.1 # radians before hard limit
# --- Speed limits ---
max_cartesian_speed: 2.0
max_joint_velocity_override: 2.0
# --- Servo loop rate ---
publish_period: 0.005 # seconds = 200 Hz
# --- Smoothing ---
use_smoothing: true
smoothing_filter_plugin_name: "online_signal_smoothing::ButterworthFilterPlugin"
# --- Timeout ---
incoming_command_timeout: 0.1
Launch File
Create launch/servo_demo.launch.py:
import os
from launch import LaunchDescription
from launch_ros.actions import Node
from ament_index_python.packages import get_package_share_directory
from moveit_configs_utils import MoveItConfigsBuilder

def generate_launch_description():
    # Load MoveIt config (replace "my_robot" with your robot name)
    moveit_config = (
        MoveItConfigsBuilder("my_robot", package_name="my_robot_moveit_config")
        .robot_description(file_path="config/my_robot.urdf.xacro")
        .robot_description_semantic(file_path="config/my_robot.srdf")
        .robot_description_kinematics(file_path="config/kinematics.yaml")
        .to_moveit_configs()
    )

    servo_params_file = os.path.join(
        get_package_share_directory("my_servo_demo"),
        "config", "servo_params.yaml",
    )

    # MoveIt Servo Node
    servo_node = Node(
        package="moveit_servo",
        executable="servo_node",
        name="servo_node",
        output="screen",
        parameters=[
            servo_params_file,
            moveit_config.robot_description,
            moveit_config.robot_description_semantic,
            moveit_config.robot_description_kinematics,
        ],
    )

    # Move Group (required for planning scene + collision checking)
    move_group_node = Node(
        package="moveit_ros_move_group",
        executable="move_group",
        output="screen",
        parameters=[moveit_config.to_dict()],
    )

    return LaunchDescription([move_group_node, servo_node])
C++ API: Using Servo Directly
MoveIt Servo offers both a ROS interface (via ServoNode) and a direct C++ interface. The C++ API provides tighter integration without the overhead of ROS messaging.
Initializing the Servo instance
// src/servo_controller.cpp
#include <moveit_servo/servo.hpp>
#include <moveit_servo/utils/common.hpp>
#include <rclcpp/rclcpp.hpp>

using namespace moveit_servo;

class ServoController {
public:
    explicit ServoController(rclcpp::Node::SharedPtr node)
        : node_(node)
    {
        // Load servo parameters
        const std::string param_namespace = "moveit_servo";
        const auto param_listener =
            std::make_shared<const servo::ParamListener>(node_, param_namespace);
        const servo::Params servo_params = param_listener->get_params();

        // Create Planning Scene Monitor
        planning_scene_monitor_ =
            createPlanningSceneMonitor(node_, servo_params);

        // Create Servo instance
        servo_ = std::make_unique<Servo>(
            node_, param_listener, planning_scene_monitor_
        );

        RCLCPP_INFO(node_->get_logger(), "ServoController initialized");
    }

    // Jog a single joint — e.g., rotate joint1 at 0.1 rad/s
    void jogJoint(const std::string& joint_name, double velocity)
    {
        JointJogCommand cmd;
        cmd.joint_names = {joint_name};
        cmd.velocities = {velocity};

        servo_->setCommandType(CommandType::JOINT_JOG);
        KinematicState next_state = servo_->getNextJointState(cmd);

        publishJointState(next_state);
    }

    // Cartesian twist jog — move TCP in specified frame
    void jogTwist(const std::string& frame_id,
                  double vx, double vy, double vz,
                  double wx, double wy, double wz)
    {
        TwistCommand cmd;
        cmd.frame_id = frame_id;
        cmd.velocities = {vx, vy, vz, wx, wy, wz};

        servo_->setCommandType(CommandType::TWIST);
        KinematicState next_state = servo_->getNextJointState(cmd);

        publishJointState(next_state);
    }

    // Pose tracking — move TCP to a target pose
    void trackPose(const std::string& frame_id,
                   const Eigen::Isometry3d& target_pose)
    {
        PoseCommand cmd;
        cmd.frame_id = frame_id;
        cmd.pose = target_pose;

        servo_->setCommandType(CommandType::POSE);
        KinematicState next_state = servo_->getNextJointState(cmd);

        publishJointState(next_state);
    }

    StatusCode getStatus() const { return servo_->getStatus(); }

private:
    void publishJointState(const KinematicState& state)
    {
        // Forward to hardware controller
        // e.g., trajectory_msgs/JointTrajectory or Float64MultiArray
        if (servo_->getStatus() == StatusCode::NO_WARNING) {
            RCLCPP_DEBUG(node_->get_logger(), "Publishing next joint state");
        }
    }

    rclcpp::Node::SharedPtr node_;
    planning_scene_monitor::PlanningSceneMonitorPtr planning_scene_monitor_;
    std::unique_ptr<Servo> servo_;
};
Main control loop at 100 Hz
// src/servo_demo_node.cpp
#include "my_servo_demo/servo_controller.hpp"
#include <rclcpp/rclcpp.hpp>

int main(int argc, char** argv)
{
    rclcpp::init(argc, argv);

    auto node = std::make_shared<rclcpp::Node>("servo_demo");
    auto controller = std::make_shared<ServoController>(node);

    rclcpp::Rate rate(100);  // 100 Hz control loop
    int cycle = 0;

    RCLCPP_INFO(node->get_logger(), "Starting servo demo loop...");

    while (rclcpp::ok()) {
        if (cycle < 200) {
            // Move forward: vx = 0.05 m/s in base_link frame
            controller->jogTwist("base_link",
                0.05, 0.0, 0.0,
                0.0,  0.0, 0.0);
        } else if (cycle < 400) {
            // Move backward
            controller->jogTwist("base_link",
                -0.05, 0.0, 0.0,
                0.0,   0.0, 0.0);
        } else {
            // Stop
            controller->jogTwist("base_link",
                0.0, 0.0, 0.0,
                0.0, 0.0, 0.0);
            cycle = 0;
        }

        // Check safety status
        auto status = controller->getStatus();
        if (status == StatusCode::HALT_FOR_COLLISION) {
            RCLCPP_WARN(node->get_logger(), "Collision detected! Stopping.");
        } else if (status == StatusCode::HALT_FOR_SINGULARITY) {
            RCLCPP_WARN(node->get_logger(), "Near singularity! Slowing down.");
        }

        ++cycle;
        rclcpp::spin_some(node);
        rate.sleep();
    }

    rclcpp::shutdown();
    return 0;
}
Build with colcon
cd ~/ros2_ws
colcon build --packages-select my_servo_demo --cmake-args -DCMAKE_BUILD_TYPE=Release
source install/setup.bash
Joint Jog: Per-Joint Control
Joint jog lets you rotate individual joints independently — useful when you need to adjust a specific joint without complex TCP motion.
Via ROS topic (easy testing)
# Terminal 1: Launch servo node
ros2 launch my_servo_demo servo_demo.launch.py
# Terminal 2: Publish JointJog message
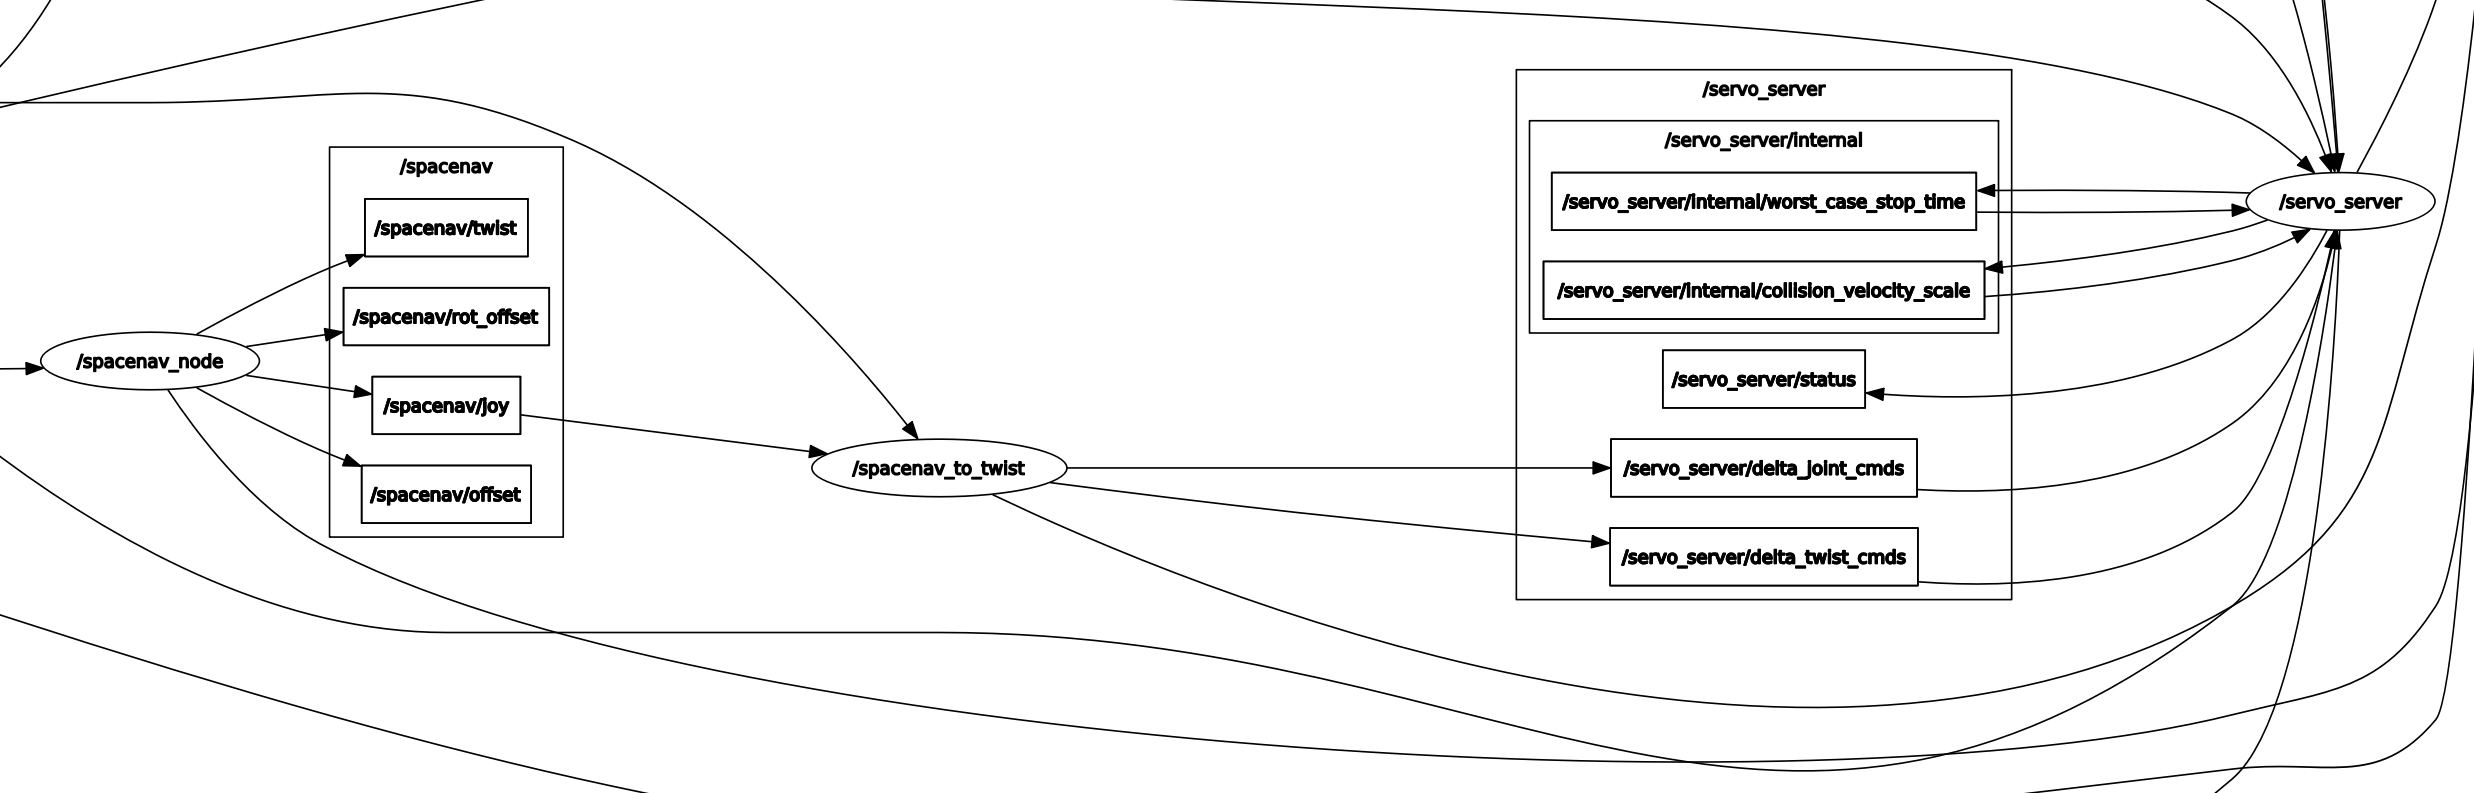
ros2 topic pub --rate 10 /servo_node/delta_joint_cmds \
control_msgs/msg/JointJog "
header:
stamp:
sec: 0
nanosec: 0
frame_id: base_link
joint_names: ['joint1']
velocities: [0.2]
duration: 0.0
"
Via C++ API
JointJogCommand cmd;
cmd.joint_names = {"joint1", "joint2"};
cmd.velocities = {0.1, -0.05};  // rad/s each

servo_->setCommandType(CommandType::JOINT_JOG);
KinematicState result = servo_->getNextJointState(cmd);
Note: joint_names and velocities must have the same number of elements. Joints not listed will not move.
Cartesian Twist Jog: TCP Control
The most common mode in practice. The user specifies TCP velocity in 6 dimensions (3 linear + 3 angular); Servo computes joint velocities accordingly.
Frame awareness — the most important concept
When sending TwistCommand, you must specify frame_id because it determines the direction of motion:
// Case 1: Twist in BASE frame
// vx = 0.1 m/s means moving along X axis of base_link
TwistCommand cmd_base;
cmd_base.frame_id = "base_link";
cmd_base.velocities = {0.1, 0.0, 0.0, 0.0, 0.0, 0.0};

// Case 2: Twist in TOOL frame
// vx = 0.1 m/s means moving "forward" relative to the tool
TwistCommand cmd_tool;
cmd_tool.frame_id = "tool0";
cmd_tool.velocities = {0.1, 0.0, 0.0, 0.0, 0.0, 0.0};
The tool frame is usually preferred in practice because operators think in terms of "move toward the workpiece" rather than "move in global X direction."
Angular velocity [ωx, ωy, ωz]:
- ωz = 0.5 rad/s in tool0   → rotate tool around its own Z axis
- ωz = 0.5 rad/s in base_link → rotate tool around world Z axis
Safety: Singularity, Collision, and Joint Limits
1. Singularity Detection
Singularity occurs when the robot loses a degree of freedom (joints align). The Jacobian becomes ill-conditioned — a small TCP velocity requires very large joint velocities, which is mechanically dangerous.
MoveIt Servo monitors the condition number of the Jacobian:
condition_number = σ_max / σ_min
(σ = singular values of the Jacobian)
condition_number < lower_singularity_threshold→ normal operation- Between the two thresholds → scale down velocity (smooth warning)
condition_number > hard_stop_singularity_threshold→ full stop
In servo_params.yaml:
lower_singularity_threshold: 17.0   # start slowing down
hard_stop_singularity_threshold: 30.0  # hard stop
2. Collision Checking
Servo integrates with MoveIt Planning Scene for continuous collision checking:
check_collisions: true
collision_check_rate: 10.0  # Hz

scene_collision_proximity_threshold: 0.02  # safety margin from obstacles
self_collision_proximity_threshold: 0.01   # self-collision margin
As the robot approaches an obstacle, velocity is scaled down proportionally to the remaining clearance — not a sudden stop, but a smooth deceleration.
3. Joint Limit Enforcement
joint_limit_margin: 0.1 # radians before hard limit
When a joint is within joint_limit_margin of its hard limit, velocity in that direction is reduced to zero. This prevents mechanical over-extension.
Status codes
StatusCode status = servo_->getStatus();

switch (status) {
    case StatusCode::NO_WARNING:
        // Normal operation
        break;
    case StatusCode::WARNING:
        // Continue but warning issued (near singularity/limit)
        break;
    case StatusCode::HALT_FOR_SINGULARITY:
        RCLCPP_WARN(node->get_logger(), "Near singularity!");
        break;
    case StatusCode::HALT_FOR_COLLISION:
        RCLCPP_ERROR(node->get_logger(), "Collision detected!");
        break;
    case StatusCode::JOINT_BOUND:
        RCLCPP_WARN(node->get_logger(), "Joint limit reached!");
        break;
}
Python: Fast Prototyping Script
Before writing full C++, Python lets you prototype very quickly. Here's a keyboard teleop script that jogs the robot via Cartesian twist:
#!/usr/bin/env python3
"""
Keyboard teleop for MoveIt Servo.
Use to prototype jog behavior before completing C++ implementation.

Keys:
  W/S  — TCP forward/back (X axis in tool frame)
  A/D  — TCP left/right (Y axis)
  Q/E  — TCP up/down (Z axis)
  J/L  — Yaw rotation (around Z)
  I/K  — Pitch rotation (around Y)
  ESC  — Exit
"""

import rclpy
from rclpy.node import Node
from geometry_msgs.msg import TwistStamped
import threading

try:
    from pynput import keyboard
    HAS_PYNPUT = True
except ImportError:
    HAS_PYNPUT = False
    print("Install pynput: pip install pynput")

class KeyboardTeleopNode(Node):
    """Node that publishes TwistStamped based on keyboard input."""

    LINEAR_SPEED = 0.05    # m/s — safe speed for beginners
    ANGULAR_SPEED = 0.3    # rad/s

    # Map key → (axis_index, sign)
    KEY_MAP = {
        'w': (0, +1.0),  # linear X +
        's': (0, -1.0),  # linear X -
        'a': (1, +1.0),  # linear Y +
        'd': (1, -1.0),  # linear Y -
        'q': (2, +1.0),  # linear Z +
        'e': (2, -1.0),  # linear Z -
        'j': (5, +1.0),  # angular Z +  (yaw)
        'l': (5, -1.0),  # angular Z -
        'i': (4, +1.0),  # angular Y +  (pitch)
        'k': (4, -1.0),  # angular Y -
    }

    def __init__(self):
        super().__init__('keyboard_teleop')

        self.twist_pub = self.create_publisher(
            TwistStamped,
            '/servo_node/delta_twist_cmds',
            10
        )

        self.velocity = [0.0] * 6  # [vx, vy, vz, wx, wy, wz]
        self._lock = threading.Lock()

        # Publish at 50 Hz
        self.timer = self.create_timer(0.02, self._publish_twist)
        self.get_logger().info(
            "Keyboard teleop started. W/A/S/D/Q/E = linear, J/L/I/K = rotation"
        )

    def on_key_press(self, key):
        try:
            char = key.char.lower() if hasattr(key, 'char') else None
            if char in self.KEY_MAP:
                axis, sign = self.KEY_MAP[char]
                with self._lock:
                    speed = (self.LINEAR_SPEED if axis < 3
                             else self.ANGULAR_SPEED)
                    self.velocity[axis] = sign * speed
        except Exception:
            pass

    def on_key_release(self, key):
        if key == keyboard.Key.esc:
            rclpy.shutdown()
            return False
        try:
            char = key.char.lower() if hasattr(key, 'char') else None
            if char in self.KEY_MAP:
                axis, _ = self.KEY_MAP[char]
                with self._lock:
                    self.velocity[axis] = 0.0
        except Exception:
            pass

    def _publish_twist(self):
        msg = TwistStamped()
        msg.header.stamp = self.get_clock().now().to_msg()
        msg.header.frame_id = 'tool0'  # Jog in tool frame

        with self._lock:
            v = self.velocity.copy()

        msg.twist.linear.x = v[0]
        msg.twist.linear.y = v[1]
        msg.twist.linear.z = v[2]
        msg.twist.angular.x = v[3]
        msg.twist.angular.y = v[4]
        msg.twist.angular.z = v[5]

        self.twist_pub.publish(msg)

def main():
    rclpy.init()
    node = KeyboardTeleopNode()

    if not HAS_PYNPUT:
        print("Need pynput for keyboard input: pip install pynput")
        rclpy.shutdown()
        return

    listener = keyboard.Listener(
        on_press=node.on_key_press,
        on_release=node.on_key_release,
    )
    listener.start()

    try:
        rclpy.spin(node)
    except KeyboardInterrupt:
        pass
    finally:
        listener.stop()
        node.destroy_node()
        if rclpy.ok():
            rclpy.shutdown()

if __name__ == '__main__':
    main()
Running it
# Terminal 1: Make sure servo node is running
ros2 launch my_servo_demo servo_demo.launch.py

# Terminal 2: Run keyboard teleop
python3 scripts/keyboard_teleop.py
Why prototype in Python first?
- Write fast, no compilation needed
- Easy to try different speeds and frames
- Debug keyboard logic → when it works, port to C++
- C++ does the same publishing — just better performance for high-frequency control loops
Demo Video
Pose Tracking: Following a Target in Real Time
Beyond velocity commands, Servo also supports pose tracking — the robot automatically moves its TCP toward a continuously updated target pose (e.g., following an object detected by camera).
# Python script that continuously publishes a moving target pose
import rclpy
from rclpy.node import Node
from geometry_msgs.msg import PoseStamped
import math

class PoseTracker(Node):
    def __init__(self):
        super().__init__('pose_tracker')
        self.pub = self.create_publisher(
            PoseStamped, '/servo_node/target_pose', 10
        )
        self.t = 0.0
        self.create_timer(0.02, self.publish_pose)  # 50 Hz

    def publish_pose(self):
        """Move TCP in a circle — pose tracking demo."""
        msg = PoseStamped()
        msg.header.frame_id = 'base_link'
        msg.header.stamp = self.get_clock().now().to_msg()

        # TCP traces a circle with r=0.1m in the X-Y plane
        msg.pose.position.x = 0.5 + 0.1 * math.cos(self.t)
        msg.pose.position.y = 0.0 + 0.1 * math.sin(self.t)
        msg.pose.position.z = 0.3

        # Keep orientation vertical (pointing down)
        msg.pose.orientation.x = 0.0
        msg.pose.orientation.y = 0.707
        msg.pose.orientation.z = 0.0
        msg.pose.orientation.w = 0.707

        self.pub.publish(msg)
        self.t += 0.1

def main():
    rclpy.init()
    node = PoseTracker()
    rclpy.spin(node)
    rclpy.shutdown()
C++ equivalent:
PoseCommand cmd;
cmd.frame_id = "base_link";

// Target pose updated by vision system, AR marker, etc.
cmd.pose = Eigen::Isometry3d::Identity();
cmd.pose.translation() = Eigen::Vector3d(0.5, 0.0, 0.3);

servo_->setCommandType(CommandType::POSE);
KinematicState result = servo_->getNextJointState(cmd);
Real-world application: Visual servoing — camera detects a marker → continuously publishes pose → Servo drives TCP to the marker even as it moves.
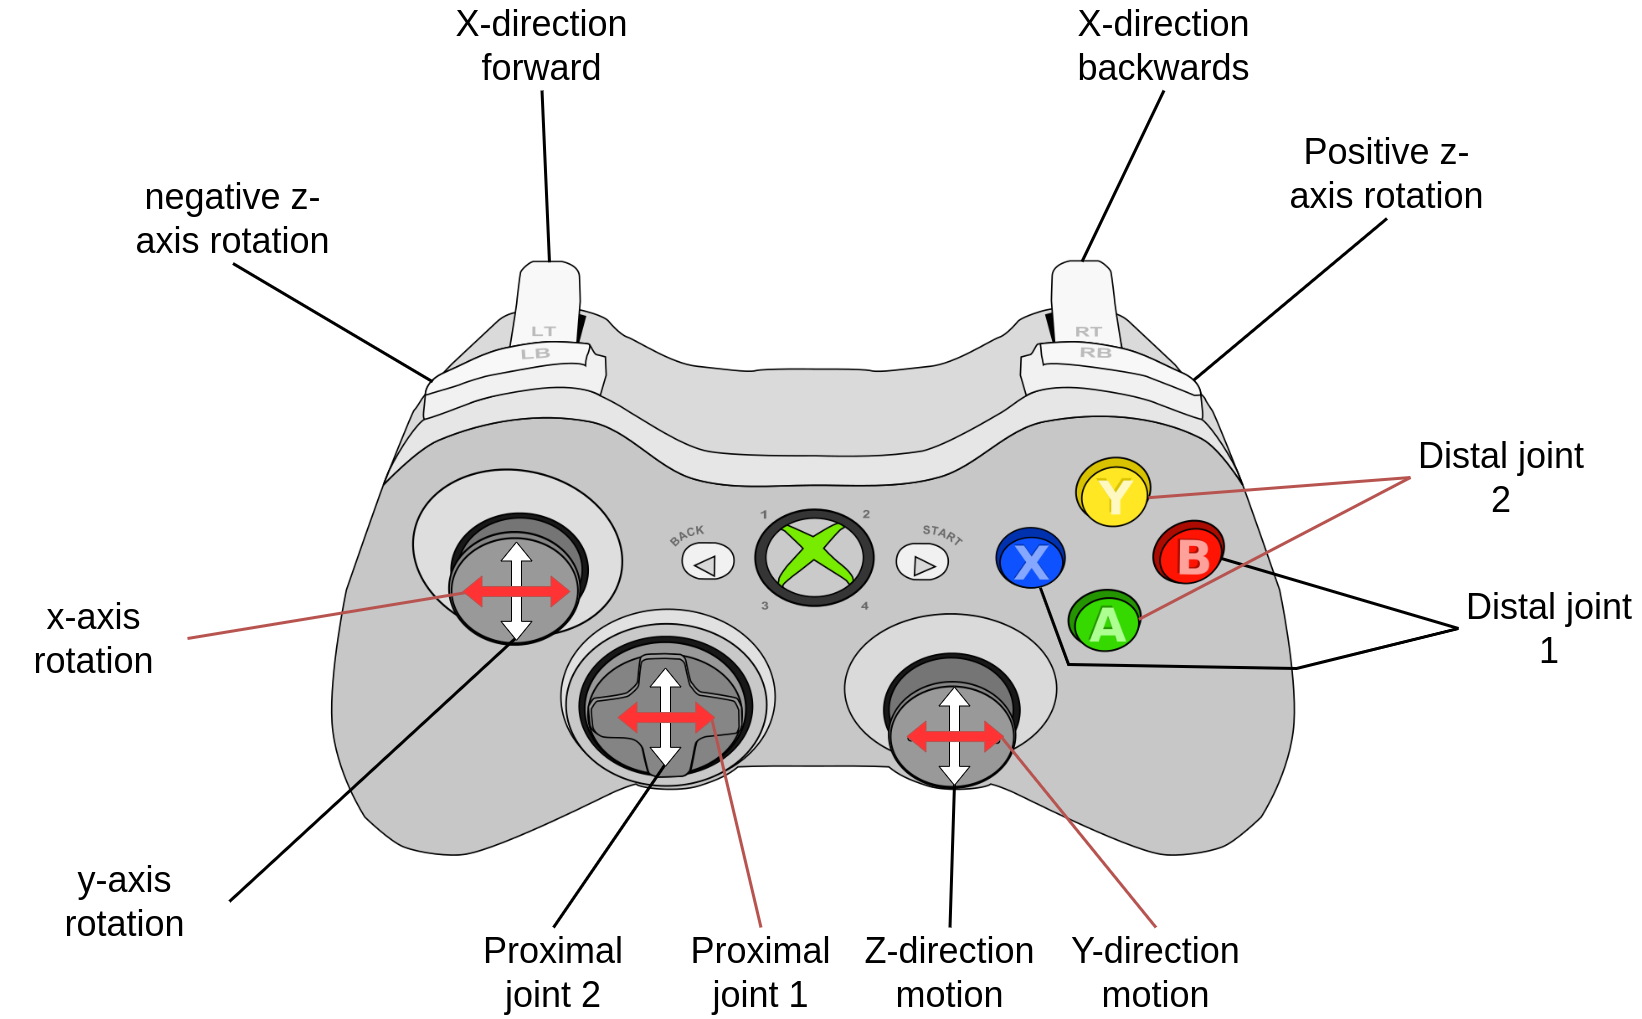
Xbox Controller Teleop
For more natural lab use, you can replace the keyboard with an Xbox controller:
# Install joy package
sudo apt install ros-humble-joy ros-humble-joy-linux

# Launch joy node
ros2 run joy joy_node

# Check what axes are available
ros2 topic echo /joy
Typical axes mapping for robot arm jogging:
- Left stick X/Y → TCP linear X/Y
- Right stick Y → TCP linear Z (up/down)
- Right stick X → TCP angular Z (yaw)
- Bumpers (LB/RB) → Joint jog for joint 1
Practical Workflow: From Prototype to Production
1. [Python] Write keyboard_teleop.py → test concept with Servo node
      ↓ Confirm behavior is correct
2. [Python] Add safety callbacks → monitor status codes
      ↓ Safety logic verified
3. [C++] Port to C++ API → better performance
      ↓ Test with real hardware
4. [C++] Integrate with broader system → visual servoing, task planning
When to use C++ instead of Python:
- Control loop >50 Hz (Python GIL limits performance)
- Direct integration with hardware driver (reduced overhead)
- Production system requiring deterministic timing
- Servo instance shared with other C++ components
Building and Running Everything
# Build workspace
cd ~/ros2_ws
colcon build --packages-select my_servo_demo --symlink-install
source install/setup.bash

# Launch with your robot simulator
ros2 launch my_servo_demo servo_demo.launch.py

# Test joint jog from terminal
ros2 topic pub --rate 10 /servo_node/delta_joint_cmds \
  control_msgs/msg/JointJog \
  "{joint_names: ['joint1'], velocities: [0.1]}"

# Test Cartesian jog
ros2 topic pub --rate 10 /servo_node/delta_twist_cmds \
  geometry_msgs/msg/TwistStamped \
  "{header: {frame_id: 'tool0'}, twist: {linear: {x: 0.05}}}"
Summary
In this article you learned:
- MoveIt Servo — what it is and how it differs from motion planning
- Inverse Jacobian — the math behind Cartesian twist jogging
- 3 input types: JointJog (per-joint), TwistStamped (Cartesian), PoseStamped (tracking)
- CMakeLists.txt and package.xml correctly structured for ament_cmake
- servo_params.yaml — configuring singularity, collision, joint limits
- C++ API — initializing Servo, setting command type, getting KinematicState
- Python teleop — rapid prototyping before committing to C++
- Frame awareness — why frame_id matters in TwistCommand
The next article in this series will bring everything together — FK, IK, MoveJ, MoveL, trajectory blending, velocity profiles, and Servo — into a complete motion planning pipeline for an industrial robot arm.