The previous six parts gave you each piece: why you need 3D (Part 1), building 3D from RGB (Part 2), a point-cloud policy (Part 3), panoramic perception (Part 4), a whole-body VLA (Part 5), and a data strategy (Part 6). This final part ties them all into a concrete deployment roadmap for a humanoid like the Unitree G1.
The goal: go from a blank G1 to a working 3D-aware whole-body manipulation system. (Note: examples use the Unitree G1 / AgiBot X2 / Fourier — it applies to any humanoid with an RL loco controller.)
Overall architecture: from pixels to whole-body action
Before each step, here is the full picture of the pipeline:
flowchart TD
    A[Top RGB-D camera] --> P
    B[Wrist camera] --> P
    C[LiDAR / wide RGB-D] --> P
    P[Robo3R + Omni-Manip:<br/>canonical robot-frame 3D scene] --> Q
    Q[Active Spatial Reasoning:<br/>select region, reason relations] --> R
    R{Policy} --> S[DP3: hand manipulation]
    R --> T[WholeBodyVLA: loco-manipulation]
    S --> U[RL low-level controller 500 Hz]
    T --> U
    U --> V[Unitree G1]
Three clear tiers: 3D perception (build the scene) → policy (emit actions) → controller (balance + execute). Each tier is one part of the series.
Step 1: Sensor placement
This is the physical foundation. A whole-body humanoid needs more than one head camera (the reason was analyzed in Part 4):
| Sensor | Location | Role |
|---|---|---|
| RGB-D camera | Head | Main forward scene, build 3D scene |
| RGB / RGB-D | Wrist | Close-up during grasp, reduce occlusion |
| LiDAR or wide RGB-D | Torso/shoulder | Out-of-FOV region, whole-body collision |
Golden rule: every sensor must be extrinsically calibrated into the same robot base frame of the G1. Without this step, point clouds from different cameras can't be fused — and the entire 3D pipeline collapses. Invest time in accurate calibration from the start.
Step 2: Choose the perception stack (build the 3D scene)
The goal of this tier: from camera images → a metric point cloud in the canonical robot frame.
- Simple start: use depth directly from RGB-D (RealSense D435i) → project into a point cloud. Enough to run DP3 immediately, but weak on transparent/reflective objects.
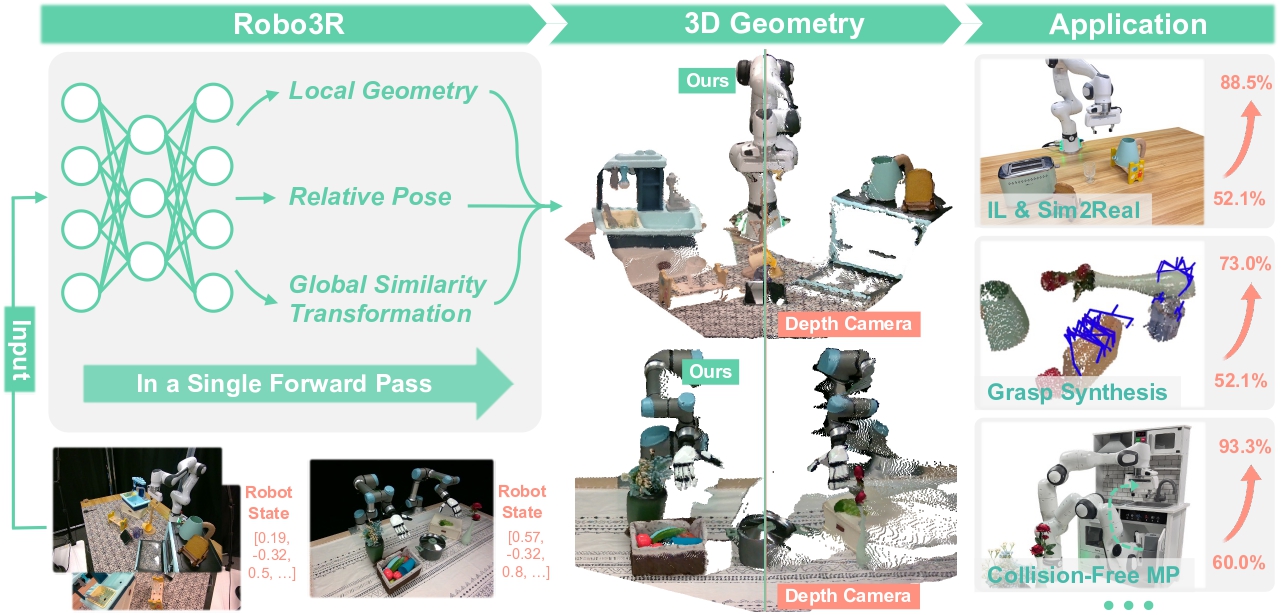
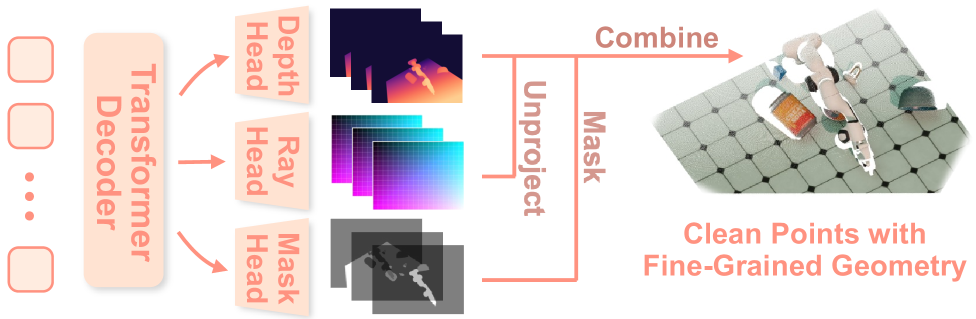
- Upgrade: add Robo3R (Part 2) to build metric 3D from RGB at 43 Hz — drops the depth-sensor dependency and handles hard objects.
- Whole-body: fuse multiple views using the Omni-Manip idea (Part 4) for an omnidirectional scene + scene memory for the out-of-FOV region.
Standard output of this step: a point cloud (N, 6) = xyz + rgb, cropped to the task-relevant region, in the robot frame.
Step 3: Choose the policy (emit actions)
Depending on task complexity:
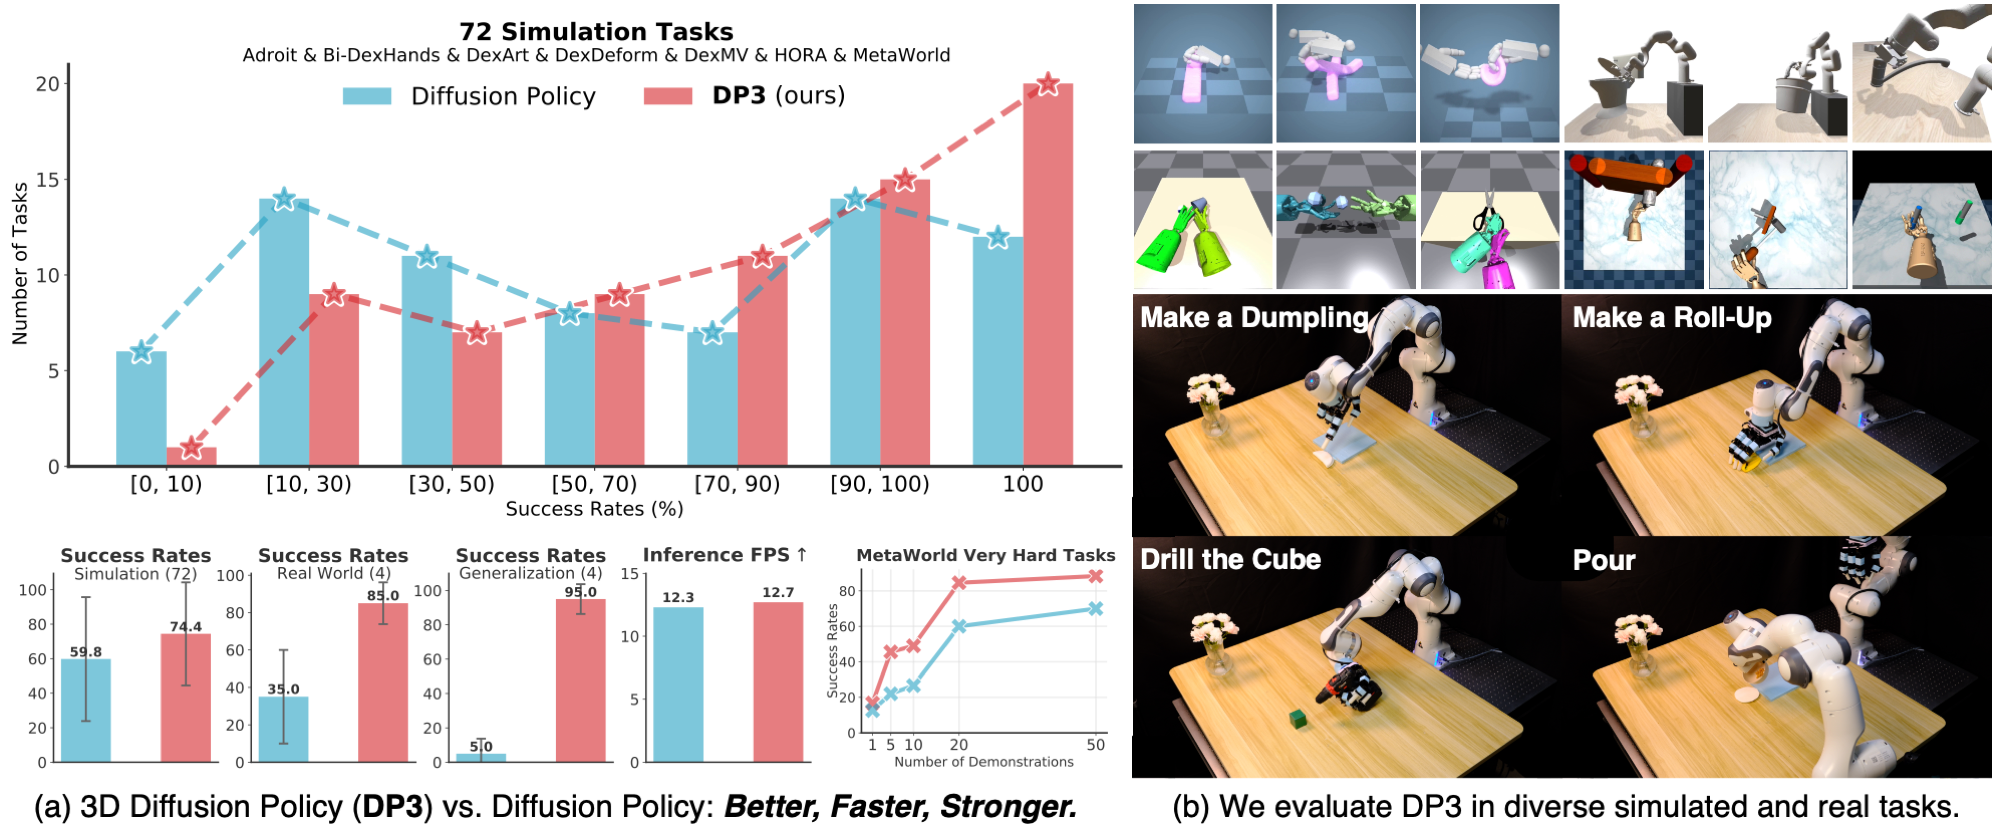
- Single/bimanual manipulation, standing still: use DP3 (Part 3). Sample-efficient, runs well from a point cloud, Simple DP3 ~25 Hz fits a Jetson Orin. A solid starting choice.
- Whole-body loco-manipulation (walk and work): use WholeBodyVLA (Part 5) — a latent VLA that coordinates the whole body, learning from video + a little teleop.
In practice, combine them: WholeBodyVLA handles whole-body coordination and walking to position, DP3 handles fine hand manipulation once stabilized. Don't force one policy to do both from day one.
Step 4: Choose the data strategy
Per the framework in Part 6, layer by budget:
- Pretrain with action-free egocentric video (cheap, massive).
- Scale with robot-free demos (HuMI) — captures whole-body pose, no robot per station.
- Final fine-tune with teleop on the G1 itself — anchor the policy to real robot kinematics.
Remember: with sample-efficient DP3, 200 clean demos are usually enough for one task; don't burn teleop money before you need to.
Step 5: RL low-level controller — the part you can't skip
This is the commonly underestimated point. The high-level policy emits intent, but if the low-level controller can't hold balance when the G1 reaches far, everything falls. You need an RL loco-manipulation controller running at ~500 Hz, trained in simulation.
- Train in Isaac Lab or MuJoCo — the robot falls millions of times to learn to stay upright as the center of mass shifts during reaching.
- Mandatory domain randomization + an actuator-delay model to cross sim2real (detailed techniques in ASAP/Unitree G1).
Step 6: Sim → real-robot checklist
Don't jump straight to the real robot. A safe path:
Sim phase:
- Build the G1 in Isaac Lab/MuJoCo, verify URDF + kinematics match the real robot.
- Train the RL loco controller to balance while reaching (no manipulation policy yet).
- Integrate 3D perception (point cloud from sim) → DP3/WholeBodyVLA.
- Measure success rate on a standard task set (pick-place, place on shelf, pick off floor).
Sim2real phase:
- Domain randomization: lighting, texture, friction, mass, actuator delay.
- Verify camera↔robot-frame extrinsic calibration on the real robot.
- Test the low-level controller alone on the real G1 (safely, with a safety harness) before attaching the policy.
- Enable the policy at slow speed, gradually expand the workspace.
Logging & evaluation:
- Log all modalities (RGB, point cloud, state, action, task outcome) for debugging and collecting more data.
- Measure success rate + time + collision count per task type.
- Use failure cases as fine-tuning data for the next round (a data flywheel).
Summary table: which part solves which roadmap piece
| Roadmap piece | Solution | Part |
|---|---|---|
| Why you need 3D | Motivation, 2D limits | Part 1 |
| Build 3D from RGB | Robo3R feed-forward | Part 2 |
| Manipulation policy | DP3 point-cloud | Part 3 |
| Panoramic perception | Omni-Manip + spatial reasoning | Part 4 |
| Whole-body coordination | WholeBodyVLA + RL | Part 5 |
| Data collection | Teleop / HuMI / video | Part 6 |
| Combine & deploy | This roadmap | Part 7 |
Conclusion: from paper to real robot
This series began with a simple question — why do image-only 2D VLAs fail at manipulation — and ends with a complete roadmap to build a 3D-aware whole-body manipulation system for a humanoid. The throughline: manipulation is a geometry problem, and geometry lives in the 3D metric space around the robot.
Don't try to do everything at once. Start small: one G1, a depth camera, DP3 for a single standing pick-place task. Once it works, add Robo3R to drop the depth sensor, add cameras to widen the workspace, then move up to WholeBodyVLA for loco-manipulation. Each step is one part of this series — now you have the full map.
Happy building. If you get stuck at any step, return to the corresponding part in the table above.
Related Posts
- Part 1: Why 2D VLA Is Not Enough for Manipulation — The start of the whole journey
- Part 5: WholeBodyVLA — Egocentric Video + RL — Whole-body coordination
- Part 6: Data Collection — Teleop vs Robot-Free vs Video — Choosing a data strategy