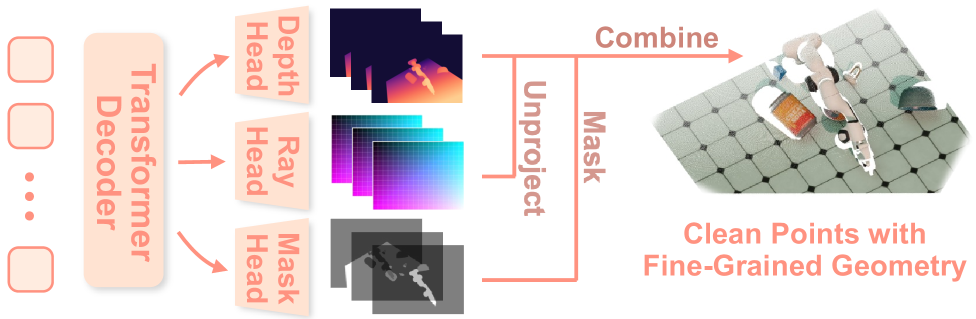
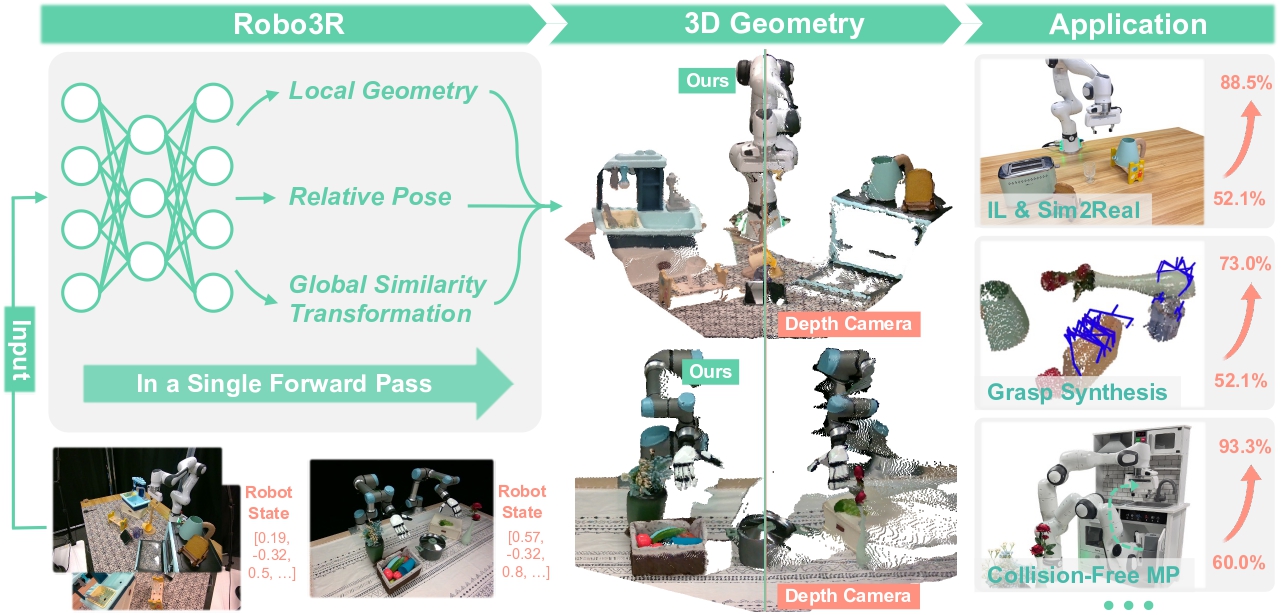
In Part 2 we saw Robo3R build metric-scale 3D geometry from a plain RGB camera at 43 Hz — fast enough for a robot control loop. The next question follows naturally: now that you have a point cloud, what do you do with it?
This is where 3D Diffusion Policy (DP3) comes in.
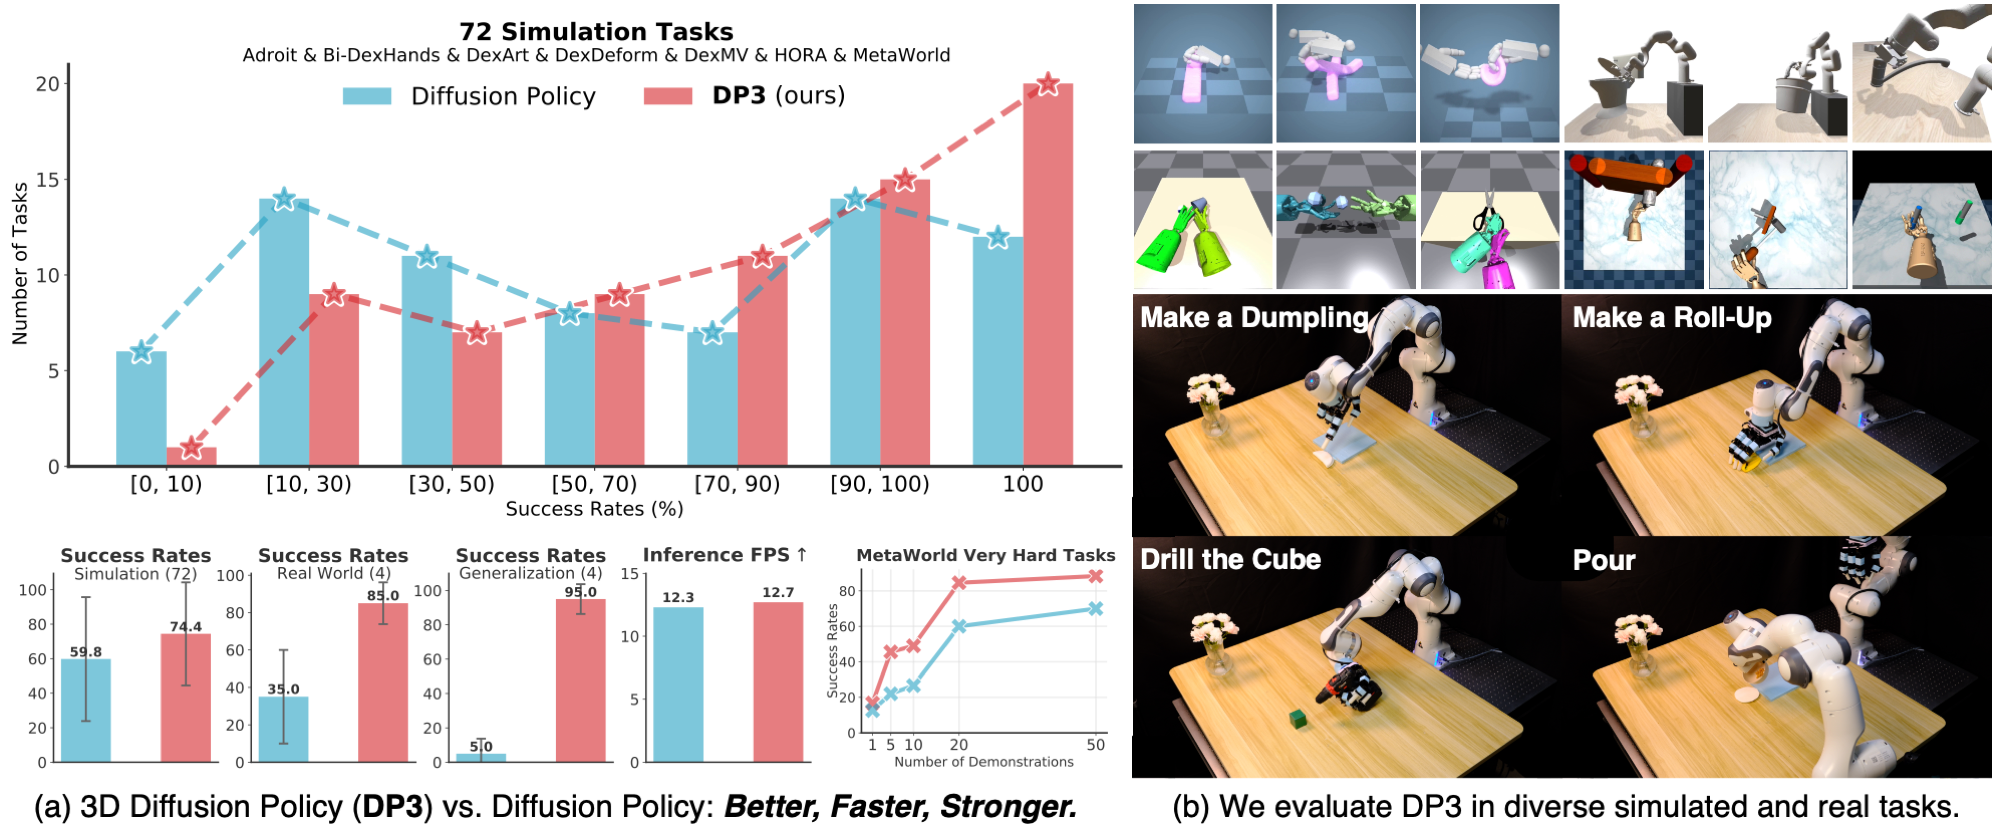
DP3 is a visuomotor policy framework published at RSS 2024 that combines two deceptively simple ideas into an impressive result: use a point cloud instead of a 2D image as the visual input to a diffusion policy. The paper reports a 24.2% relative improvement across 72 simulation tasks and an 85% success rate on real robots with just 40 demonstrations.
Paper: 3D Diffusion Policy: Generalizable Visuomotor Policy Learning via Simple 3D Representations — Yanjie Ze, Gu Zhang, Kangning Zhang, Chenyuan Hu, Muhan Wang, Huazhe Xu — RSS 2024.
This article is hands-on: we will understand the architecture, set up the environment, generate demonstrations, train from scratch, and evaluate the policy — all based directly on the YanjieZe/3D-Diffusion-Policy repo.
Why point clouds, not images?
Before the hands-on, let's understand DP3's design motivation.
What image-based Diffusion Policy offers
Diffusion Policy (Chi et al., CoRL 2023) is one of the state-of-the-art methods for behavior cloning: it uses a diffusion model to learn a probability distribution over the action space, conditioned on visual observations. With RGB images as input, it works well in fixed lab environments.
But Part 1 of this series pointed out the core issue: 2D images do not encode geometry. A policy trained on RGB images must "guess" depth, shape, and spatial relationships from pixel values — an ill-posed problem. Change the camera angle slightly, change the lighting, or add a distractor to the background, and the policy fails.
DP3 replaces images with point clouds
Instead of showing the policy an image, DP3 shows it a sparse point cloud — a set of 3D points in the robot frame. Each point carries coordinates (x, y, z) and color (r, g, b) — six dimensions per point.
Advantages over images:
| Problem with 2D images | How point clouds solve it |
|---|---|
| No absolute depth | Metric z-coordinate in robot frame |
| Camera-sensitive (move angle → fail) | Pose-invariant (3D coords don't change with camera) |
| Domain gap (lighting, background) | 3D geometry barely affected by appearance |
| Occlusion ambiguous | Explicit depth ordering |
| 224×224 image = 150K values | Sparse cloud ~1024 pts × 6 = 6K values |
Downside: you need an extra preprocessing step to obtain the point cloud — either a depth camera (RealSense, Azure Kinect) or 3D reconstruction like Robo3R from Part 2.
DP3 architecture
DP3 has three components running in sequence:
1. Point Cloud Encoder (DP3 Encoder)
This is the core difference from image-based policies. The encoder takes a point cloud $P \in \mathbb{R}^{N_p \times 6}$ — each point with 6 dimensions (x, y, z, r, g, b).
Encoder architecture, PointNet++-style:
- Farthest Point Sampling (FPS): select $N_s$ representative points spread evenly across 3D space — avoids clustering too many points in one region
- Ball Query: for each representative point, gather neighbors within radius $r$ into a neighborhood
- MLP layers: encode the local geometry of each neighborhood into a feature vector
- Hierarchical grouping: repeat at coarser resolutions — like pooling in a CNN but in 3D
- Global Pooling: aggregate all local features into a single compact global vector $z_e \in \mathbb{R}^{d}$
The key point: this encoder is lightweight — only a few million parameters, and runs in real time without an expensive GPU.
2. Conditional Denoising Diffusion (Action Head)
Once we have the visual embedding $z_e$ from the point cloud encoder, DP3 uses a diffusion model to generate the action sequence — this part is inherited from the original Diffusion Policy.
How it works:
During training:
- Take a clean action $a^0$ from the dataset
- Add Gaussian noise per schedule: $a^k = \sqrt{\bar{\alpha}_k} a^0 + \sqrt{1 - \bar{\alpha}_k} \epsilon$
- The network $\epsilon_\theta$ learns to predict the noise $\epsilon$ conditioned on $(z_e, s_t)$
- Loss: $\mathcal{L} = \mathbb{E}{k,\epsilon}\left[||\epsilon - \epsilon\theta(a^k, k, z_e, s_t)||^2\right]$
During inference:
- Sample pure Gaussian noise $a^K$
- Run reverse denoising for $K$ steps, each guided by $(z_e, s_t)$
- Output an action sequence $a^0$ — usually 8–32 timesteps
This "point cloud encoder + diffusion head" combination is extremely sample-efficient: only 10 demonstrations in simulation are enough for good performance.
3. Simple DP3 — a 2x faster variant
The paper also introduces Simple DP3, which simplifies the diffusion backbone:
- Replaces the full U-Net with a smaller UNet with fewer residual blocks
- 2x inference speedup while keeping comparable accuracy
- Uses ~10GB GPU memory (vs ~16GB for full DP3)
- Trains in ~1–2 hours on an Nvidia A40 (full DP3 takes ~3 hours)
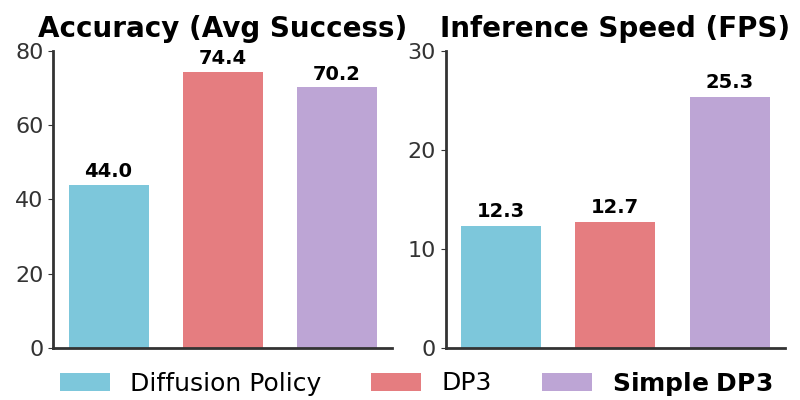
For real-world robot deployment, Simple DP3 is usually the better choice due to lower latency at comparable performance.
Detailed comparison: DP3 vs image-based Diffusion Policy
| Criterion | Image Diffusion Policy | DP3 |
|---|---|---|
| Visual input | RGB image (224×224 = 150K values) | Sparse point cloud (~1024 pts × 6 = 6K values) |
| Geometry encoding | Implicit (learned from pixels) | Explicit 3D coordinates |
| Camera sensitivity | High — change angle → fail | Low — pose-invariant |
| Lighting sensitivity | High | Low (stable geometry) |
| Data efficiency | Needs many demos | Works with 10 demos (sim) |
| Inference speed | Fast | Fast (Simple DP3 ≈ comparable) |
| Hardware | RGB camera only | Depth sensor or 3D reconstruction |
| Real-world generalization | Hard (image domain gap) | Better |
Quantitative result across 72 simulation tasks: DP3 improves 24.2% over the image-based baseline. On real robots: 85% success rate vs ~60% for the image-based counterpart.
Hands-on: environment setup
This section follows the repo's INSTALL.md exactly.
Requirements:
- Ubuntu 20.04 (recommended)
- CUDA ≥ 12.1
- Nvidia GPU (≥ 10GB VRAM for Simple DP3, ≥ 16GB for full DP3)
- Python 3.8
Step 1: Clone the repo
git clone https://github.com/YanjieZe/3D-Diffusion-Policy.git
cd 3D-Diffusion-Policy
Step 2: Create a conda environment
conda create -n dp3 python=3.8
conda activate dp3
Step 3: Install PyTorch (CUDA 12.1)
pip3 install torch torchvision torchaudio --index-url https://download.pytorch.org/whl/cu121
For a different CUDA version, adjust the URL per the PyTorch install guide.
Step 4: Install the DP3 package
cd 3D-Diffusion-Policy && pip install -e . && cd ..
Step 5: Install MuJoCo (for the simulation environments)
mkdir -p ~/.mujoco
cd ~/.mujoco
wget https://github.com/deepmind/mujoco/releases/download/2.1.0/mujoco210-linux-x86_64.tar.gz \
    -O mujoco210.tar.gz --no-check-certificate
tar -xvzf mujoco210.tar.gz
Add to ~/.bashrc:
export LD_LIBRARY_PATH=$LD_LIBRARY_PATH:${HOME}/.mujoco/mujoco210/bin
export LD_LIBRARY_PATH=$LD_LIBRARY_PATH:/usr/lib/nvidia
export LD_LIBRARY_PATH=$LD_LIBRARY_PATH:/usr/local/cuda/lib64
export MUJOCO_GL=egl
Then source ~/.bashrc.
Step 6: Install mujoco-py
cd third_party/mujoco-py-2.1.2.14
pip install -e .
cd ../..
Step 7: Install the simulation environments
pip install setuptools==59.5.0 Cython==0.29.35 patchelf==0.17.2.0

cd third_party
cd dexart-release && pip install -e . && cd ..
cd gym-0.21.0 && pip install -e . && cd ..
cd Metaworld && pip install -e . && cd ..
cd rrl-dependencies && pip install -e mj_envs/. && pip install -e mjrl/. && cd ..
cd ..
Step 8: Install PyTorch3D (simplified)
cd third_party/pytorch3d_simplified && pip install -e . && cd ../..
Step 9: Install remaining packages
pip install zarr==2.12.0 wandb ipdb gpustat dm_control omegaconf \
    hydra-core==1.2.0 dill==0.3.5.1 einops==0.4.1 diffusers==0.11.1 \
    numba==0.56.4 moviepy imageio av matplotlib termcolor
Important: version pinning is mandatory. hydra-core==1.2.0 and diffusers==0.11.1 must be exactly those versions — newer versions usually cause API incompatibility. Likewise numba==0.56.4 must match Python 3.8.
Hands-on: generate demonstrations
DP3 uses behavior cloning — it needs demonstrations from an expert policy. The repo provides scripts to generate them from pre-trained RL experts.
Supported environments
| Benchmark | # tasks | Examples | Difficulty |
|---|---|---|---|
| Adroit | 4 | hammer, door, pen, relocate | Medium–Hard |
| DexArt | 4 | bucket, laptop, toilet, faucet | Hard |
| MetaWorld | 50 | reach, push, pick-place, button-press... | Easy–Medium |
| Bi-DexHands | many | bimanual dexterous tasks | Very Hard |
To start, Adroit hammer is the best task: it ships with an RL expert, the task is practically meaningful (a dexterous hand hammering a nail), and it clearly shows the benefit of 3D.
Generate demonstrations for Adroit hammer
bash scripts/gen_demonstration_adroit.sh hammer
This script:
- Loads a pre-trained RL expert policy from
third_party/rrl-dependencies/ - Runs the expert in MuJoCo simulation
- Collects ~400 episodes as observations + actions
- Saves to
data/adroit_hammer.zarr
The dataset format DP3 uses:
data/adroit_hammer.zarr/
├── data/
│   ├── point_cloud  # (N, T, Np, 6) — T timesteps, Np points, xyz+rgb
│   ├── robot_state  # (N, T, D_s) — robot joint positions
│   └── action       # (N, T, D_a) — target actions
Hands-on: training
Train DP3
bash scripts/train_policy.sh dp3 adroit_hammer 0112 0 0
Each argument explained:
dp3— policy name (usesimple_dp3for Simple DP3)adroit_hammer— environment name0112— experiment ID (organizes checkpoints)0— GPU ID (0 = first GPU)0— seed offset
To use Simple DP3 (faster, recommended):
bash scripts/train_policy.sh simple_dp3 adroit_hammer 0112 0 0
Monitoring training
Training logs to Weights & Biases by default. If you have no WandB account or want to run offline:
WANDB_MODE=disabled bash scripts/train_policy.sh dp3 adroit_hammer 0112 0 0
Estimated training times:
- Simple DP3 on A40 (48GB): ~1–2 hours
- Full DP3 on A40: ~3 hours
- On RTX 3090 (24GB): ~4–6 hours (full DP3)
Checkpoints are saved to outputs/ in Hydra format.
Hands-on: evaluation
bash scripts/eval_policy.sh dp3 adroit_hammer 0112 0 0
This script:
- Loads the latest checkpoint from
outputs/ - Runs the policy in simulation for 100 episodes
- Reports the success rate
Target performance per paper:
adroit_hammer: >80% success ratemetaworld_*(most tasks): >85% success ratedexart_*: 60–80% success rate
Train and eval on real-robot data
To test with real-robot data (Franka + Allegro Hand on the drilling task realdex_drill):
Download the dataset from Google Drive:
# Dataset link: https://drive.google.com/file/d/1G5MP6Nzykku9sDDdzy7tlRqMBnKb253O/view
# Download and place it in the data/ directory
Then train:
bash scripts/train_policy.sh dp3 realdex_drill 0112 0 0
Generalization results
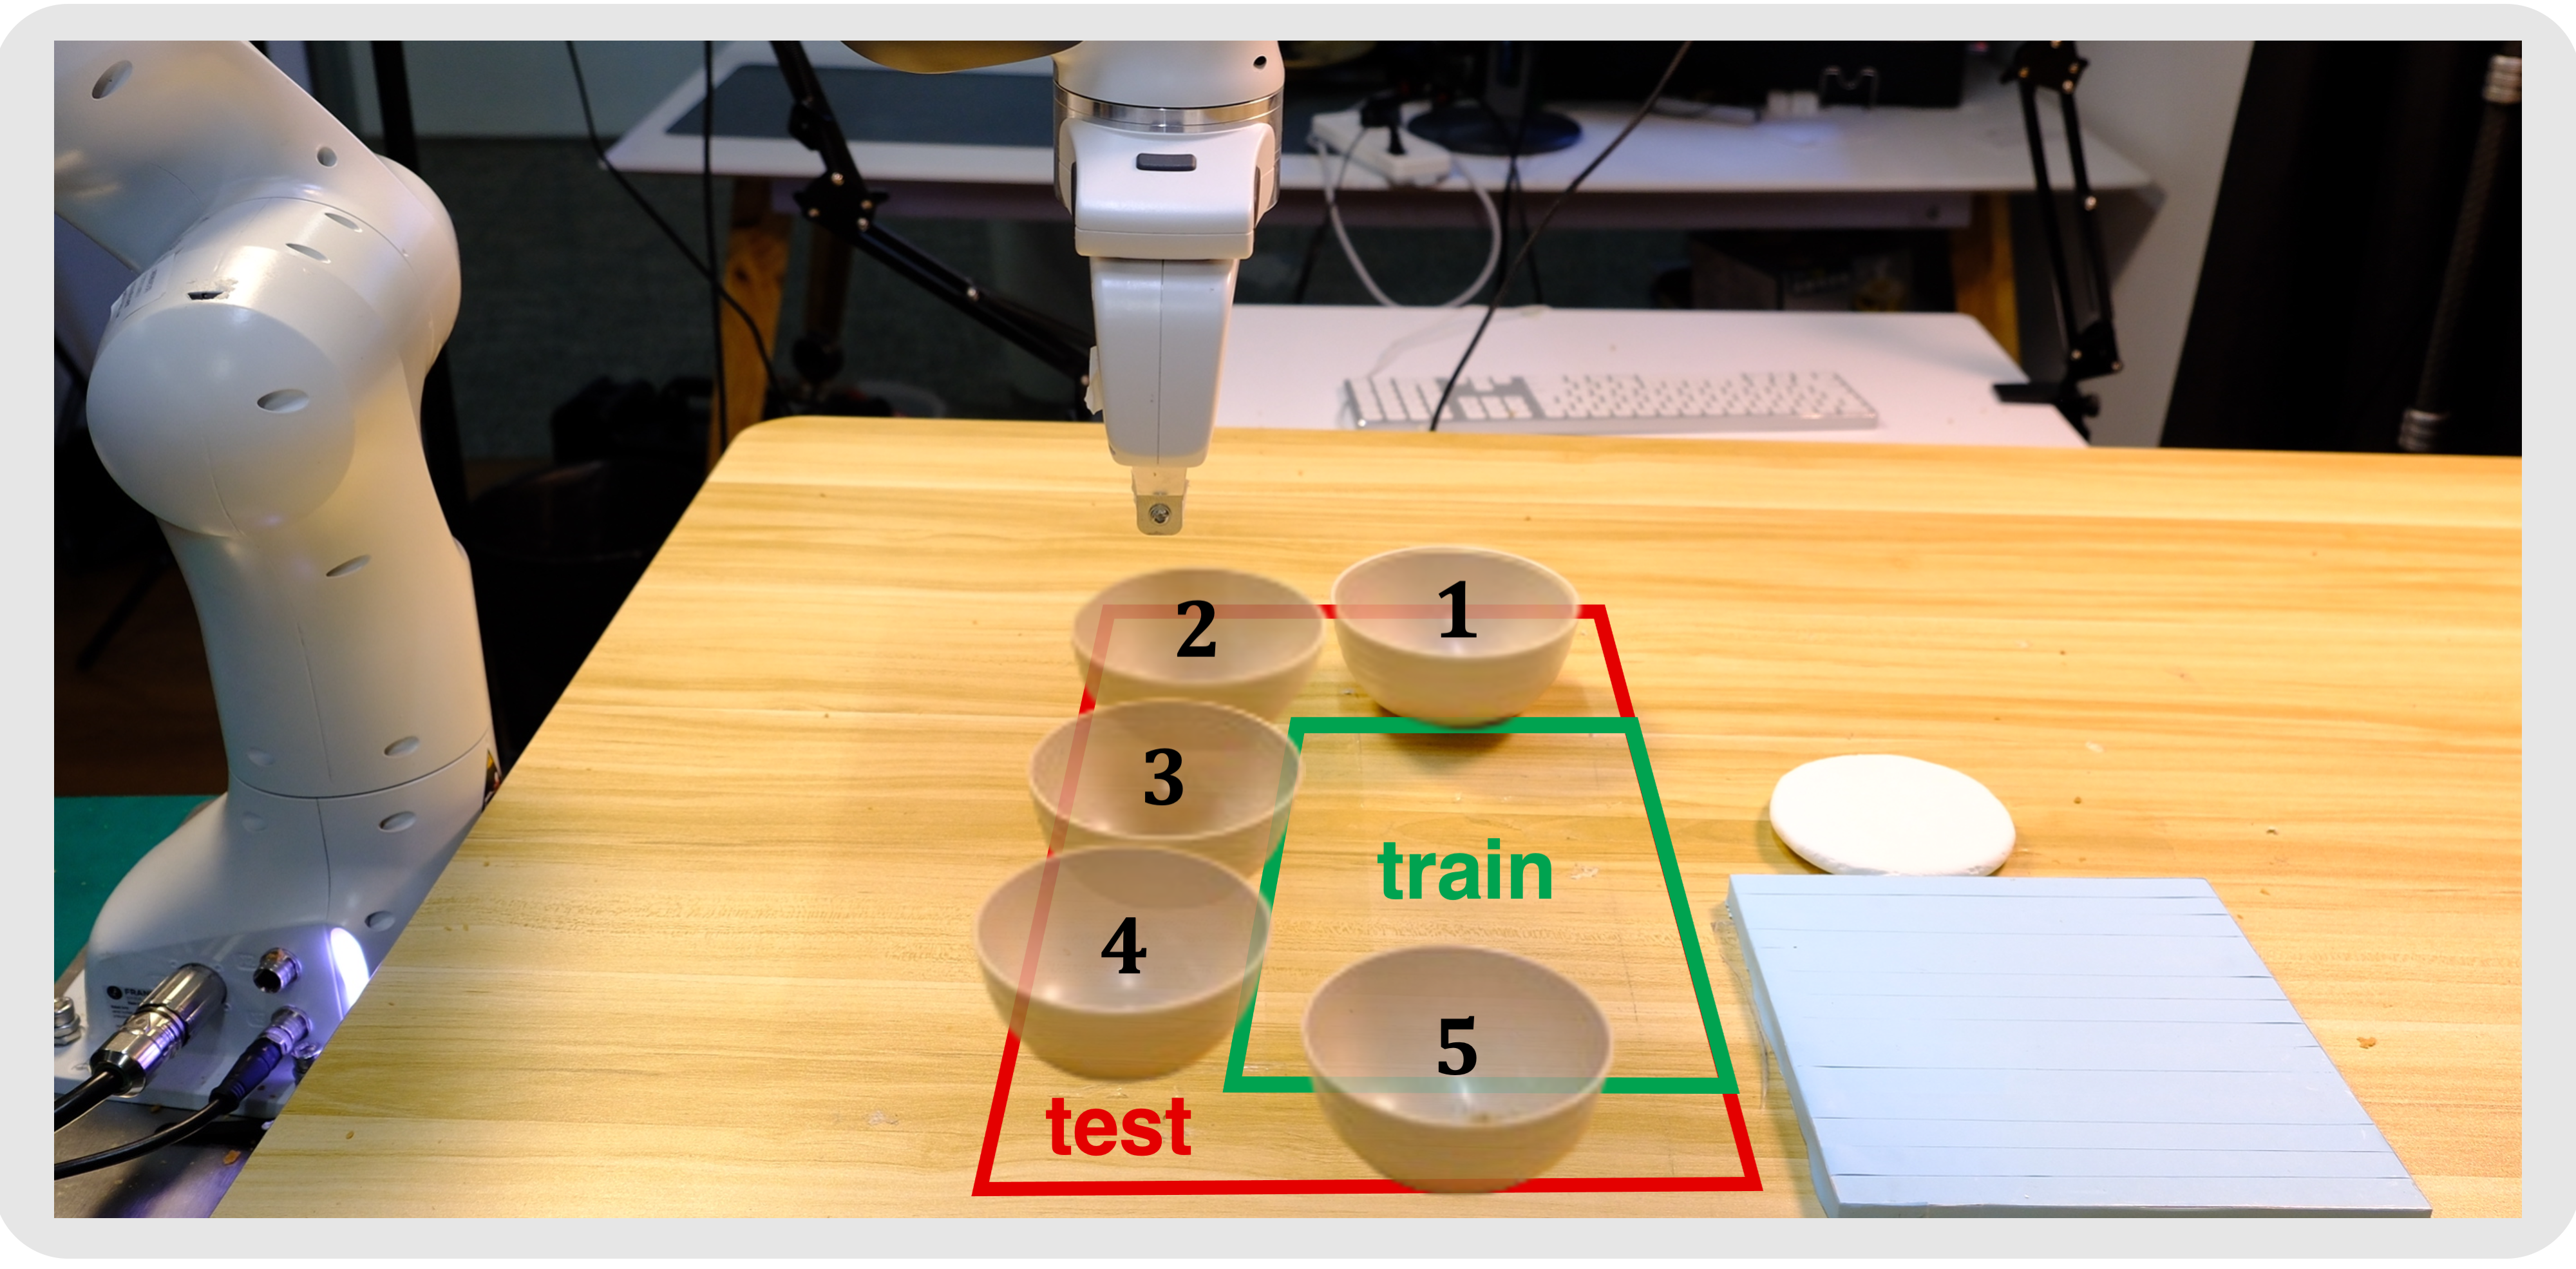
DP3's biggest strength is generalization. The paper tests four kinds:
- Spatial generalization: objects at different positions in the workspace — DP3 reaches 85% success because the point cloud encodes absolute 3D position
- Appearance generalization: changing object color/texture — DP3 stays stable because geometry is unchanged
- Instance generalization: a different object of the same category (e.g. a different drill) — little impact
- Viewpoint generalization: camera at a different angle — point clouds are 3D coordinates, so they are invariant to camera pose
Contrast with image-based policies: changing the lighting or shifting an object 5cm is enough to fail. DP3 with point clouds is markedly less sensitive for this reason.
Connecting with Robo3R: the full pipeline
This is the most important part for understanding the big picture of the series.
DP3 needs a point cloud as input. But where does the point cloud come from in practice?
Source 1: depth camera (what the original repo uses)
The repo uses a RealSense L515 to capture a depth image and project it into a point cloud:
RealSense L515 → depth image → backproject → point cloud (xyz) + color (rgb)
This is the simplest approach but has limits: depth cameras struggle with transparent, reflective, or very thin objects.
Source 2: Robo3R feed-forward reconstruction (recommended)
Part 2 introduced Robo3R — which produces a metric-scale point cloud from a plain RGB camera at 43 Hz. Pairing Robo3R with DP3 yields a stronger pipeline:
RGB camera (any type)
        ↓
Robo3R (43 Hz) — feed-forward 3D reconstruction
        ↓
Metric-scale point cloud in robot frame
        ↓
DP3 Point Cloud Encoder
        ↓
Diffusion denoising (K steps)
        ↓
Action sequence → sent to robot controller
The advantage: you only need a plain RGB camera, no expensive depth sensor. Every depth-camera limitation (transparent objects, reflections, strong light) goes away because Robo3R only uses RGB.
Real-world deployment on Unitree G1
The Unitree G1 has 43 DoF and two dexterous hands — an ideal platform to test DP3. Here are the practical points when deploying.
Suggested hardware setup
- Camera: an RGB head camera or a wrist camera
- Point cloud: use a RealSense D435i (with depth) in the early stage, then upgrade to the Robo3R pipeline
- Inference: Jetson Orin NX 16GB onboard (Simple DP3 ~10GB fits), or an external workstation over WiFi
What to tune when adapting to G1
1. Crop the point cloud aggressively
G1 has a large workspace and a lot of visual clutter (robot hands, torso, floor). Crop to keep only the task-relevant region:
def crop_workspace_pointcloud(pcd, x_range=(-0.5, 0.5),
                               y_range=(-0.3, 0.3),
                               z_range=(0.0, 0.6)):
    mask = (
        (pcd[:, 0] > x_range[0]) & (pcd[:, 0] < x_range[1]) &
        (pcd[:, 1] > y_range[0]) & (pcd[:, 1] < y_range[1]) &
        (pcd[:, 2] > z_range[0]) & (pcd[:, 2] < z_range[1])
    )
    return pcd[mask]
2. Use global position for the action space
The paper is explicit: DP3 performs better with global end-effector position rather than delta/relative position. For G1, the action space should be the absolute wrist position in the robot base frame.
3. Tune the prediction horizon
- Horizon 8: good for fast tasks (pick-and-place)
- Horizon 16: balance of speed and smoothness (recommended)
- Horizon 32: good for tasks needing long, smooth trajectories (pouring, insertion)
4. Inference frequency
Full DP3 runs at ~10 Hz, Simple DP3 at ~25 Hz. With a G1 controller running at 500 Hz, you need interpolation between action predictions.
Common pitfalls when setting up DP3
1. Version incompatibility is the number-one culprit
hydra-core, diffusers, and numba all need exact version pins. Newer versions usually cause import errors or API mismatches. Always use the versions in INSTALL.md.
2. Headless rendering on a server
Running on a server with no display: you must set MUJOCO_GL=egl. Without it you get a No display found error the moment MuJoCo imports.
export MUJOCO_GL=egl
# Add to ~/.bashrc to make it automatic
3. Wrong point-cloud density
DP3 uses FPS to sample ~1024 points from the input. Too few points (<500) and the encoder lacks information; too many (>10000) and FPS slows down significantly. Target input: 2000–5000 points before FPS.
4. GPU memory OOM
Simple DP3 needs ~10GB, full DP3 ~16GB. On OOM, lower batch_size in the config:
# In the config file:
training:
  batch_size: 64  # Lower to 32 or 16 on OOM
5. WandB login blocking
If the server has no internet, WandB login blocks indefinitely. Always set WANDB_MODE=disabled for offline training.
Simple DP3 vs Full DP3: which one?
| Simple DP3 | Full DP3 | |
|---|---|---|
| GPU memory | ~10GB | ~16GB |
| Training time (A40) | 1–2 hours | ~3 hours |
| Inference speed | ~25 Hz | ~10 Hz |
| Accuracy | Comparable | Baseline |
| When to use | Real deployment, Jetson | Research, benchmark |
The conclusion is clear: for real robot deployment (including the Unitree G1), Simple DP3 is the better choice.
Summary and next steps
DP3 is a strong baseline for 3D-aware visuomotor policies:
- Simple architecture: a PointNet++-style point cloud encoder + a diffusion backbone — easy to understand, easy to extend
- Well-maintained repo: 1,300+ stars, 16+ follow-up papers use it as a baseline
- Data efficient: only 10 demos in sim, 40 demos on a real robot
- Strong generalization: all four kinds of generalization benefit from the 3D representation
That said, DP3 has clear limits: it is a single-arm policy that does not handle the large workspace of a full-body humanoid, and it lacks language conditioning for instructions. For a Unitree G1 that needs both hands and whole-body motion, you need something broader.
That is why Part 4 dives into Omni-Manip — a framework that extends spatial 3D perception to an omnidirectional workspace, a better fit for humanoids.
Related Posts
- Part 1: Why 2D VLA Isn't Enough for Manipulation — Foundation: the 5 core limits of 2D representation
- Part 2: Robo3R — Feed-Forward 3D Reconstruction from RGB — How to get a point cloud from a plain RGB camera
- Part 4: Omni-Manip — Spatial 3D for Humanoids — Extending DP3 to an omnidirectional large workspace