A robot looks at a table and sees a coffee cup. Simple question: "where is that cup in 3D space, and how do I grip it?" But answering this accurately enough for the robot to actually pick it up requires solving two completely different hard problems simultaneously: natural language understanding and 3D spatial geometry.
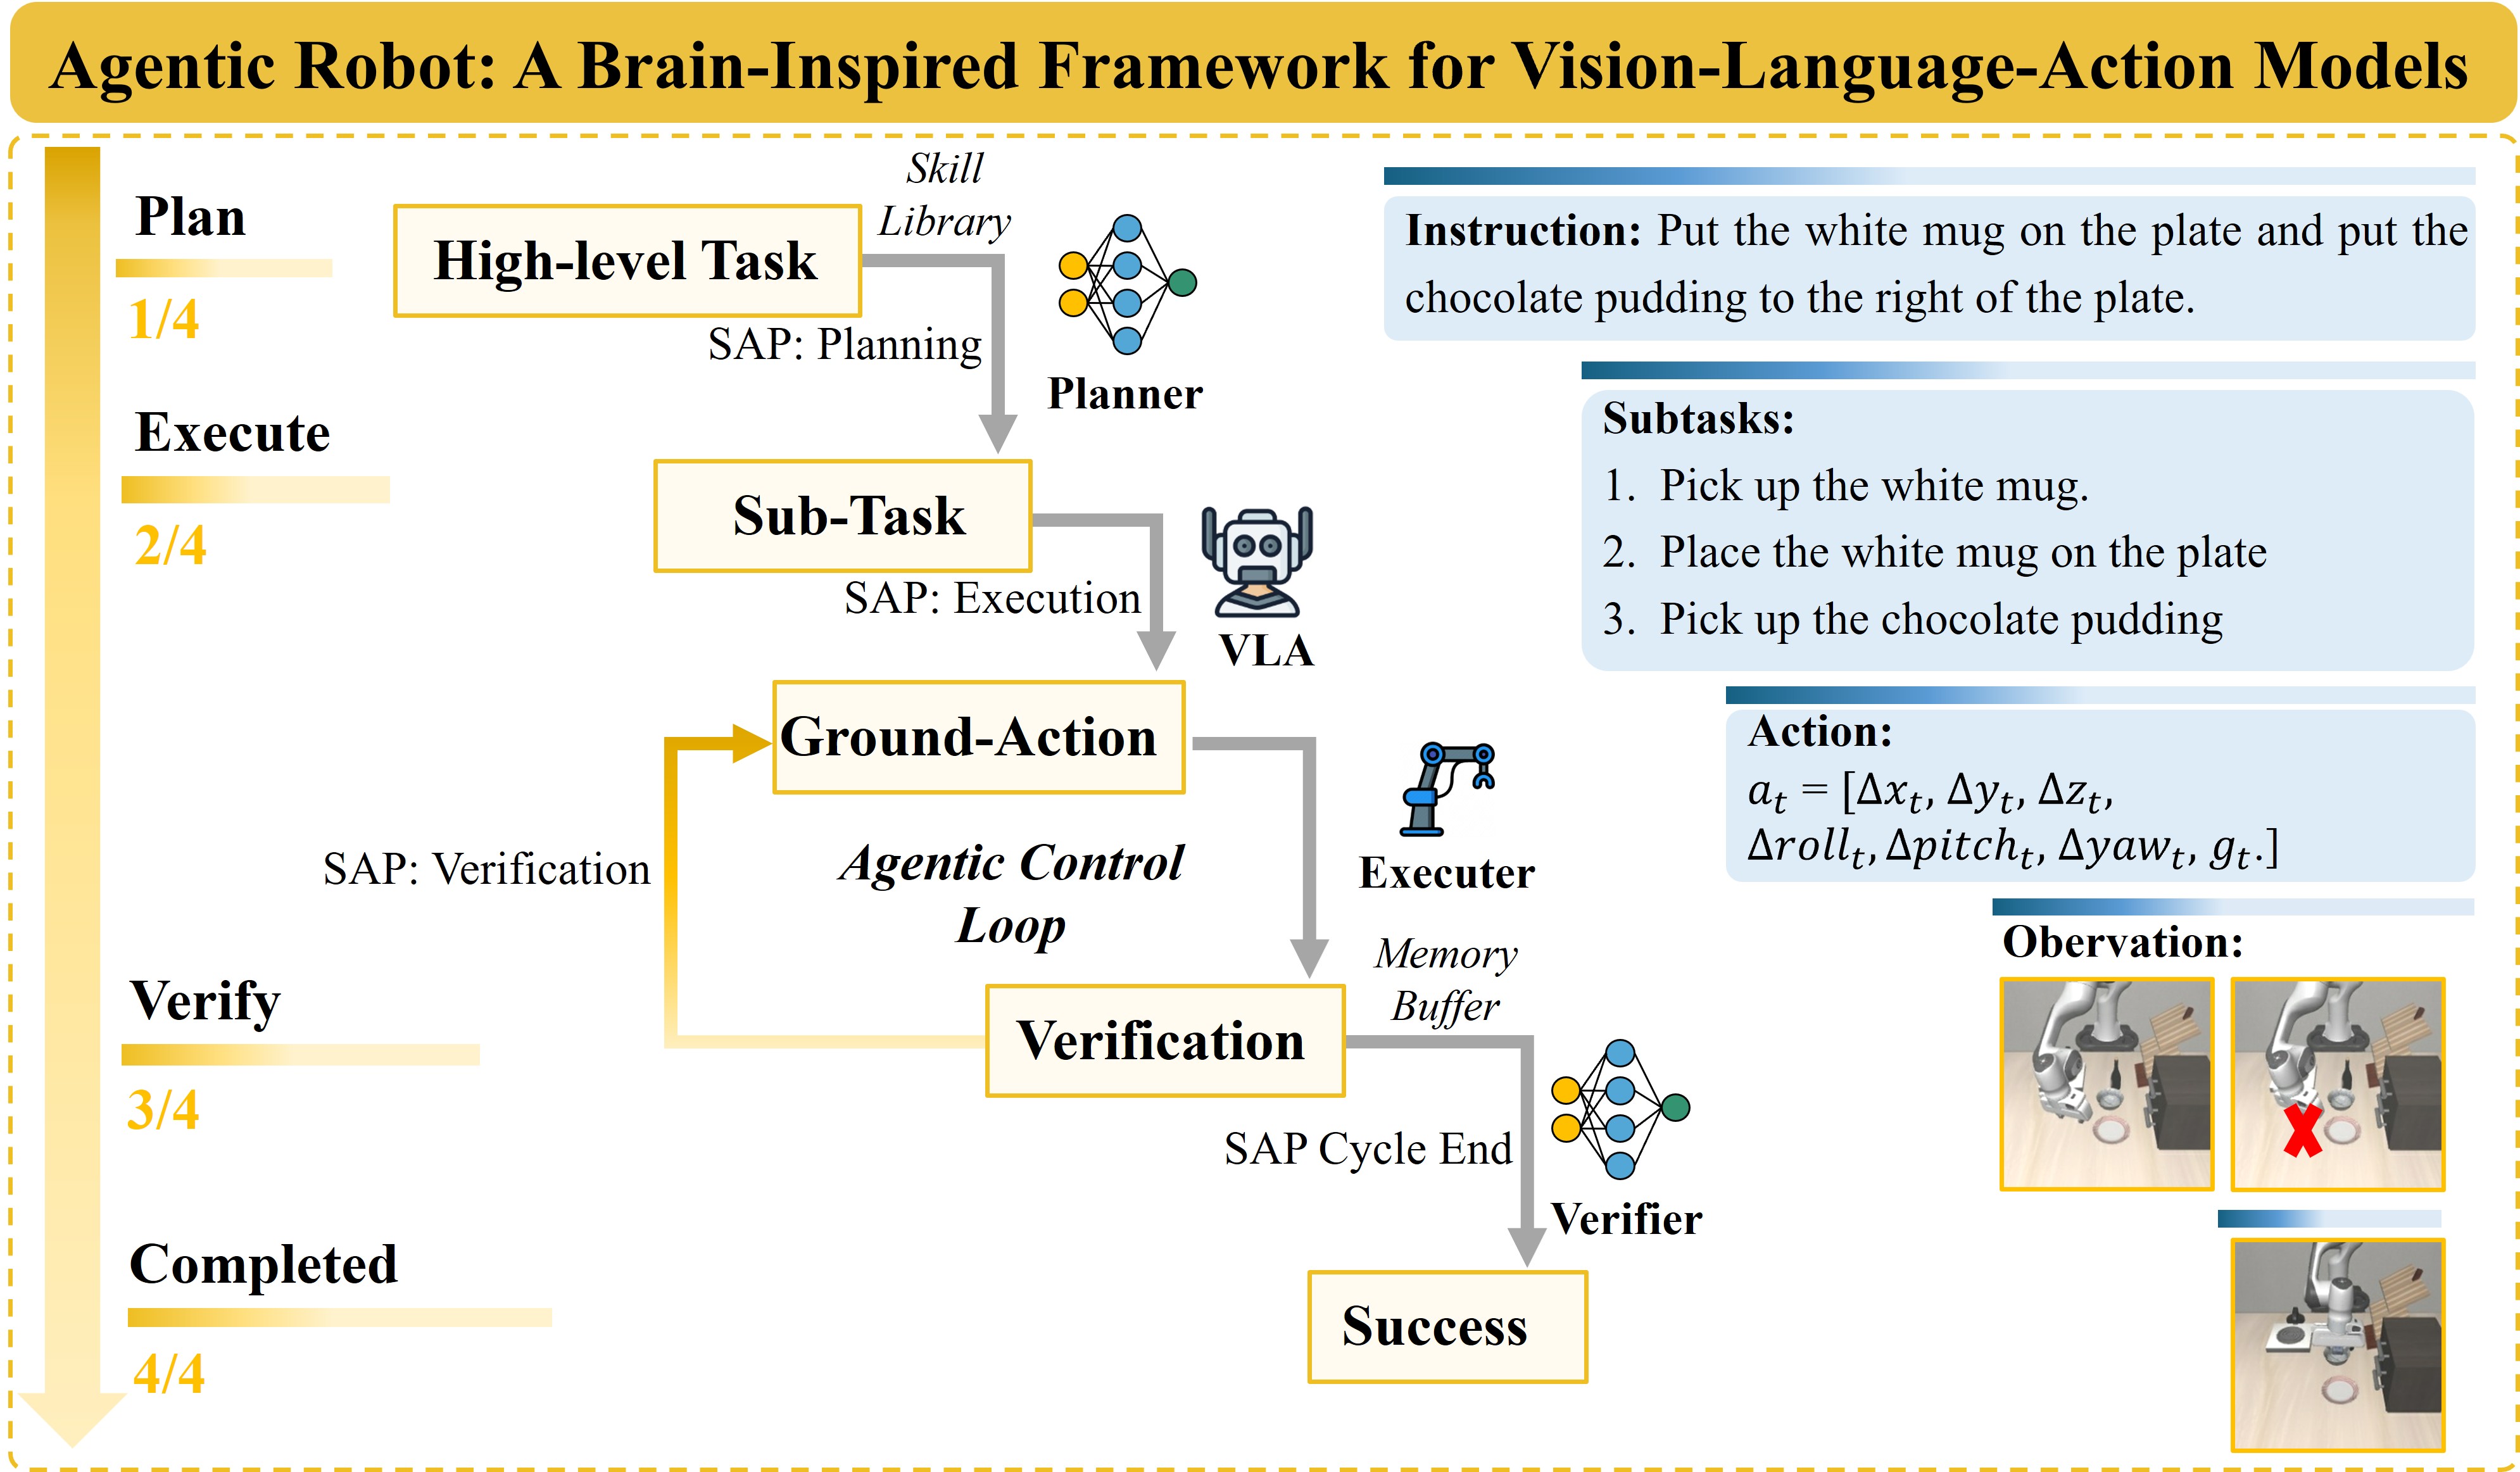
This is precisely why the previous article (Why Multi-Agent Beats Stand-Alone VLA?) showed that isolating perception into a dedicated agent is the right call. This article digs inside the Perception Agent of ManiAgent — the architecture that achieved 86.8% on SimplerEnv — to see what it does, how it works, and how you can build a similar module from scratch.
Series Roadmap: AI Agent Pipeline for Robot Manipulation
| # | Article | Status |
|---|---|---|
| 1 | Why Multi-Agent Beats VLA? | ✅ Published |
| 2 | Perception Agent: Florence-v2 + AnyGrasp ← you are here | 📍 |
| 3 | ALRM, CAP vs TAP: Three Planning Paradigms | 🔜 |
| 4 | SAP Verifier: Self-Verification in the Pipeline | 🔜 |
| 5 | Sim-to-Real Deployment | 🔜 |
What Does the Perception Agent Do?
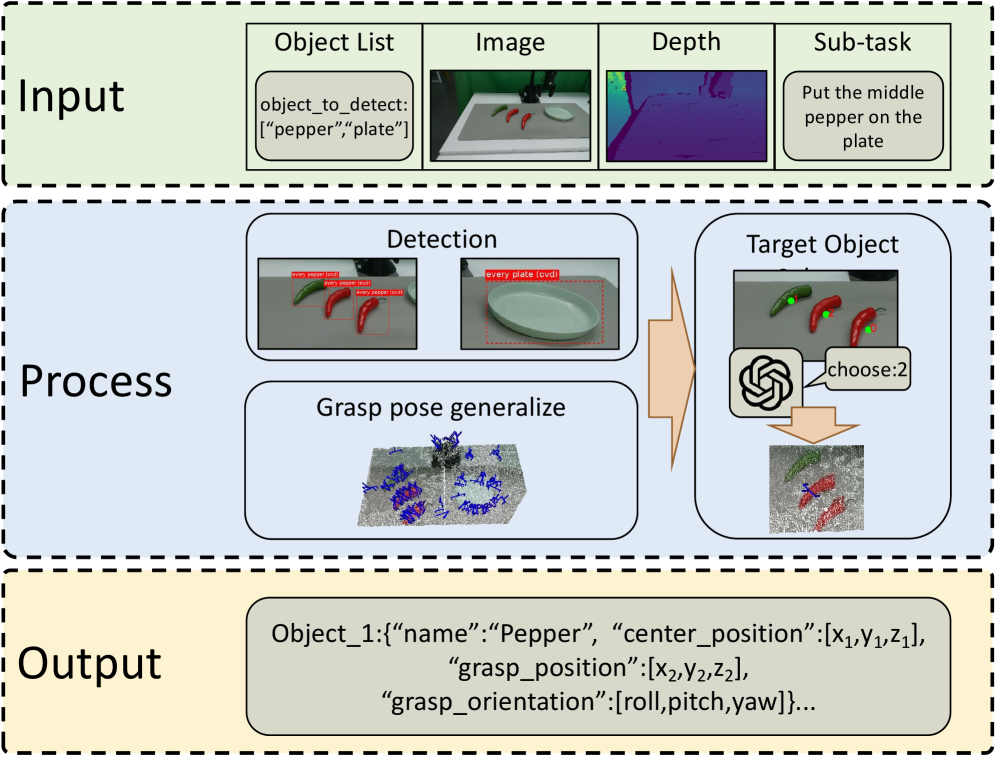
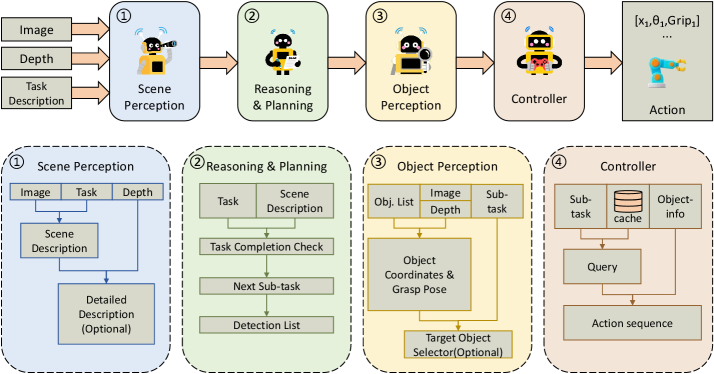
Think of the Perception Agent as a warehouse receiving clerk: it takes a request ("get me the red box"), locates the exact item, determines where it sits on the shelf, and reports back with the location and best approach angle. Only then can the delivery team (Reasoning Agent + Action Agent) know where to go.
Technically, ManiAgent's Perception Agent receives:
- RGB image from camera (RealSense D435 in the original paper)
- Depth image (per-pixel distance in meters)
- List of target object names (from Reasoning Agent)
And returns a spatial_info dictionary containing:
object_label— the detected object nameposition— 3D center coordinates in the robot base frame[x, y, z](meters)grasp_pose— 6-DoF grasp: 3×3 rotation matrix + 3D translation + quality score
To accomplish this, the pipeline uses two models in sequence: Florence-v2 for the language→image part, AnyGrasp for the geometry→pose part.
Perception Agent pipeline — source: ManiAgent paper (arXiv:2510.11660)
Florence-v2: Eyes That Understand Language
The Problem with Traditional Object Detection
YOLO, Faster R-CNN, Detectron2 — all require a fixed list of classes defined at training time. Want to detect "a white coffee cup with a handle"? You need a dataset with that label, a training loop, then a model. In real-world robot manipulation, you simply cannot train a model for every object a user might request.
Open-vocabulary detection solves this: the model takes an image + any object name → localizes it. No fine-tuning, no new dataset required.
Florence-2 Architecture
Florence-2 (arXiv:2311.06242, Microsoft Research, CVPR 2024) uses a sequence-to-sequence architecture:
- Backbone: DaViT (Dual-attention Vision Transformer) — encodes images into visual token embeddings
- Encoder-decoder: standard transformer processing both visual embeddings and text prompts
- Training: FLD-5B dataset — 5.4 billion annotations across 126 million images, covering bounding boxes, segmentation masks, captions, and grounding
The key insight: Florence-2 doesn't learn to "recognize classes" — it learns to translate language prompts into spatial coordinates. When you send <OPEN_VOCABULARY_DETECTION>coffee cup, the model translates that into a bounding box. Similar to how a person understands "point me to the cup" without needing a pre-defined "cup" class.
Florence-2 Task Prompts
Florence-2 uses a task prompt system to select output type:
| Prompt | Task |
|---|---|
<OD> |
Detect all objects in the image (auto-naming) |
<OPEN_VOCABULARY_DETECTION> |
Detect objects by any name you specify |
<CAPTION_TO_PHRASE_GROUNDING> |
Link phrases in a caption to image regions |
<DENSE_REGION_CAPTION> |
Describe each region in the image in detail |
For the Perception Agent, we use <OPEN_VOCABULARY_DETECTION> since it takes an object name from the Reasoning Agent and finds exactly that object.
Code: Load and Run Florence-v2
import torch
from PIL import Image
from transformers import AutoProcessor, Florence2ForConditionalGeneration

# Load model (once at startup)
MODEL_ID = "microsoft/Florence-2-large"

model = Florence2ForConditionalGeneration.from_pretrained(
    MODEL_ID,
    torch_dtype=torch.float16,
    device_map="cuda"
)
processor = AutoProcessor.from_pretrained(MODEL_ID, trust_remote_code=True)
model.eval()

def detect_object(rgb_image: Image.Image, object_name: str) -> dict:
    """
    Detect an object by name, return bounding box and label.

    Args:
        rgb_image: PIL Image (RGB)
        object_name: target object name, e.g. "coffee cup"

    Returns:
        {'bboxes': [[x1, y1, x2, y2]], 'bboxes_labels': ['coffee cup']}
    """
    task_prompt = "<OPEN_VOCABULARY_DETECTION>"

    inputs = processor(
        text=task_prompt,
        images=rgb_image,
        text_input=object_name,
        return_tensors="pt"
    ).to(model.device, torch.float16)

    with torch.no_grad():
        generated_ids = model.generate(
            **inputs,
            max_new_tokens=1024,
            num_beams=3,
            do_sample=False
        )

    generated_text = processor.batch_decode(
        generated_ids, skip_special_tokens=False
    )[0]

    parsed = processor.post_process_generation(
        generated_text,
        task=task_prompt,
        image_size=rgb_image.size  # (width, height)
    )
    return parsed.get(task_prompt, {})
Output format:
{
    'bboxes': [[156.2, 203.4, 289.1, 341.7]],  # [x1, y1, x2, y2] pixels
    'bboxes_labels': ['coffee cup']
}
From Pixel to 3D Space
Florence-v2 gives us a bounding box in pixel coordinates — but the robot needs the object's location in real 3D space. This requires back-projection using the camera model.
Pinhole Camera Model
A camera is like a pinhole — light from a 3D point (X, Y, Z) passes through the pinhole and hits the sensor at pixel (u, v):
u = fx * (X / Z) + cx
v = fy * (Y / Z) + cy
Where:
fx,fy: focal length in pixels (typically 600–900 for RealSense D435)cx,cy: optical center (roughly at image center)Z: depth (distance from camera to object)
Inverting to find 3D from pixel + depth:
X = (u - cx) * Z / fx
Y = (v - cy) * Z / fy
Z = depth[v, u]   # from depth image
Code: Pixel → 3D in Robot Base Frame
import numpy as np

def pixel_to_3d(
    u: float, v: float,
    depth_image: np.ndarray,
    camera_intrinsics: dict,
    T_base_cam: np.ndarray
) -> np.ndarray:
    """
    Convert pixel coordinates to 3D in robot base frame.

    Args:
        u, v: pixel coordinates (can be float, e.g. bounding box center)
        depth_image: depth image (H, W), in meters
        camera_intrinsics: {'fx': ..., 'fy': ..., 'cx': ..., 'cy': ...}
        T_base_cam: 4x4 transform matrix camera → robot base

    Returns:
        3D coordinates [x, y, z] in robot base frame (meters)
    """
    fx = camera_intrinsics['fx']
    fy = camera_intrinsics['fy']
    cx = camera_intrinsics['cx']
    cy = camera_intrinsics['cy']

    # Get depth at (u, v) — use 5x5 patch median to reduce noise
    v_int, u_int = int(round(v)), int(round(u))
    v0, v1 = max(0, v_int - 2), min(depth_image.shape[0], v_int + 3)
    u0, u1 = max(0, u_int - 2), min(depth_image.shape[1], u_int + 3)
    patch = depth_image[v0:v1, u0:u1]
    valid = patch[patch > 0.1]
    if len(valid) == 0:
        raise ValueError(f"Invalid depth at pixel ({u}, {v})")
    Z = float(np.median(valid))

    # Back-project to camera frame
    X_cam = (u - cx) * Z / fx
    Y_cam = (v - cy) * Z / fy
    point_cam = np.array([X_cam, Y_cam, Z, 1.0])

    # Transform to robot base frame
    point_base = T_base_cam @ point_cam
    return point_base[:3]  # [x, y, z]
AnyGrasp: Intelligent Gripping from Point Clouds
What Is a 6-DoF Grasp?
When you pick up a coffee cup, you don't just know "place hand here" — you also know the approach angle, finger orientation, and how wide to open your hand. That's 6 degrees of freedom:
- 3 DoF position: x, y, z — grasp center
- 3 DoF orientation: pitch, yaw, roll — approach direction
For a 2-finger gripper (like Robotiq 2F-85), a grasp pose is represented as:
- Rotation matrix R (3×3): gripper axes in space
- Translation vector t (3D): center point between fingers
- Width: gripper opening distance (meters)
- Score: quality metric (higher is better)
AnyGrasp: Dense Prediction Over Sampling
Traditional grasp detection (GPD, GQ-CNN) uses sampling — propose many random grasp candidates, score each one. This is slow and misses many good grasps.
AnyGrasp (Fang et al., IEEE T-RO 2023) uses dense prediction: for every point in the point cloud, the model directly predicts the probability it could be a good grasp point (the graspness score). For points with high graspness, the model simultaneously generates all 6-DoF grasp parameters.
Think of it this way: AnyGrasp scans the entire scene at once (dense), rather than checking one corner at a time (sampling).
Result: AnyGrasp can process an entire scene with multiple objects, propose hundreds of grasp candidates, and you pick the one that matches your target object.
Code: Calling AnyGrasp SDK
import numpy as np
from gsnet import AnyGrasp  # installed from anygrasp_sdk

# Initialize model (once at startup)
cfgs = {
    'checkpoint_path': 'log/checkpoint_detection.tar',
    'max_gripper_width': 0.1,    # meters — matches Robotiq 2F-85
    'gripper_height': 0.03,
    'top_down_grasp': False,     # allow grasps from any direction
    'debug': False
}
anygrasp = AnyGrasp(cfgs)
anygrasp.load_net()

def detect_grasps(
    rgb_image: np.ndarray,    # (H, W, 3) uint8
    depth_image: np.ndarray,  # (H, W) float32, meters
    camera_intrinsics: dict,
    workspace_lims: list      # [xmin, xmax, ymin, ymax, zmin, zmax] camera frame
) -> object:
    """
    Generate grasp candidates from RGB-D point cloud.

    Returns:
        GraspGroup after NMS and sorted by score (best first)
    """
    fx = camera_intrinsics['fx']
    fy = camera_intrinsics['fy']
    cx = camera_intrinsics['cx']
    cy = camera_intrinsics['cy']

    # Build point cloud from depth image
    H, W = depth_image.shape
    u_grid, v_grid = np.meshgrid(np.arange(W), np.arange(H))

    Z = depth_image.flatten()
    X = ((u_grid.flatten() - cx) * Z / fx)
    Y = ((v_grid.flatten() - cy) * Z / fy)

    # Filter invalid depth
    valid_mask = (Z > 0.1) & (Z < 2.0) & np.isfinite(Z)
    points = np.stack([X, Y, Z], axis=-1)[valid_mask].astype(np.float32)
    colors = (rgb_image.reshape(-1, 3)[valid_mask] / 255.0).astype(np.float32)

    # Run AnyGrasp
    gg, cloud = anygrasp.get_grasp(
        points, colors,
        lims=workspace_lims,
        apply_object_mask=True,    # filter background
        dense_grasp=False,         # True for more candidates (slower)
        collision_detection=True   # avoid grasps that collide with table/shelf
    )

    if gg is None or len(gg) == 0:
        return None

    # Non-Maximum Suppression + sort by score descending
    gg = gg.nms().sort_by_score()
    return gg

def select_best_grasp_near_object(
    grasp_group,
    object_position_3d: np.ndarray,  # [x, y, z] in camera frame
    max_distance: float = 0.05        # 5cm tolerance
):
    """
    Select the highest-scoring grasp within proximity of the target object.
    """
    if grasp_group is None:
        return None

    best_grasp = None
    best_score = -1.0

    for grasp in grasp_group:
        dist = np.linalg.norm(grasp.translation - object_position_3d)
        if dist <= max_distance and grasp.score > best_score:
            best_score = grasp.score
            best_grasp = grasp

    return best_grasp
Packaging the Output: spatial_info Dict
After collecting all information from Florence-v2 and AnyGrasp, the Perception Agent packages everything into spatial_info and passes it to the Reasoning Agent:
import numpy as np
from PIL import Image

def run_perception_agent(
    rgb_image: np.ndarray,
    depth_image: np.ndarray,
    camera_intrinsics: dict,
    T_base_cam: np.ndarray,
    object_name: str,
    workspace_lims: list
) -> dict:
    """
    Full Perception Agent: RGB-D + object name → spatial_info.

    Args:
        rgb_image: numpy array (H, W, 3) uint8
        depth_image: numpy array (H, W) float32, meters
        camera_intrinsics: dict with 'fx', 'fy', 'cx', 'cy'
        T_base_cam: 4x4 float64 matrix (camera → robot base)
        object_name: target object name, e.g. "coffee cup"
        workspace_lims: [xmin, xmax, ymin, ymax, zmin, zmax] camera frame (m)

    Returns:
        spatial_info dict or None if object/grasp not found
    """
    # --- Step 1: Florence-v2 detects the object ---
    pil_rgb = Image.fromarray(rgb_image)
    detection = detect_object(pil_rgb, object_name)

    if not detection.get('bboxes'):
        print(f"[Perception] '{object_name}' not found in image")
        return None

    # --- Step 2: Convert bounding box center to 3D ---
    bbox = detection['bboxes'][0]
    x1, y1, x2, y2 = bbox
    u_center = (x1 + x2) / 2.0
    v_center = (y1 + y2) / 2.0

    # 3D in camera frame (for AnyGrasp proximity lookup)
    obj_pos_cam = pixel_to_3d(
        u_center, v_center, depth_image, camera_intrinsics,
        T_base_cam=np.eye(4)  # identity → camera frame
    )
    # 3D in robot base frame (for Reasoning Agent)
    obj_pos_base = pixel_to_3d(
        u_center, v_center, depth_image, camera_intrinsics, T_base_cam
    )

    # --- Step 3: AnyGrasp generates grasp candidates ---
    grasp_group = detect_grasps(
        rgb_image, depth_image, camera_intrinsics, workspace_lims
    )

    # --- Step 4: Select best grasp near the detected object ---
    best_grasp = select_best_grasp_near_object(
        grasp_group, obj_pos_cam, max_distance=0.05
    )

    if best_grasp is None:
        print(f"[Perception] No suitable grasp found for '{object_name}'")
        return None

    # Transform grasp from camera frame to robot base frame
    R_cam = best_grasp.rotation_matrix   # 3x3
    t_cam = best_grasp.translation        # 3D
    t_base = (T_base_cam @ np.append(t_cam, 1.0))[:3]
    R_base = T_base_cam[:3, :3] @ R_cam

    # --- Step 5: Package spatial_info ---
    spatial_info = {
        "object_label": detection['bboxes_labels'][0],
        "position": obj_pos_base.tolist(),          # [x, y, z] meters, base frame
        "grasp_pose": {
            "rotation": R_base.tolist(),            # 3x3 list of lists
            "translation": t_base.tolist(),         # [x, y, z] meters, base frame
            "score": float(best_grasp.score),       # 0.0–1.0
            "width": float(best_grasp.width)        # meters
        }
    }

    print(f"[Perception] Found '{object_name}' at {obj_pos_base.round(3)}")
    print(f"[Perception] Grasp score: {best_grasp.score:.3f}, width: {best_grasp.width:.3f}m")

    return spatial_info
Example real-world output:
{
    "object_label": "coffee cup",
    "position": [0.312, -0.087, 0.142],    # 31.2cm forward, 8.7cm left, 14.2cm up
    "grasp_pose": {
        "rotation": [
            [0.998, -0.043, 0.042],
            [0.041,  0.999, 0.024],
            [-0.043, -0.022, 0.999]
        ],
        "translation": [0.308, -0.085, 0.178],   # midpoint between fingers
        "score": 0.847,
        "width": 0.072                            # 7.2cm — fits a standard mug
    }
}
System Requirements
Dependencies
# Florence-2
pip install transformers>=4.41.0 torch torchvision Pillow

# AnyGrasp SDK (requires license key from graspnet.net)
# See: https://github.com/graspnet/anygrasp_sdk
pip install MinkowskiEngine  # build from source for your CUDA version
# Then clone anygrasp_sdk and install gsnet wheel

# Point cloud + visualization
pip install open3d numpy
Hardware Requirements
| Component | Minimum | Recommended |
|---|---|---|
| GPU VRAM | 8 GB (Florence-2-base) | 16 GB (Florence-2-large) |
| CUDA | 11.x | 12.x |
| RAM | 16 GB | 32 GB |
| Camera | Any RGB-D | Intel RealSense D435 |
Note: Florence-2 and AnyGrasp can share one GPU if loaded/unloaded sequentially. In production, two separate GPUs reduce latency significantly.
Latency Benchmarks (RTX 4090)
| Step | Time |
|---|---|
| Florence-2-large inference | ~180ms |
| Pixel → 3D conversion | <5ms |
| Build point cloud | ~20ms |
| AnyGrasp inference | ~150ms |
| Total | ~360ms |
360ms per perception cycle is well within the 3–5 Hz control frequency of most manipulation tasks.
Common Pitfalls
1. Depth Noise at Object Edges
The RealSense D435 (and most depth cameras) produces flying pixels at object edges — unstable depth values where the sensor straddles two surfaces at different depths. The bounding box center sometimes falls on these.
Fix: Use the median of a 5×5 patch around the bounding box center instead of a single pixel.
2. AnyGrasp Returns No Grasps
Happens when the object is too small, transparent (glass), or workspace_lims is too tight. Debug with:
print(f"Total grasps found: {len(gg) if gg else 0}")
# If 0: widen workspace_lims or disable collision_detection
3. Florence-v2 Picks the Wrong Object (Multiple Similar Items)
If the table has three cups, Florence-v2 may return multiple bounding boxes. Use the largest box (closest to camera), or add spatial context: "red coffee cup on the left".
4. Wrong Extrinsic Matrix
The most common deployment error: 3D coordinates are relatively correct but have a fixed absolute offset. Validate by placing an object at a known position:
# Place object exactly 30cm in front of robot base
print(f"Measured: {obj_pos_base}, Expected: [0.30, 0.00, ...]")
Summary
The Perception Agent in ManiAgent is an elegant combination of two powerful models:
- Florence-v2 solves "name → location" with open-vocabulary detection — no fine-tuning needed for new object types
- AnyGrasp solves "point cloud → how to grip" with dense prediction across the entire scene
- Camera back-projection (pixel + depth → 3D) bridges the two worlds
The spatial_info dictionary is the common language that the Perception Agent uses to communicate with the Reasoning and Action Agents. This standardized format is what makes the pipeline modular: you can swap Florence-v2 for Grounding DINO, or swap AnyGrasp for Contact-GraspNet — as long as the output is still a spatial_info dict with the same schema.
In the next article, we'll see how the Reasoning Agent receives spatial_info and plans what to do — comparing three paradigms: ALRM, CAP, and TAP, and which one works best for complex manipulation tasks.
For deeper background on VLA foundation models that ManiAgent benchmarks against, see VLA Models: From RT-2 to OpenVLA and Diffusion Policy: Learning from Demonstrations.