Build your first UMI gripper: 3D printing, assembly, and GoPro smoke test
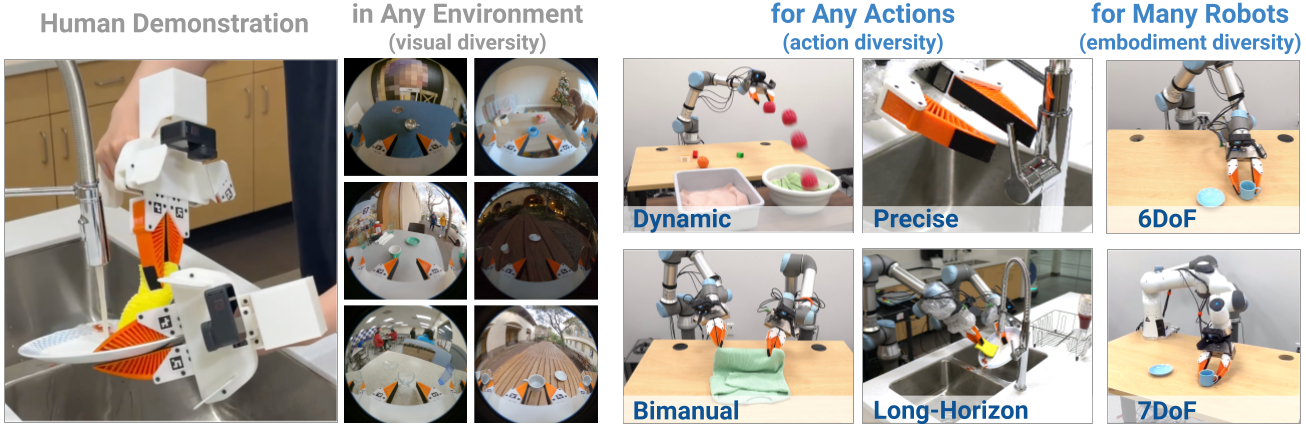
This is Part 2 in the UMI + VLA series. If you haven't read Part 1 yet, start there to understand why we're building this gripper.
Goal of this post: you'll have one complete UMI handheld unit, GoPro streaming, and the gripper opening and closing smoothly. This is the only physical step before recording demos.
Important: UMI uses GoPro — not RealSense or a regular webcam. The reason: the official SLAM pipeline needs the GoPro's built-in IMU and wide fisheye FOV. Part 6 covers when and how to upgrade to D405.
Bill of materials (1 unit)
| Item | Qty | Notes |
|---|---|---|
| UMI 3D printed parts | 1 set | Download STL from the official UMI Hardware Guide / Onshape |
| Soft fingers (TPU) | 2 | Print with TPU 95A; geometry should match your robot's fingertip |
| Springs (return mechanism) | 1 set | Exact spec in hardware guide; measure closing force with caliper after assembly |
| Screws / heat-set inserts | 1 set | M2/M3 assorted; check the official BOM |
| GoPro Hero 7 Black or newer | 1 | Hero 10/11 better for video quality; Black edition has IMU |
| GoPro mount bracket (3D printed) | 1 | STL in UMI repo |
| Side mirrors (optional) | 1 set | Extra side view; can skip for first build |
| ArUco marker (gripper width) | 1–2 | Stick on jaw to measure gripper width via vision |
| Caliper | 1 | Measure min/max gripper width — critical for calibration |
Estimated hardware cost (1 unit): ~$200–500 USD depending on GoPro model and filament quality.
Clone the repo and read the hardware guide
Before printing, clone the repo and review the official hardware documentation:
git clone https://github.com/real-stanford/universal_manipulation_interface.git
cd universal_manipulation_interface

# See what scripts and configs are available
ls scripts/ scripts_slam_pipeline/ scripts_real/
ls diffusion_policy/config/task/
The hardware guide and official STL files are on Onshape (linked in the repo README). Don't use STL files from unofficial sources — the gripper geometry directly affects the observation gap during training.
Recommended print settings
| Part | Material | Layer height | Infill | Support |
|---|---|---|---|---|
| Body / handle | PETG | 0.2 mm | 40% | Per overhang |
| Linkage / jaw | PETG or Nylon | 0.16–0.2 mm | 50% | Avoid on sliding surfaces |
| Finger shell | PETG | 0.16–0.2 mm | 35% | Per STL |
| Soft pads | TPU 95A | 0.16–0.2 mm | 15–25% | Usually none needed |
| GoPro bracket | PETG | 0.16–0.2 mm | 50% | May be needed |
Print tips:
- Print the body at 20% infill first to check fit before printing the final version.
- Deburr all screw holes and sliding surfaces before assembly.
- Let parts cool completely before inserting heat-set inserts.
- For TPU, print slower (~30 mm/s) to avoid underextrusion.
Step-by-step assembly
Step 1: Prepare parts
Before assembly:
- Use a deburring tool to clean all screw holes.
- Test-fit the jaw/linkage into the body without screws — it should slide smoothly.
- Use a soldering iron to install heat-set inserts in all M3 holes on the body.
- Check the GoPro mount hole: the camera must sit tight, no rotation.
Step 2: Install linkage and spring
- Install the spring in the return mechanism position (see hardware guide for correct orientation).
- Attach the jaw to the body via the linkage pivot.
- Test open/close by hand: should be smooth, no binding, spring returns to closed.
- Use a caliper to measure gripper width when fully closed and fully open. Record both numbers — you'll need them when running
scripts/calibrate_gripper_range.pylater.
Step 3: Attach soft fingers
- Press TPU fingers into the finger mount. Glue is usually not needed — TPU friction is sufficient.
- Check that the fingers don't touch each other when fully closed.
- Check finger symmetry — if misaligned, grasping force distribution will be uneven.
Step 4: Mount the GoPro
- Mount GoPro to bracket.
- Attach bracket to UMI body. Bracket must be rigid — no wobble when held.
- Check camera angle: open the gripper and look at the GoPro preview. The camera must see:
- Fingertip contact zone
- Object in front of the gripper
- Enough background for SLAM feature tracking
- If GoPro is pointing too directly at the fingers, reprint the bracket with more forward tilt.
Step 5: Apply ArUco marker (gripper width)
Generate and print the ArUco tag:
cd universal_manipulation_interface
python scripts/gen_aruco_tag_pdf.py
Print the tag, cut it out, and stick it on the jaw per the hardware guide. The tag must be visible from the camera view in normal operating position.
Step 6: Cable management
- Use a cable tie or clip to secure the GoPro USB cable to the handle. Critical: if the cable is free, it will pull the gripper off-axis during motion — adding tracking error.
- Leave a service loop at the wrist so wrist rotation doesn't strain the cable.
Smoke tests: verify GoPro before collecting demos
Before entering the SLAM pipeline, verify GoPro is working correctly:
Test 1: Video stream
# Connect GoPro via USB-C
# Check: 60fps, 1080p or 4K, fisheye mode enabled
Test 2: IMU data exists
The GoPro IMU is extracted via the official SLAM pipeline script. To verify the tool runs:
python scripts_slam_pipeline/01_extract_gopro_imu.py --help
Test 3: ArUco detection
python scripts/detect_aruco.py --help
python scripts/draw_aurco_detection.py --help
If the script runs and detects the tag in frame — assembly is successful.
Test 4: Verify orientation
python scripts/check_gopro_orientation.py --help
This checks that the GoPro isn't mounted upside down. Run with a test clip before collecting real data.
Common errors and fixes
| Error | Cause | Fix |
|---|---|---|
| Jaw binds | Print warp or rough surface | Reprint, lightly sand sliding surface |
| Camera only sees fingers | Bracket angle too steep | Reprint bracket with more forward tilt |
| Spring too strong/weak | Wrong spring spec | Replace per hardware guide spec |
| GoPro cable pulls gripper | No strain relief | Clamp cable to handle |
| ArUco not detected | Tag too small or blurry | Print larger, improve lighting |
| Heat-set insert loose | Insufficient heat | Re-insert with more pressure |
Definition of done — before moving to Part 3
Check this list before continuing:
[ ] Jaw opens/closes smoothly, no binding
[ ] GoPro streams at 60fps with fisheye mode enabled
[ ] ArUco tag is detected in camera frame
[ ] Cable doesn't create tension during wrist rotation
[ ] Min/max gripper width recorded (mm)
[ ] Camera sees fingertip area + workspace ahead
[ ] scripts/check_gopro_orientation.py runs OK
If all items are checked — you're ready for Part 3: record demos and run the SLAM pipeline.
One unit or two?
If your end goal is bimanual (two arms), you'll need 2 units. But perfect the first unit before building the second — confirm everything works, then build the duplicate. Both units must have identical geometry — same STL revision, same print settings, compare caliper measurements after assembly.
References
- UMI project page + hardware guide
- real-stanford/universal_manipulation_interface
- UMI paper (Chi et al., 2024)