From Zero to Deployed Manipulation Policy
This is the final post of the Robot Manipulation Masterclass series. After 6 posts of theory and analysis, this is a complete hands-on tutorial: from unboxing your robot to deploying a policy on real hardware.
I'll use LeRobot — Hugging Face's open-source library (arXiv:2602.22818) — because it integrates the entire pipeline: hardware control, data collection, training, evaluation, and deployment. No need to glue together 5 different repositories.
Goal: Teach a robot arm to perform pick-and-place task (pick object and place in box) with 50 demonstrations and ACT policy.
See LeRobot hands-on in the AI for Robotics series for more about the LeRobot ecosystem.

Step 1: Hardware Setup
Choose a Robot Arm
| Robot | DoF | Price | LeRobot Support | Recommendation |
|---|---|---|---|---|
| SO-100 (Hugging Face) | 5+1 | ~300 USD | Native | Best for beginners |
| Koch v1.1 | 6+1 | ~500 USD | Native | Good, more DOF |
| WidowX 250 (Trossen) | 6+1 | ~3,500 USD | Community | Research-grade |
| Franka Emika | 7+1 | ~30,000 USD | Community | Industry-grade |
Recommendation: Start with SO-100 (~300 USD, 2 arms for leader-follower). Cheapest, directly supported by Hugging Face, and sufficient for learning basic manipulation.
Bill of Materials (SO-100)
SO-100 Kit (per arm):
  - 6x Dynamixel STS3215 servos: ~180 USD
  - 3D printed parts: ~20 USD (STL files free)
  - Screws, wires, USB adapter: ~30 USD
  - Camera (Logitech C920): ~70 USD

Total for leader-follower setup: ~600 USD (2 arms + 1 camera)
Total for bimanual: ~1,200 USD (4 arms + 2 cameras)
Assembly and Wiring
# 1. 3D print parts (PLA, 0.2mm layer height)
# Download STL from: github.com/huggingface/lerobot/blob/main/hardware/

# 2. Assemble per video guide
# https://github.com/huggingface/lerobot/blob/main/examples/10_use_so100.md

# 3. Connect servos (daisy chain)
# Servo 1 (base) -> Servo 2 (shoulder) -> ... -> Servo 6 (gripper)
# USB2Dynamixel adapter -> PC

# 4. Configure servo IDs (critical!)
python -m lerobot.scripts.configure_motor --port=/dev/ttyUSB0 --brand=feetech
Step 2: Install LeRobot
System Requirements
- OS: Ubuntu 22.04+ (recommended) or macOS
- Python: 3.10+
- GPU: NVIDIA RTX 3060+ (for training). CPU sufficient for inference
- RAM: 16GB+
- Disk: 50GB+ (for datasets)
Installation
# 1. Create virtual environment
conda create -n lerobot python=3.10
conda activate lerobot

# 2. Install PyTorch (CUDA 12.1)
pip install torch torchvision --index-url https://download.pytorch.org/whl/cu121

# 3. Install LeRobot
pip install lerobot

# 4. Verify
python -c "import lerobot; print(lerobot.__version__)"
Connect to Robot
# Check USB connection
ls /dev/ttyUSB*  # Should see /dev/ttyUSB0

# Calibrate (do once)
python -m lerobot.scripts.calibrate \
    --robot.type=so100 \
    --robot.arms='["main_leader", "main_follower"]' \
    --robot.cameras='["top"]'

# Test teleoperation (leader -> follower)
python -m lerobot.scripts.teleoperate \
    --robot.type=so100
When running teleoperate, move the leader arm — the follower arm should copy exactly. If not, check servo IDs and recalibrate.
Step 3: Collect Data (Record Demonstrations)
Prepare Workspace
Camera setup:
  [Logitech C920] — mounted on tripod, looking down at workspace
        |
        v
  +-------------------+
  |    Workspace       |
  |  [Object]  [Box]  |
  |    [Robot arm]     |
  +-------------------+
Workspace tips:
- Simple background: white or black, avoid complex patterns
- Even lighting: avoid shadows, changing light
- Distinctive object: high contrast with background
- Fixed positions: camera and box in same location each episode
Record Episodes
# Record 50 demonstrations
python -m lerobot.scripts.record \
    --robot.type=so100 \
    --fps=50 \
    --repo-id=my_pick_and_place \
    --num-episodes=50 \
    --task="Pick the object and place it in the box" \
    --warmup-time-s=3 \
    --episode-time-s=20 \
    --reset-time-s=10

# Each episode workflow:
# 1. [Warmup 3s] - place object at random location
# 2. [Recording 20s] - teleoperate: pick + place
# 3. [Reset 10s] - return object to new position

Check Data Quality
# Replay episode to verify
python -m lerobot.scripts.replay \
    --robot.type=so100 \
    --repo-id=my_pick_and_place \
    --episode=0

# Visualize dataset statistics
python -m lerobot.scripts.visualize_dataset \
    --repo-id=my_pick_and_place
Remove bad episodes: if any episode has jerky movements, is incomplete, or failed task -> delete before training. 40 good episodes beat 50 with 10 bad ones.
Data Augmentation (Optional)
# Image augmentation in LeRobot config
training:
  image_transforms:
    brightness:
      weight: 1.0
      min_max: [0.8, 1.2]
    contrast:
      weight: 1.0
      min_max: [0.8, 1.2]
    saturation:
      weight: 1.0
      min_max: [0.8, 1.2]
    hue:
      weight: 1.0
      min_max: [-0.05, 0.05]
    sharpness:
      weight: 1.0
      min_max: [0.8, 1.2]
Step 4: Train Policy
Choose Policy: ACT vs Diffusion
For pick-and-place with 50 demos, ACT is the best choice:
- Data efficient (50 demos is sufficient)
- Trains fast (2-4 hours)
- Inference fast (~5ms)
# Train ACT
python -m lerobot.scripts.train \
    --policy.type=act \
    --dataset.repo_id=my_pick_and_place \
    --training.num_epochs=2000 \
    --training.batch_size=8 \
    --training.lr=1e-5 \
    --policy.chunk_size=50 \
    --policy.n_obs_steps=1 \
    --policy.kl_weight=10 \
    --training.eval_freq=500 \
    --output_dir=outputs/pick_and_place_act
Monitor Training
# View training logs with tensorboard
tensorboard --logdir=outputs/pick_and_place_act

# Or check terminal output
# Key metrics:
# - loss: should decrease gradually, converge after ~1000 epochs
# - eval/success_rate: (if sim eval) should increase
# - kl_loss: should be stable, not growing
Training Timeline (RTX 4090)
| Phase | Duration | Notes |
|---|---|---|
| Data loading | 1-2 min | Cached after first run |
| Epoch 1-500 | ~30 min | Loss decreases rapidly |
| Epoch 500-1500 | ~1.5h | Slower loss decrease, starting convergence |
| Epoch 1500-2000 | ~1h | Fine-tuning, marginal improvement |
| Total | ~3h | On 50 demos, batch_size=8 |
When to Switch to Diffusion Policy?
Switch to Diffusion Policy when:
- ACT achieves < 70% success rate and you suspect multimodal actions
- Task is more complex (long-horizon, many steps)
- You have 100+ demos
# Train Diffusion Policy (change policy.type)
python -m lerobot.scripts.train \
    --policy.type=diffusion \
    --dataset.repo_id=my_pick_and_place \
    --training.num_epochs=5000 \
    --training.batch_size=64 \
    --policy.n_action_steps=8 \
    --policy.num_inference_steps=10
Step 5: Evaluate
Sim Evaluation (if Available)
# Evaluate in simulation (ALOHA sim)
python -m lerobot.scripts.eval \
    --policy.path=outputs/pick_and_place_act/checkpoints/last/pretrained_model \
    --env.type=aloha \
    --env.task=AlohaTransferCube-v0 \
    --eval.n_episodes=50 \
    --eval.batch_size=10
Real Robot Evaluation
# Evaluate on real robot
python -m lerobot.scripts.eval \
    --policy.path=outputs/pick_and_place_act/checkpoints/last/pretrained_model \
    --robot.type=so100 \
    --eval.n_episodes=20

# Robot will execute task autonomously
# You just need to:
# 1. Place object at random location
# 2. Press Start
# 3. Observe success/failure
# 4. Reset and repeat
Metrics to Monitor
| Metric | Target | How to Measure |
|---|---|---|
| Success rate | >80% | Success / Total episodes |
| Completion time | <15s | Pick start to place in box |
| Grasp success | >90% | Successful grasps / Total grasps |
| Placement accuracy | <2cm | Distance from object to target |
Step 6: Deploy and Iterate
Deployment Checklist
[ ] Policy file: outputs/.../pretrained_model/
[ ] Camera calibration: use same camera and position as during training
[ ] Workspace: match training (background, lighting)
[ ] Safety: workspace bounds, emergency stop accessible
[ ] Latency test: inference < 20ms (50Hz control)
Troubleshooting
Policy can't grasp object:
- Check camera angle — is it same as training data?
- Replay one episode — can robot reproduce it?
- Check action scale — are actions being clipped?
Robot is slower than during demo:
- Increase inference frequency (reduce batch overhead)
- Check USB latency (use USB 3.0)
- Reduce image resolution (320x240 instead of 640x480)
Low success rate (<50%):
- Collect more data (add 20-30 new demos)
- Remove bad demos
- Increase training epochs (3000-5000)
- Try Diffusion Policy instead of ACT
Iterate: Continuous Improvement
Improvement loop:
1. Deploy policy v1 -> measure success rate
2. Analyze failures — why did it fail?
3. Collect more demos for difficult cases
4. Re-train (co-train with old + new data)
5. Deploy policy v2 -> measure again
6. Repeat until target reached
Typically takes 3-5 iterations to go from 60% -> 90% success. Each iteration adds 10-20 targeted demos.
Series Conclusion
Over 7 posts, I've covered the entire manipulation pipeline:
| Part | Topic | Key Takeaway |
|---|---|---|
| 1 | Grasping | Analytical (force closure) vs Learning (Contact-GraspNet) |
| 2 | Imitation Learning | BC -> DAgger -> ACT, data quality is everything |
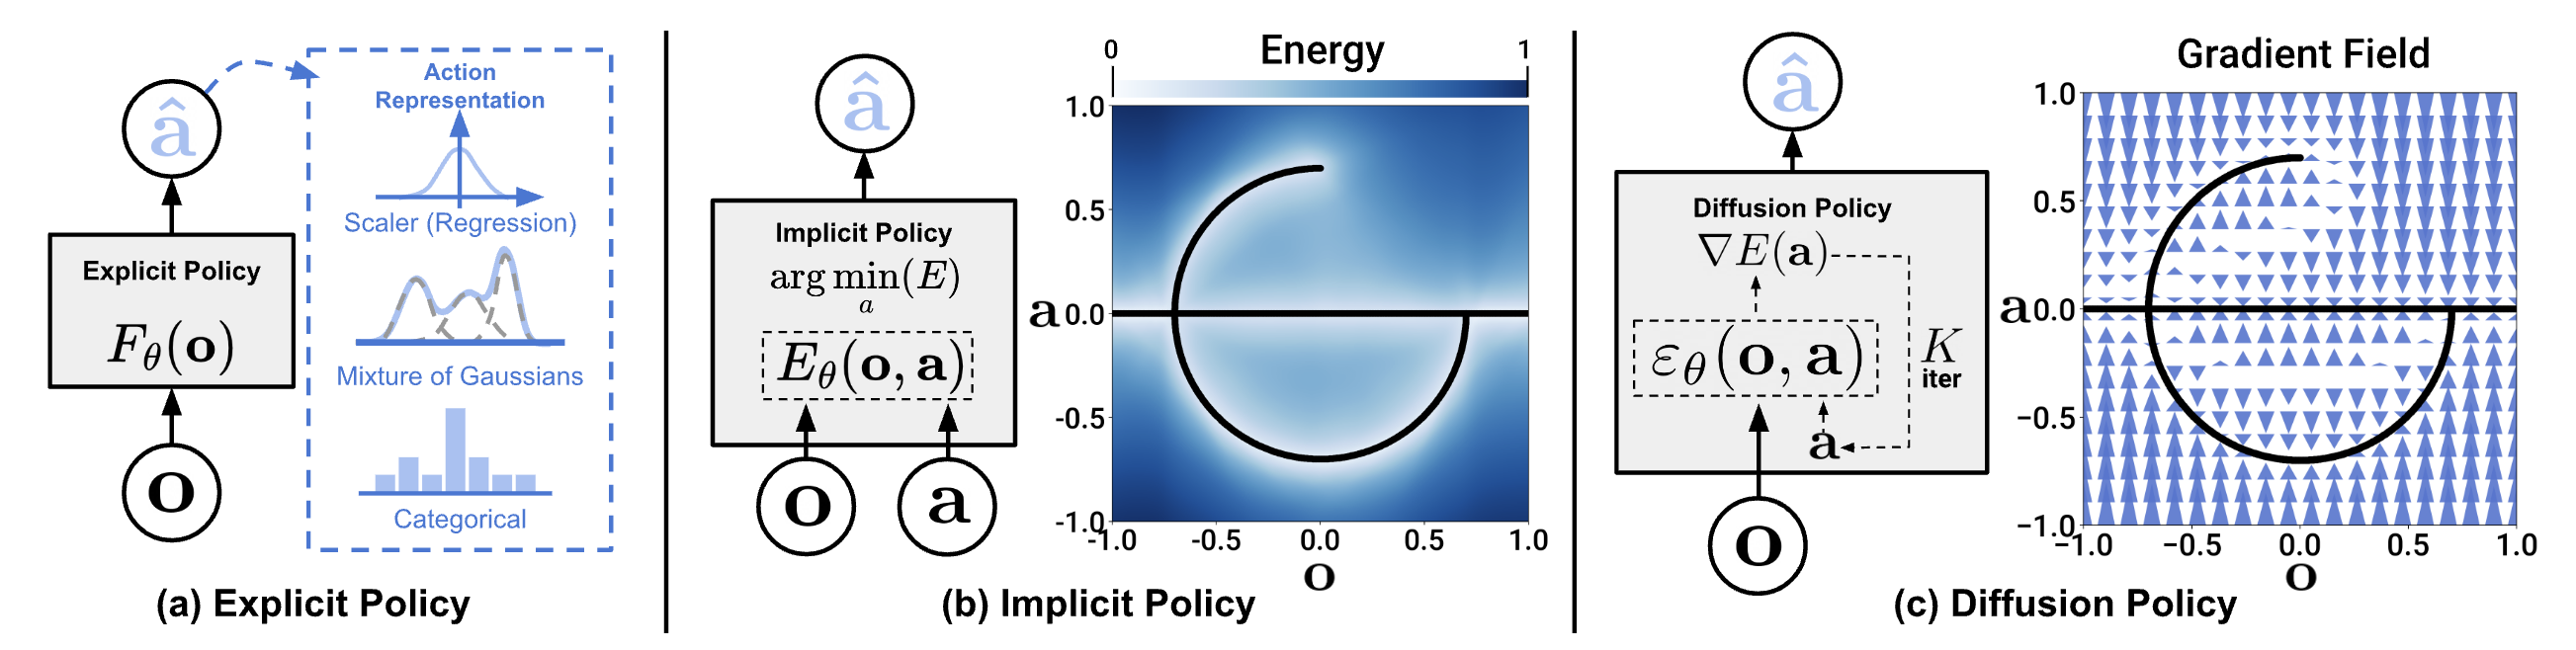
| 3 | Diffusion Policy | DDPM for actions, multimodal handling, DDIM for real-time |
| 4 | VLA Models | RT-2 (reasoning), Octo (open-source), pi0 (continuous) |
| 5 | Dexterous | Multi-finger hands, tactile sensing, RL + sim-to-real |
| 6 | Bimanual | ALOHA hardware, ACT for bimanual, co-training |
| 7 | Deployment | LeRobot end-to-end: setup -> record -> train -> deploy |
Roadmap for Beginners
Month 1: Setup SO-100, do pick-and-place with ACT (posts 1, 2, 7)
Month 2: Try Diffusion Policy, compare with ACT (post 3)
Month 3: Fine-tune Octo for multi-task (post 4)
Month 4: Bimanual setup, co-training (post 6)
Month 5+: Dexterous hands, tactile sensing (post 5)
Resources Summary
- LeRobot: github.com/huggingface/lerobot — Main repo
- LeRobot paper: arXiv:2602.22818
- ALOHA paper: arXiv:2304.13705
- Diffusion Policy: arXiv:2303.04137
- Open X-Embodiment: robotics-transformer-x.github.io
- LeRobot Discord: Community support and Q&A
Related Articles
- Bimanual Manipulation: Teaching Robots to Use Both Arms — Part 6 of this series
- LeRobot hands-on: Building Robot Learning Pipelines — LeRobot in AI series
- Diffusion Policy in Practice: From Theory to Code — Detailed training guide
- Sim-to-Real Transfer: Train in Simulation, Deploy in Reality — Sim + real deployment