LeRobot: Democratizing Robot Learning
Nếu bạn đã đọc bài về Foundation Models cho Robot và SpatialVLA, câu hỏi tiếp theo tự nhiên là: "Làm sao để chạy những model này trên robot thật?"
Câu trả lời: LeRobot — framework open-source của Hugging Face, cung cấp complete pipeline từ record demonstrations, train policies, đến deploy trên real robots. LeRobot là "Hugging Face Transformers cho robotics" — standardize mọi thứ từ dataset format, training loop, đến hardware interface.
Trong bài này, chúng ta sẽ đi qua toàn bộ pipeline: setup LeRobot, record data với SO-100 arm, fine-tune OpenVLA bằng LoRA + 8-bit quantization, evaluate policy, và deploy qua ROS 2.

LeRobot hỗ trợ những gì?
LeRobot không chỉ hỗ trợ OpenVLA — nó cung cấp unified API cho nhiều policy architectures:
| Policy | Type | Params | Use Case |
|---|---|---|---|
| ACT | Imitation Learning | ~10M | Single-task, fast inference |
| Diffusion Policy | Diffusion-based IL | ~50M | Multi-modal actions, precise manipulation |
| Pi0 / Pi0.5 | VLA (base) | Varies | General manipulation |
| SmolVLA | Lightweight VLA | ~250M | Edge deployment, fine-tune trên consumer GPU |
| GR00T N1.5 | Foundation Model | Large | Humanoid, cross-embodiment |
| OpenVLA | VLA | 7B | General-purpose, strong language grounding |
Tại sao chọn OpenVLA cho tutorial này? OpenVLA có best balance giữa language understanding (nhờ Llama 2 backbone) và manipulation performance. Với LoRA + quantization, fine-tune được trên RTX 3090/4090. Nếu bạn có GPU yếu hơn, SmolVLA (~250M params) là lựa chọn thay thế tốt.
Bước 1: Setup LeRobot
Yêu cầu hệ thống
| Component | Minimum | Recommended |
|---|---|---|
| GPU | RTX 3090 (24GB) | RTX 4090 (24GB) hoặc A100 (40GB) |
| RAM | 32GB | 64GB |
| Storage | 100GB SSD | 500GB NVMe |
| Python | 3.10+ | 3.10 (khuyến nghị dùng conda) |
| OS | Ubuntu 22.04 | Ubuntu 22.04/24.04 |
Cài đặt
# 1. Tạo conda environment
conda create -n lerobot python=3.10 -y
conda activate lerobot

# 2. Install PyTorch (CUDA 12.1)
pip install torch torchvision torchaudio --index-url https://download.pytorch.org/whl/cu121

# 3. Install LeRobot
pip install lerobot

# 4. Verify GPU
python -c "import torch; print(f'CUDA: {torch.cuda.is_available()}, GPU: {torch.cuda.get_device_name(0)}')"
# Output: CUDA: True, GPU: NVIDIA GeForce RTX 4090

# 5. Install thêm cho OpenVLA fine-tuning
pip install peft bitsandbytes accelerate
Lưu ý quan trọng: Khi install LeRobot qua pip, nó có thể overwrite PyTorch GPU version bằng CPU version. Luôn verify torch CUDA sau khi install và reinstall GPU version nếu cần.
Kiểm tra LeRobot
import lerobot
from lerobot.common.policies.act.modeling_act import ACTPolicy

print(f"LeRobot version: {lerobot.__version__}")
# Liệt kê datasets có sẵn
print(lerobot.available_datasets[:5])
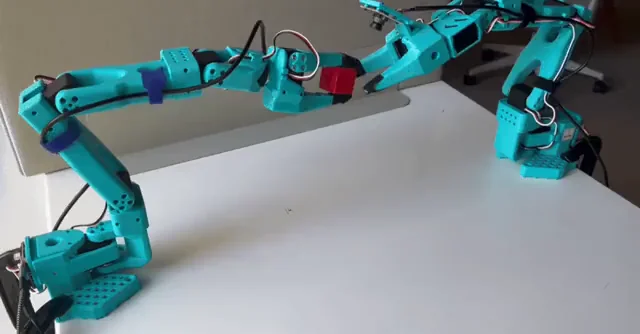
Bước 2: Hardware — SO-100 Robot Arm ($100)
SO-100 (Spectral Open 100) là robot arm giá rẻ được thiết kế cho LeRobot ecosystem. Với giá chỉ ~$100 cho BOM (bill of materials), đây là entry point tốt nhất để bắt đầu robot learning.
Specs
| Feature | SO-100 |
|---|---|
| DOF | 6 (5 joints + gripper) |
| Reach | ~25cm |
| Payload | ~200g |
| Actuators | 6x Feetech STS3215 servos |
| Interface | USB (serial) |
| Frame | 3D printed |
| Cost | ~$100 |
Setup phần cứng
Bạn cần 2 cánh tay cho teleoperation: 1 leader (bạn điều khiển) + 1 follower (robot copy movements):
# Detect servo ports
python -m lerobot.find_port
# Output: /dev/ttyACM0 (leader), /dev/ttyACM1 (follower)

# Calibrate servos (chạy 1 lần cho mỗi arm)
python -m lerobot.calibrate \
    --robot.type=so100 \
    --robot.port=/dev/ttyACM0 \
    --robot.id=leader

python -m lerobot.calibrate \
    --robot.type=so100 \
    --robot.port=/dev/ttyACM1 \
    --robot.id=follower
Camera setup
LeRobot hỗ trợ USB webcam và Intel RealSense. Cho tutorial này, 1 webcam USB là đủ:
# Kiểm tra camera
python -m lerobot.find_port --type=camera
# Output: /dev/video0

# Test camera stream
python -m lerobot.view_camera --port=0 --fps=30
Bước 3: Record Demonstrations
Đây là bước quan trọng nhất — chất lượng demonstrations quyết định chất lượng policy.
Thu thập data
# Record 50 episodes cho task "pick up red block"
python -m lerobot.record \
    --robot.type=so100 \
    --robot.port=/dev/ttyACM1 \
    --robot.id=follower \
    --leader.type=so100 \
    --leader.port=/dev/ttyACM0 \
    --leader.id=leader \
    --camera.port=0 \
    --camera.fps=30 \
    --camera.width=640 \
    --camera.height=480 \
    --repo-id=your-username/so100-pick-red-block \
    --task="pick up the red block and place it in the bin" \
    --num-episodes=50 \
    --episode-time-s=15
Mỗi episode kéo dài 15 giây. Giữa các episodes, LeRobot sẽ pause để bạn reset scene. Target: 50 episodes cho single task, 200+ cho multi-task.
Tips thu thập data tốt
- Consistent setup: Giữ camera angle, lighting, và scene layout nhất quán giữa các episodes
- Diverse demonstrations: Thay đổi nhẹ vị trí object giữa các episodes — giúp model generalize
- Smooth motions: Teleoperate chậm và mượt — jerky movements tạo noisy data
- Filter failures: Nếu episode fail (rơi object, miss grasp), record lại — bad demos hurt performance
- 50 demos minimum: Ít hơn thường underfit, nhiều hơn (100-200) luôn tốt hơn

Kiểm tra dataset
from lerobot.common.datasets.lerobot_dataset import LeRobotDataset

# Load dataset vừa record
dataset = LeRobotDataset("your-username/so100-pick-red-block")

print(f"Episodes: {dataset.num_episodes}")
print(f"Total frames: {len(dataset)}")
print(f"FPS: {dataset.fps}")
print(f"Keys: {dataset.features.keys()}")
# Keys: dict_keys(['observation.image', 'observation.state', 'action', ...])

# Xem 1 frame
sample = dataset[0]
print(f"Image shape: {sample['observation.image'].shape}")  # (3, 480, 640)
print(f"State shape: {sample['observation.state'].shape}")   # (6,) - joint positions
print(f"Action shape: {sample['action'].shape}")             # (6,) - target joint positions
Bước 4: Fine-tune OpenVLA với LoRA + Quantization
Đây là core pipeline — fine-tune model 7B trên consumer GPU bằng 2 kỹ thuật:
- LoRA (Low-Rank Adaptation): Chỉ train ~0.2% parameters, giữ nguyên pre-trained weights
- 8-bit quantization: Giảm memory footprint từ ~28GB xuống ~10GB
Full training script
"""
Fine-tune OpenVLA 7B trên custom SO-100 data
LoRA + 8-bit quantization
Yêu cầu: 1x RTX 3090/4090 (24GB VRAM)
"""
import torch
from torch.utils.data import DataLoader
from transformers import (
    AutoModelForVision2Seq,
    AutoProcessor,
    BitsAndBytesConfig,
)
from peft import LoraConfig, get_peft_model, TaskType
from lerobot.common.datasets.lerobot_dataset import LeRobotDataset

# ============================
# 1. Load model với 8-bit quantization
# ============================
model_id = "openvla/openvla-7b"

# 8-bit quantization config — giảm VRAM từ ~28GB xuống ~10GB
bnb_config = BitsAndBytesConfig(
    load_in_8bit=True,
    llm_int8_threshold=6.0,
    llm_int8_has_fp16_weight=False,
)

processor = AutoProcessor.from_pretrained(
    model_id,
    trust_remote_code=True,
)

model = AutoModelForVision2Seq.from_pretrained(
    model_id,
    quantization_config=bnb_config,
    torch_dtype=torch.bfloat16,
    device_map="auto",
    trust_remote_code=True,
)

print(f"Model loaded. Memory: {torch.cuda.memory_allocated()/1e9:.1f}GB")
# Output: Model loaded. Memory: ~10.2GB

# ============================
# 2. Apply LoRA
# ============================
lora_config = LoraConfig(
    r=32,                          # LoRA rank
    lora_alpha=32,                 # Scaling factor
    target_modules=[
        "q_proj", "v_proj",        # Attention projections
        "k_proj", "o_proj",
    ],
    lora_dropout=0.05,
    bias="none",
    task_type=TaskType.CAUSAL_LM,
)

model = get_peft_model(model, lora_config)
model.print_trainable_parameters()
# trainable: 13.1M || total: 7.6B || trainable%: 0.17%

# ============================
# 3. Prepare dataset
# ============================
dataset = LeRobotDataset("your-username/so100-pick-red-block")

def collate_fn(batch):
    """Convert LeRobot batch sang OpenVLA format"""
    images = [sample["observation.image"] for sample in batch]
    states = [sample["observation.state"] for sample in batch]
    actions = [sample["action"] for sample in batch]

    # OpenVLA expects language instruction
    instruction = "pick up the red block and place it in the bin"

    inputs = processor(
        images=images,
        text=[f"In: What action should the robot take to {instruction}?\n"] * len(images),
        return_tensors="pt",
        padding=True,
    ).to("cuda")

    # Tokenize actions (256 bins per dimension)
    action_tensor = torch.stack(actions)
    action_tokens = tokenize_actions(action_tensor, n_bins=256)
    inputs["labels"] = action_tokens.to("cuda")

    return inputs

def tokenize_actions(actions, n_bins=256):
    """
    Discretize continuous actions vào 256 bins.
    actions: tensor shape (B, action_dim)
    """
    # Normalize tới [0, 1] range
    a_min, a_max = actions.min(dim=0).values, actions.max(dim=0).values
    normalized = (actions - a_min) / (a_max - a_min + 1e-8)
    # Map sang bin indices
    tokens = (normalized * (n_bins - 1)).long()
    return tokens

dataloader = DataLoader(
    dataset,
    batch_size=4,              # Batch size 4 cho 24GB GPU
    shuffle=True,
    collate_fn=collate_fn,
    num_workers=4,
    pin_memory=True,
)

# ============================
# 4. Training loop
# ============================
optimizer = torch.optim.AdamW(
    model.parameters(),
    lr=2e-5,
    weight_decay=0.01,
    betas=(0.9, 0.95),
)

# Learning rate scheduler — warmup + cosine decay
from transformers import get_cosine_schedule_with_warmup
num_epochs = 10
total_steps = len(dataloader) * num_epochs
scheduler = get_cosine_schedule_with_warmup(
    optimizer,
    num_warmup_steps=100,
    num_training_steps=total_steps,
)

model.train()
for epoch in range(num_epochs):
    epoch_loss = 0
    for step, batch in enumerate(dataloader):
        outputs = model(**batch)
        loss = outputs.loss

        loss.backward()

        # Gradient clipping — quan trọng cho stability
        torch.nn.utils.clip_grad_norm_(model.parameters(), max_norm=1.0)

        optimizer.step()
        scheduler.step()
        optimizer.zero_grad()

        epoch_loss += loss.item()

        if step % 50 == 0:
            lr = scheduler.get_last_lr()[0]
            print(f"Epoch {epoch} Step {step}: loss={loss.item():.4f}, lr={lr:.2e}")

    avg_loss = epoch_loss / len(dataloader)
    print(f"Epoch {epoch} complete: avg_loss={avg_loss:.4f}")

# ============================
# 5. Save LoRA weights
# ============================
output_dir = "/models/openvla-so100-pick-lora"
model.save_pretrained(output_dir)
processor.save_pretrained(output_dir)
print(f"LoRA weights saved to {output_dir}")
print(f"Size: ~52MB (vs 14GB for full model)")
Training tips
| Parameter | Value | Note |
|---|---|---|
| Learning rate | 2e-5 | Cao hơn → unstable, thấp hơn → slow |
| Batch size | 4 | Tăng nếu GPU > 24GB |
| LoRA rank | 32 | 16 cho faster training, 64 cho better quality |
| Epochs | 10 | Monitor loss — stop early nếu plateau |
| Gradient clipping | 1.0 | Critical cho 8-bit training stability |
| Training time | ~3-4 hours | RTX 4090, 50 episodes, 10 epochs |
Bước 5: Evaluate Policy
Trước khi deploy lên robot thật, evaluate trong controlled setting:
"""
Evaluate fine-tuned OpenVLA policy
"""
from peft import PeftModel
import numpy as np

# Load base model + LoRA weights
base_model = AutoModelForVision2Seq.from_pretrained(
    "openvla/openvla-7b",
    quantization_config=bnb_config,
    torch_dtype=torch.bfloat16,
    device_map="auto",
    trust_remote_code=True,
)
model = PeftModel.from_pretrained(base_model, "/models/openvla-so100-pick-lora")
model.eval()

def predict_action(image, instruction):
    """Inference: image + instruction → robot action"""
    inputs = processor(
        images=image,
        text=f"In: What action should the robot take to {instruction}?\n",
        return_tensors="pt",
    ).to("cuda")

    with torch.no_grad():
        output = model.generate(
            **inputs,
            max_new_tokens=7,    # 7 action dimensions
            do_sample=False,
        )

    # Decode action tokens → continuous values
    action_tokens = output[0, -7:]  # Last 7 tokens
    action = detokenize_actions(action_tokens, n_bins=256)
    return action.cpu().numpy()

# Run evaluation trên held-out episodes
eval_dataset = LeRobotDataset("your-username/so100-pick-red-block", split="test")
successes = 0
total = 20

for i in range(total):
    sample = eval_dataset[i * eval_dataset.fps * 15]  # First frame of each episode
    image = sample["observation.image"]

    predicted_action = predict_action(image, "pick up the red block")
    ground_truth = sample["action"].numpy()

    # L2 error between predicted and ground truth
    error = np.linalg.norm(predicted_action - ground_truth)
    if error < 0.05:  # Threshold for "correct"
        successes += 1
    print(f"Episode {i}: L2 error = {error:.4f}")

print(f"Success rate: {successes}/{total} = {successes/total*100:.0f}%")
Bước 6: Deploy trên Robot thật qua ROS 2
Cuối cùng — đưa policy lên robot thật. Chúng ta dùng lerobot-ros bridge để kết nối LeRobot policy với ROS 2 control stack.
Install ROS 2 bridge
# Trong conda environment đã có LeRobot
pip install lerobot-ros

# Hoặc build from source (nếu cần custom modifications)
cd ~/ros2_ws/src
git clone https://github.com/ycheng517/lerobot-ros.git
cd ~/ros2_ws
colcon build --packages-select lerobot_ros
source install/setup.bash
Deploy pipeline
"""
Deploy OpenVLA policy trên SO-100 qua ROS 2
Yêu cầu: ROS 2 Humble/Jazzy, lerobot-ros
"""
import rclpy
from rclpy.node import Node
from sensor_msgs.msg import Image, JointState
from cv_bridge import CvBridge
import numpy as np
import torch
from peft import PeftModel
from transformers import AutoModelForVision2Seq, AutoProcessor

class OpenVLANode(Node):
    def __init__(self):
        super().__init__("openvla_policy")

        # Load model (1 lần khi startup)
        self.get_logger().info("Loading OpenVLA + LoRA weights...")
        self.processor = AutoProcessor.from_pretrained(
            "openvla/openvla-7b", trust_remote_code=True
        )
        base_model = AutoModelForVision2Seq.from_pretrained(
            "openvla/openvla-7b",
            load_in_8bit=True,
            device_map="auto",
            trust_remote_code=True,
        )
        self.model = PeftModel.from_pretrained(
            base_model, "/models/openvla-so100-pick-lora"
        )
        self.model.eval()
        self.get_logger().info("Model loaded!")

        # ROS 2 subscribers/publishers
        self.bridge = CvBridge()
        self.latest_image = None

        self.image_sub = self.create_subscription(
            Image, "/camera/color/image_raw", self.image_callback, 10
        )
        self.joint_pub = self.create_publisher(
            JointState, "/joint_commands", 10
        )

        # Control loop at 5 Hz (inference speed ~6Hz cho OpenVLA)
        self.timer = self.create_timer(0.2, self.control_loop)
        self.instruction = "pick up the red block and place it in the bin"

    def image_callback(self, msg):
        self.latest_image = self.bridge.imgmsg_to_cv2(msg, "rgb8")

    def control_loop(self):
        if self.latest_image is None:
            return

        # Predict action
        action = self.predict(self.latest_image, self.instruction)

        # Publish joint commands
        msg = JointState()
        msg.header.stamp = self.get_clock().now().to_msg()
        msg.name = [
            "joint_1", "joint_2", "joint_3",
            "joint_4", "joint_5", "gripper",
        ]
        msg.position = action.tolist()
        self.joint_pub.publish(msg)

    def predict(self, image, instruction):
        inputs = self.processor(
            images=image,
            text=f"In: What action should the robot take to {instruction}?\n",
            return_tensors="pt",
        ).to("cuda")

        with torch.no_grad():
            output = self.model.generate(
                **inputs, max_new_tokens=7, do_sample=False
            )

        action_tokens = output[0, -7:]
        return detokenize_actions(action_tokens).cpu().numpy()

def main():
    rclpy.init()
    node = OpenVLANode()
    rclpy.spin(node)
    rclpy.shutdown()

if __name__ == "__main__":
    main()
Chạy pipeline hoàn chỉnh
# Terminal 1: Camera driver
ros2 run usb_cam usb_cam_node_exe --ros-args \
    -p video_device:="/dev/video0" \
    -p framerate:=30.0

# Terminal 2: SO-100 driver
python -m lerobot.control \
    --robot.type=so100 \
    --robot.port=/dev/ttyACM1 \
    --control-mode=ros2

# Terminal 3: OpenVLA policy
python openvla_deploy_node.py
Hardware Requirements tổng kết
| Stage | GPU | RAM | Time |
|---|---|---|---|
| Record data | None | 8GB | ~15 min (50 eps) |
| Fine-tune (LoRA 8-bit) | RTX 3090 (24GB) | 32GB | 3-4 hours |
| Fine-tune (full) | A100 (80GB) | 64GB | 8-12 hours |
| Inference | RTX 3060 (12GB) | 16GB | ~6 Hz |
| Inference (CPU) | None | 32GB | ~0.5 Hz |
Budget option: Nếu không có GPU mạnh, dùng SmolVLA (~250M params) thay OpenVLA — fine-tune được trên RTX 3060 12GB, inference nhanh hơn, kết quả vẫn tốt cho single-task.
Troubleshooting thường gặp
1. CUDA OOM khi fine-tune
# Giảm batch size
--batch-size=2
# Hoặc dùng gradient accumulation
--gradient-accumulation-steps=8
2. LeRobot overwrite PyTorch GPU
# Kiểm tra
python -c "import torch; print(torch.cuda.is_available())"
# Nếu False, reinstall:
pip install torch torchvision --index-url https://download.pytorch.org/whl/cu121
3. Servo jitter khi deploy
# Thêm exponential moving average cho action smoothing
alpha = 0.7
smoothed_action = alpha * new_action + (1 - alpha) * prev_action
4. Policy chỉ hoạt động ở 1 vị trí
- Thu thập thêm demonstrations với object ở nhiều vị trí khác nhau
- Augment data: random crop, color jitter
- Cân nhắc dùng SpatialVLA nếu task cần spatial generalization
Next Steps
Sau khi hoàn thành tutorial này, bạn có thể:
- Multi-task: Record data cho nhiều tasks, fine-tune với mixed dataset
- Better hardware: Upgrade lên ALOHA 2 cho bimanual manipulation
- SmolVLA: Thử SmolVLA — lightweight hơn, fine-tune nhanh hơn, phù hợp edge deployment
- Sim pre-training: Dùng Isaac Lab để pre-train trong simulation trước khi fine-tune trên real data
- 3D-aware: Tích hợp depth information theo hướng SpatialVLA để cải thiện spatial reasoning
Robot learning đang ở giai đoạn rất exciting — tools như LeRobot, hardware giá rẻ như SO-100, và pre-trained models như OpenVLA giúp bất kỳ ai cũng có thể bắt đầu. Build something, share your dataset trên Hugging Face Hub, và contribute back to the community!
Bài viết liên quan
- Foundation Models cho Robot: RT-2, Octo, OpenVLA thực tế -- Tổng quan và so sánh các VLA models
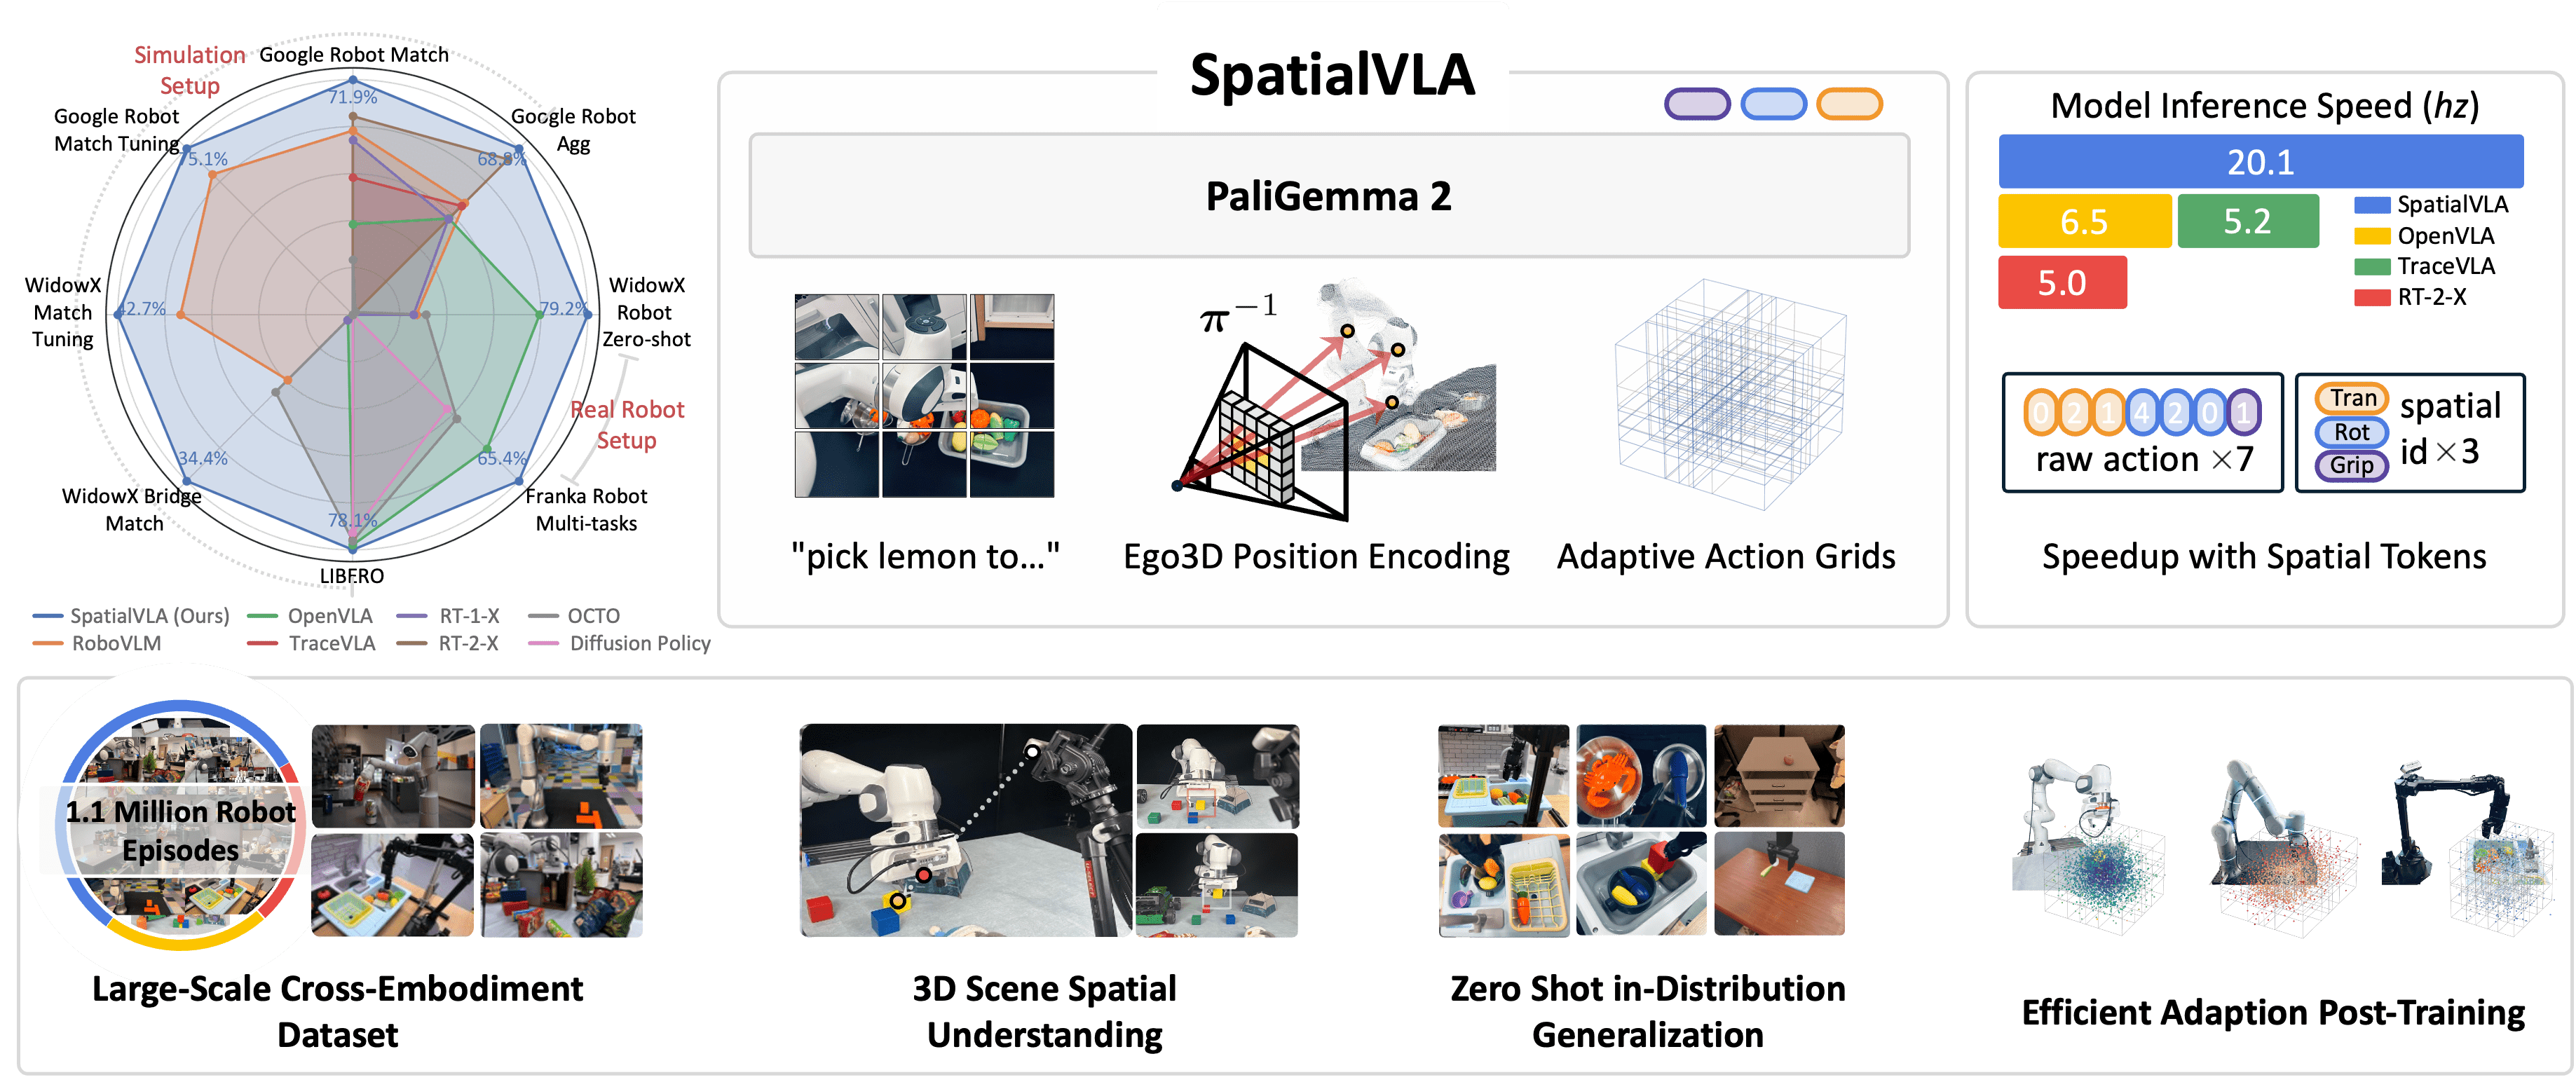
- SpatialVLA: 3D understanding cho robot manipulation -- Tại sao 3D spatial awareness quan trọng cho VLA
- Sim-to-Real Transfer: Train simulation, chạy thực tế -- Kỹ thuật transfer model từ sim sang real
- Deploy YOLOv8 trên Jetson Orin Nano -- Edge AI deployment cho robot perception
- Xu hướng nghiên cứu robotics 2025 -- Tổng quan research landscape