Why this article matters
In Part 1, we brought up G1 in MuJoCo through low-level DDS. Part 2 converted motion data into MCAP for Foxglove playback. Part 3 used PlotJuggler to inspect control signals. Part 4 compared posture PD with contact-aware WBID.
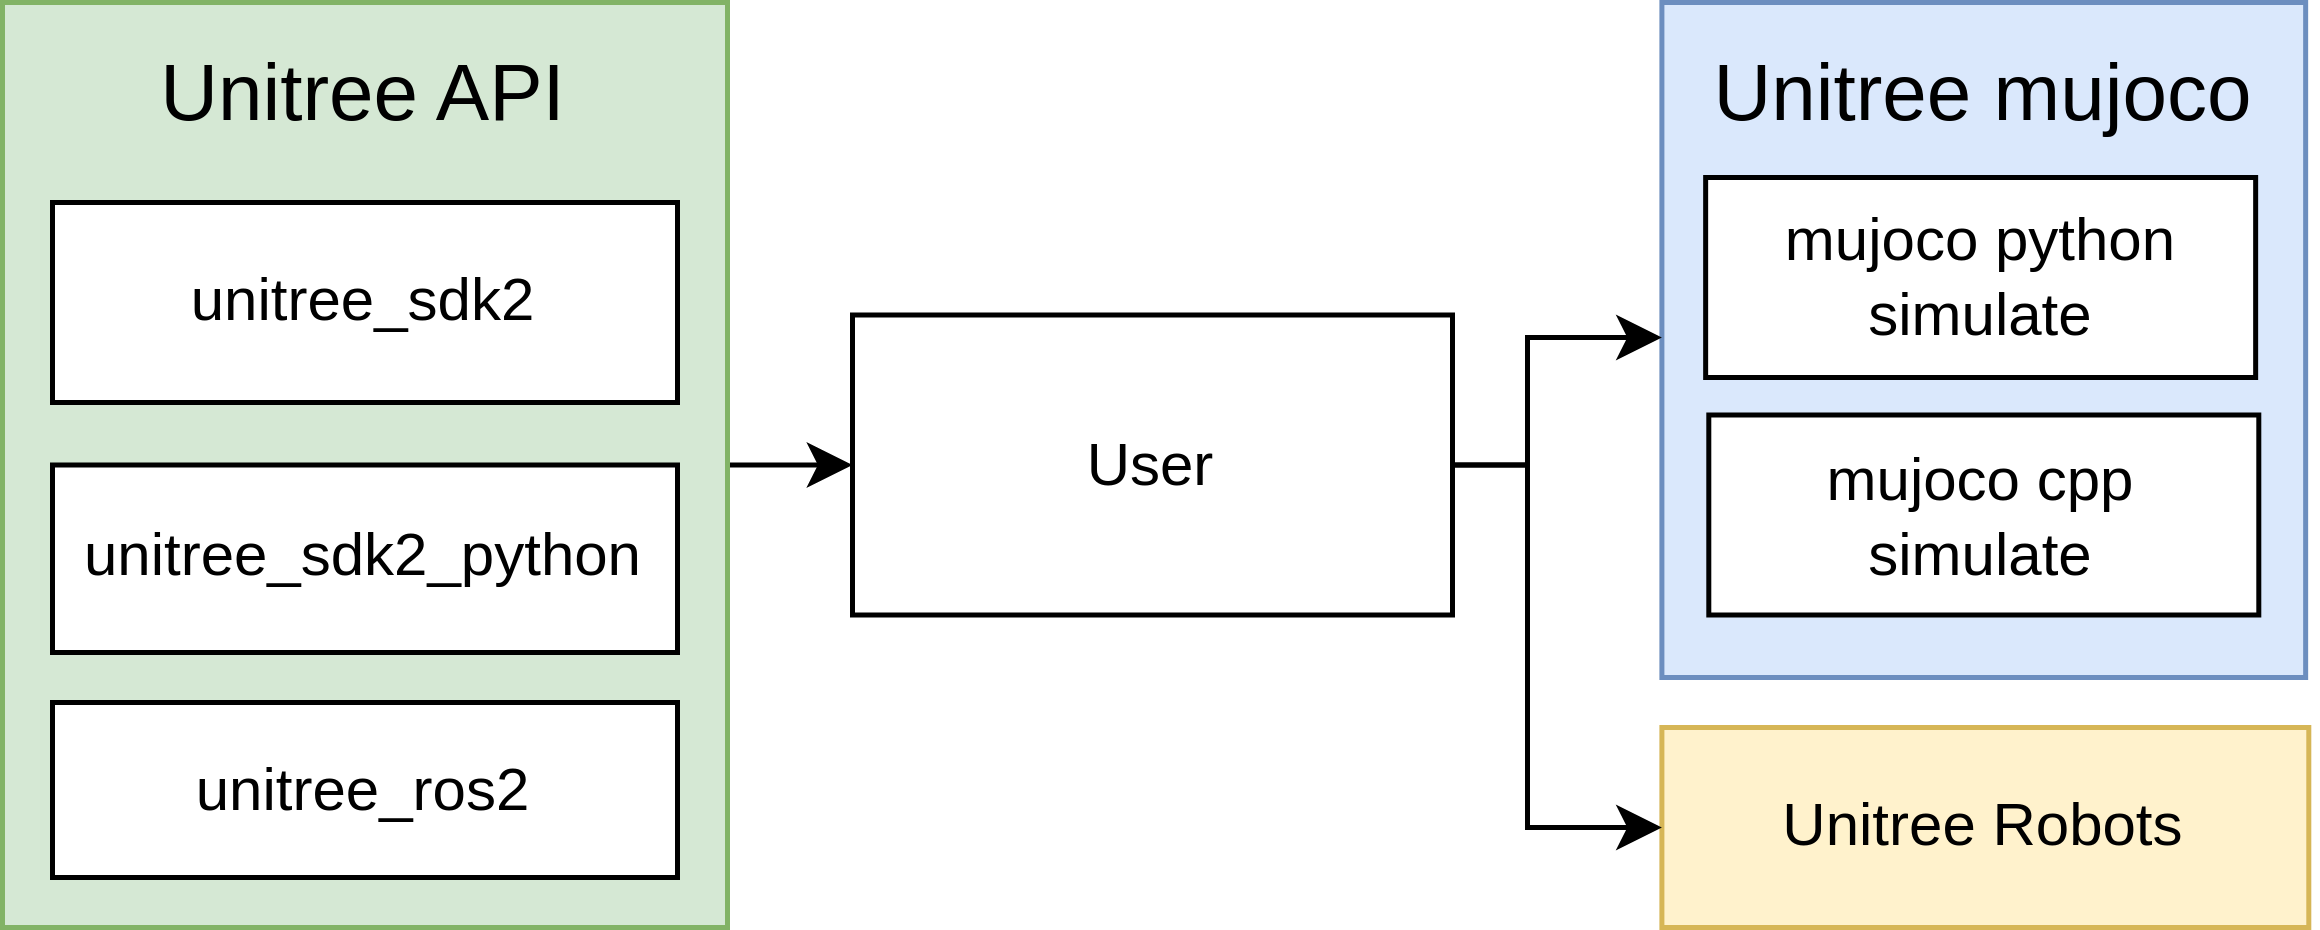
Part 5 moves into a very practical layer: controlling the G1 upper body with VR and inverse kinematics in MuJoCo. The main source is the GalaxyGeneralRobotics/OpenWBT repository, especially deploy/run_teleoperation_mujoco.py, deploy/controllers/controller.py, deploy/configs/run_teleoperation.yaml, deploy/helpers/ik_server.py, and the G1_29_ArmIK class in deploy/teleop/robot_control/robot_arm_ik.py. The OpenWBT README describes a teleoperation system for Unitree G1/H1 using Apple Vision Pro, supporting both physical robots and simulation. Lower-body control uses joystick commands for walking and body-pose changes; upper-body control derives robot hand motion from human hand poses measured in VR through inverse kinematics.
The goal is not to reimplement OpenWBT from scratch. The goal is to read the real pipeline clearly: TeleVisionWrapper.get_data() obtains left_wrist/right_wrist, G1_29_ArmIK.solve_ik() produces sol_q, the code clips that result around runner.target_dof_pos[runner.config.action_hl_idx], then Runner_handle_mujoco_vision.run_squat() or run_loco() drives the target into MuJoCo with control_dt: 0.02, control_decimation: 4, and the model resources/robots/g1_description/g1_29dof_camera.xml.
If you are new to MuJoCo, also read Getting Started with MuJoCo. For a broader software-stack view, Humanoid Robot Software Stack: ROS 2, Isaac and LeRobot is a useful companion article.
Series roadmap
The G1 MuJoCo: Control, Foxglove and PlotJuggler series has six parts:
| Part | Article | Main focus |
|---|---|---|
| 1 | Bring Up G1 MuJoCo with Low-Level DDS | Interfaces, DDS, topics, and the simulation loop |
| 2 | Convert LAFAN1 G1 Motions to Foxglove MCAP | Package motion data for playback |
| 3 | Debug G1 MPC/WBID with PlotJuggler | Plot CoM, contact, foot references, and solve time |
| 4 | From Posture PD to Contact-Aware WBID | Why walking needs contact-aware control |
| 5 | G1 Upper Body: IK, VR and MuJoCo | Wrist poses from VR, dual-arm IK, and the MuJoCo loop |
| 6 | Sim-to-Real Checklist | Align simulation and hardware: network, gains, timing, safety |
Runtime configuration: run_teleoperation.yaml
The entry point for this article is:
deploy/configs/run_teleoperation.yaml
The important lines are:
squat_config: 'g1_squat.yaml'
loco_config: 'g1_loco.yaml'
exp_name: 'run_teleoperation'
xml_path: "resources/robots/g1_description/g1_29dof_camera.xml"

control_dt: 0.02
control_decimation: 4

num_dof: 29
dof_idx: [0, 1, ..., 28]
action_hl_idx: [15, 16, 17, 18, 19, 20, 21,
                22, 23, 24, 25, 26, 27, 28]
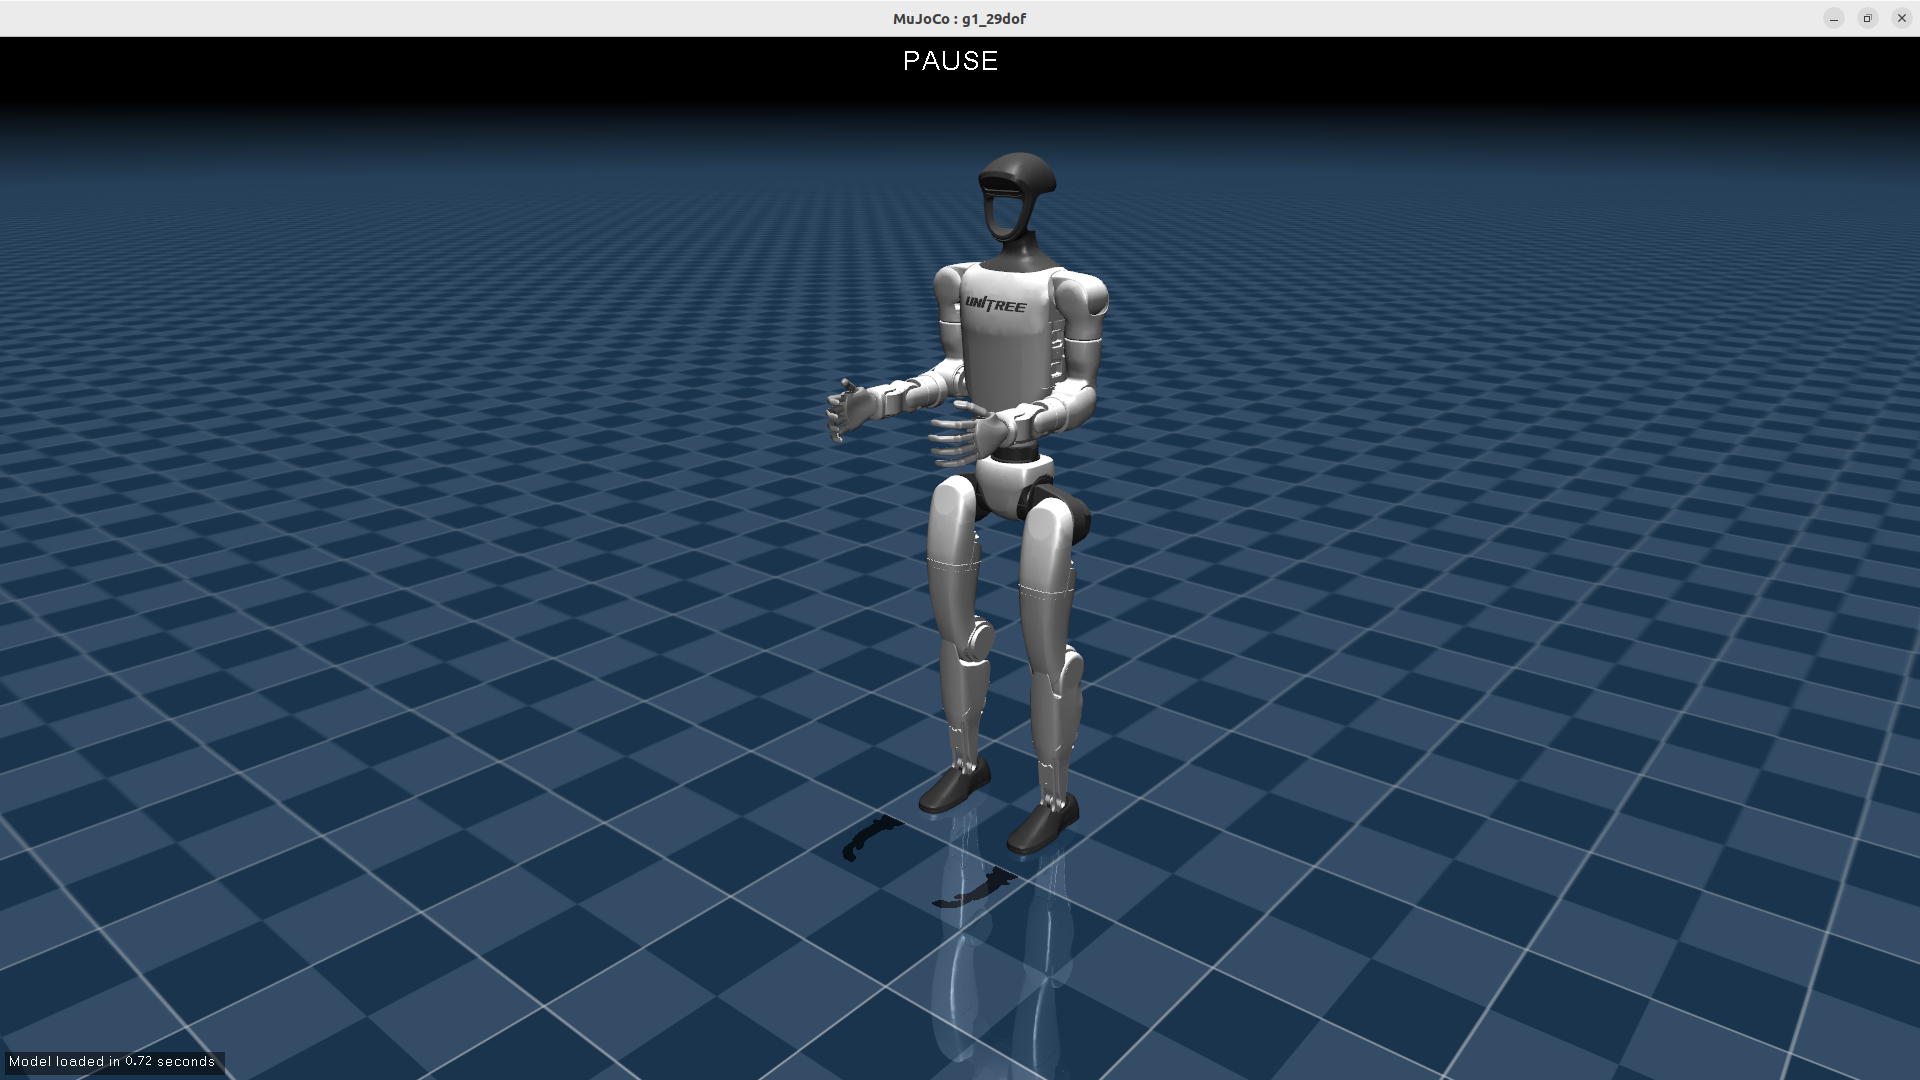
xml_path points to the MuJoCo model for the 29-DoF G1 with cameras. The file name g1_29dof_camera.xml is a hint that this is not only a body model. It also contains the left_eye and right_eye cameras used to render images back to the VR side. Runner_handle_mujoco_vision depends on exactly those camera names.
control_dt: 0.02 means the high-level control layer runs at 50 Hz. control_decimation: 4 means the policy, squat, or locomotion target is not recomputed at every MuJoCo step. In Runner_handle_mujoco.run_squat() and run_loco(), the code updates the target only when counter % control_decimation == 0. The intermediate physics steps reuse the previous target, compute PD torque, and call mujoco.mj_step(). If the simulation timestep is 0.005 seconds, decimation of 4 matches the 0.02-second high-level period. Beginners should keep this relationship in mind: policy updates can be slower than physics stepping, while the actuator-level command is still applied every simulation step.
action_hl_idx is the key bridge between IK and the 29-DoF command vector. Indices 0-11 are the two legs, indices 12-14 are waist joints, indices 15-21 are the left arm, and indices 22-28 are the right arm. This article focuses on the last 14 indices: shoulder, elbow, and wrist joints for both sides. g1_squat.yaml leaves a useful comment for the order: shoulder_pitch, shoulder_roll, shoulder_yaw, elbow, wrist_roll, wrist_pitch, and wrist_yaw.
The main loop in run_teleoperation_mujoco.py
OpenWBT runs MuJoCo teleoperation with:
source /opt/ros/foxy/setup.sh
source ~/unitree_ros2/setup.sh
python -m deploy.run_teleoperation_mujoco --config run_teleoperation.yaml
Inside deploy/run_teleoperation_mujoco.py, the program creates shared memory for stereo images:
tv_img_shape = (480, 1280, 3)
tv_img_shm = shared_memory.SharedMemory(create=True, size=np.prod(tv_img_shape))
tv_img_array = np.ndarray(tv_img_shape, dtype=np.uint8, buffer=tv_img_shm.buf)
The 480 x 1280 shape comes from two 640 x 480 images concatenated horizontally: left camera and right camera. The code then constructs:
tv_wrapper = TeleVisionWrapper(True, tv_img_shape, tv_img_shm.name)
arm_ik = G1_29_ArmIK()
runner = Runner_handle_mujoco_vision(config, args=args)
current_mode = "SQUAT"
TeleVisionWrapper(True, ...) enables binocular image handling. G1_29_ArmIK() is the dual-arm IK solver for the 29-DoF G1 model. Runner_handle_mujoco_vision is both the MuJoCo runner and the renderer for the two eye cameras.
The most important block is the local function tv_arms():
head_rmat, left_wrist, right_wrist, left_hand, right_hand = tv_wrapper.get_data()
current_lr_arm_q = runner.qj.copy()[15:29]
current_lr_arm_dq = runner.dqj.copy()[15:29]
sol_q, sol_tauff = arm_ik.solve_ik(
    left_wrist,
    right_wrist,
    current_lr_arm_q,
    current_lr_arm_dq,
)
sol_q = np.clip(
    sol_q,
    runner.target_dof_pos[runner.config.action_hl_idx] - 0.01,
    runner.target_dof_pos[runner.config.action_hl_idx] + 0.01,
)
runner.target_dof_pos[runner.config.action_hl_idx] = sol_q
Read slowly, this block is the whole upper-body pipeline:
| Step | Variable | Meaning |
|---|---|---|
| 1 | left_wrist, right_wrist |
Left/right wrist poses from VR after conversion to robot conventions |
| 2 | current_lr_arm_q |
Current 14 arm joint positions from runner.qj[15:29] |
| 3 | current_lr_arm_dq |
Current 14 arm joint velocities |
| 4 | solve_ik() |
Find arm joint targets that move both end-effectors toward the wrist poses |
| 5 | np.clip(... +/- 0.01) |
Limit each IK update to 0.01 rad around the current target |
| 6 | assign to target_dof_pos[action_hl_idx] |
Put the IK result into the same target vector used by the runner |
The clipping step is the most practical detail. IK can jump when VR tracking is noisy, when a frame changes abruptly, or when the optimization finds a different valid posture. OpenWBT does not send raw sol_q directly to the robot target. It only lets the arm target move by a very small amount around the previous target. A 0.01-rad step is about 0.57 degrees. This is a simple target-rate limiter before PD torque sees the command.
What does TeleVisionWrapper.get_data() return?
The file deploy/teleop/open_television/tv_wrapper.py is easy to skim past, but it decides whether IK is even solving in the right coordinate system.
The wrapper starts from OpenXR/Vuer data: head matrix, left hand, right hand, and 25 landmarks for each hand. The comments state the conventions clearly:
OpenXR: y up, z back, x right
Robot:  z up, y left, x front
The first step is therefore a basis change:
head_mat = T_robot_openxr @ head_vuer_mat @ fast_mat_inv(T_robot_openxr)
left_wrist_mat = T_robot_openxr @ left_wrist_vuer_mat @ fast_mat_inv(T_robot_openxr)
right_wrist_mat = T_robot_openxr @ right_wrist_vuer_mat @ fast_mat_inv(T_robot_openxr)
The code then converts wrist convention from Apple Vision Pro/XR to the Unitree URDF convention. Left and right wrists are not identical because the axis conventions for left and right hands differ:
unitree_left_wrist = left_wrist_mat @ T_to_unitree_left_wrist
unitree_right_wrist = right_wrist_mat @ T_to_unitree_right_wrist
Next comes the origin shift. The raw wrist pose is in a world/head-related frame, while the OpenWBT IK solver uses an origin near the waist joint motor. The code subtracts the head translation and applies an offset:
unitree_left_wrist[0:3, 3] -= head_mat[0:3, 3]
unitree_right_wrist[0:3, 3] -= head_mat[0:3, 3]

unitree_left_wrist[0, 3] += 0.15
unitree_right_wrist[0, 3] += 0.15
unitree_left_wrist[2, 3] += 0.45
unitree_right_wrist[2, 3] += 0.45
The final return is:
return head_rmat, unitree_left_wrist, unitree_right_wrist, unitree_left_hand, unitree_right_hand
In run_teleoperation_mujoco.py, the arm IK path uses only left_wrist/right_wrist. left_hand/right_hand are returned as well, but this MuJoCo vision pipeline does not use them directly to control finger joints. That distinction matters: this article is about 14-DoF upper-arm IK, not full dexterous-hand teleoperation. The dexterous-hand classes in controller.py belong to a separate real/dexhand path with DDS topics such as rt/dex3/left/cmd and rt/dex3/right/cmd.
G1_29_ArmIK: why solve only the arms?
G1_29_ArmIK builds the robot from:
deploy/assets/g1/g1_body29_hand14.urdf
But the solver does not optimize the entire robot. It defines mixed_jointsToLockIDs, including all leg joints, waist joints, and finger joints. It then calls buildReducedRobot(). In plain terms: the full model contains body, arms, and hands; the reduced model locks the parts that are not being solved and leaves the 14 arm joints active.
After building the reduced model, the code adds two operational frames:
L_ee: attached to left_wrist_yaw_joint, offset [0.05, 0, 0]
R_ee: attached to right_wrist_yaw_joint, offset [0.05, 0, 0]
These two frames are the end-effectors that IK tries to move toward the VR-provided left_wrist/right_wrist transforms. The solver uses Pinocchio for kinematics, CasADi for symbolic functions, and Ipopt for optimization. The objective has four terms:
50 * translational_cost
+ 1 * rotation_cost
+ 0.02 * regularization_cost
+ 0.1 * smooth_cost
The translation weight is 50, much larger than the rotation weight. That is a reasonable choice for beginner-friendly teleoperation: the wrist should reach the desired position first, while orientation still matters but should not force extreme or unstable joint postures. regularization_cost discourages unreasonable joint angles. smooth_cost penalizes deviation from the previous solution. On top of that, WeightedMovingFilter([0.4, 0.3, 0.2, 0.1], 14) filters the sol_q output.
solve_ik() receives:
solve_ik(left_wrist, right_wrist, current_lr_arm_motor_q, current_lr_arm_motor_dq)
If current_lr_arm_motor_q is available, it becomes init_data and var_q_last. This is a key realtime detail. IK does not restart from a neutral pose every frame; it starts near the current arm posture. The resulting solution is usually closer to the current state, less jumpy, and more appropriate for a control loop.
On success, the code extracts sol_q, filters it, updates init_data, and computes sol_tauff using Pinocchio RNEA:
sol_tauff = pin.rnea(model, data, sol_q, v, zeros)
In the MuJoCo pipeline described here, sol_tauff is not used as the final torque feedforward command. The runner still uses PD position control in MuJoCo. You should treat sol_q as the main output: the target joint positions for both arms.
If Ipopt fails to converge, solve_ik() prints debug information and returns current_lr_arm_motor_q with zero torque. That is a conservative fallback: when IK fails, the arm does not jump to a bad solution; it stays close to the current state.
How Runner_handle_mujoco_vision turns target into torque
In controller.py, Runner_handle_mujoco loads the model:
self.m = mujoco.MjModel.from_xml_path(config.xml_path)
self.d = mujoco.MjData(self.m)
self.m.opt.timestep = self.config.simulation_dt
Each time run_squat() or run_loco() runs, the runner reads proprioception from MuJoCo:
self.qj = self.d.qpos[7:][self.config.dof_idx]
self.dqj = self.d.qvel[6:][self.config.dof_idx]
self.quat = self.d.qpos[3:7]
self.ang_vel = self.d.qvel[3:6]
Again, note the difference between qpos[7:] and qvel[6:]. A floating base has 7 configuration values but 6 velocity values.
In run_squat(), when the high-level tick arrives:
if self.counter % self.config.control_decimation == 0:
    self.refresh_prop()
    gravity_orientation = self.get_gravity_orientation(self.quat)
    target_dof_pos = self.target_dof_pos.copy()
    cmd_raw[0] = usb_left.lx   # height
    cmd_raw[1] = usb_right.rx
    self.target_dof_pos = self.squat_controller.run(...)
    self.transition_squat()
Then the target becomes torque:
tau = self.pd_control(self.squat_controller, self.target_dof_pos)
self.d.ctrl[:] = tau
mujoco.mj_step(self.m, self.d)
The MuJoCo pd_control() is direct:
return (target_q - q) * kp + (target_dq - dq) * kd
Because tv_arms() already writes sol_q into target_dof_pos[action_hl_idx], the arm portion of the target vector flows through the same PD function. The lower-body squat/loco policy updates legs and body; IK updates both arms; PD is the final layer that turns the 29-DoF target vector into simulation torque.
Runner_handle_mujoco_vision extends that runner with stereo rendering:
self.renderer = Renderer(self.m, width=640, height=480)
self.left_camera_id = mj_name2id(..., "left_eye")
self.right_camera_id = mj_name2id(..., "right_eye")
After super().run_squat() or super().run_loco(), it renders both cameras and concatenates them:
self.render_image = np.concatenate((left_image, right_image), axis=1)
The outer loop then calls np.copyto(tv_img_array, np.array(runner.render_image)), sending that image into shared memory. The TeleVisionWrapper side uses this shared memory to stream the robot camera view back to the XR device. The pipeline is therefore bidirectional: VR sends wrist poses into IK, and MuJoCo renders robot-camera images back into VR.
How SQUAT and LOCOMOTION differ
In run_teleoperation_mujoco.py, the initial mode is "SQUAT". In that mode, the loop calls:
tv_arms()
runner.run_squat(manual=True)
viewer.sync()
This means upper-body IK is updated in SQUAT mode. The operator can adjust body pose with joysticks while moving both wrists in VR. When the transfer condition is satisfied, runner.transfer_to_loco switches the robot to "LOCOMOTION".
In LOCOMOTION mode, the loop calls:
runner.run_loco(manual=True)
viewer.sync()
In this specific file, tv_arms() is not called inside the LOCOMOTION branch. That does not mean OpenWBT as a concept cannot move arms while walking. It means the exact MuJoCo script we are reading updates wrist IK in the SQUAT branch and focuses on locomotion control in the LOCOMOTION branch. If you expect to walk and wave at the same time in this script, check where tv_arms() is called before blaming the IK solver.
The two modes also use different policy configs:
| Mode | Config | Purpose |
|---|---|---|
| SQUAT | g1_squat.yaml |
Adjust height and body pose, while allowing upper-body IK to update arm targets |
| LOCOMOTION | g1_loco.yaml |
Command forward/lateral/yaw velocity with joysticks |
g1_loco.yaml has num_dof: 12 and num_actions: 12 for the legs, but the gains and default angles still cover a 29-element vector so the final PD layer has a complete target. g1_squat.yaml observes 29 DOF, while its main policy action is lower-body focused. The arm targets enter through action_hl_idx.
When is ik_server.py used?
deploy/helpers/ik_server.py is not part of the direct MuJoCo loop above, but it is worth reading because it shows how OpenWBT separates IK as a service for Isaac Sim. IKServer opens a TCP socket on localhost:12345 and receives JSON containing:
left_wrist
right_wrist
current_lr_arm_q
current_lr_arm_dq
It then calls the same solver:
sol_q, sol_tauff = self.arm_ik.solve_ik(...)
On success, the server returns sol_q and success: true. On failure, it returns current_lr_arm_q, success: false, and an error_msg. This design has a practical benefit: an Isaac Sim client does not need to embed the full Pinocchio/CasADi solver in its main process. It can send wrist targets and receive arm joint targets. In the MuJoCo script discussed here, the solver runs in-process; in the Isaac Sim path, it can run as a separate process through start_ik_server.sh.
Beginner debug checklist
If you want to run or modify this pipeline, check it in this order:
- Confirm that
run_teleoperation.yamlpoints toresources/robots/g1_description/g1_29dof_camera.xml. If the model lacksleft_eye/right_eye,Runner_handle_mujoco_visioncannot render stereo images. - Check whether
control_dtandcontrol_decimationmatch the simulation timestep. If the physics step and policy step are poorly aligned, the robot may jitter or respond late. - Verify that
TeleVisionWrapper.get_data()returns valid 4 x 4 wrist transforms. If tracking drops, print translation values and the rotation-matrix determinant before blaming IK. - Confirm that
current_lr_arm_q = runner.qj[15:29]matches the actual joint order. A one-index mistake can swap shoulder, elbow, and wrist behavior. - Check whether
solve_ik()converges. If it does not, the wrist target may be outside the robot workspace, or the head-to-waist offset may be wrong. - Keep the
np.clip(... +/- 0.01)limiter while testing. Removing it too early can make the arm jump when VR tracking is noisy. - Distinguish
sol_qfromsol_tauff. In this MuJoCo script,sol_qis the main command target; the RNEA torque is not the final actuator command. - Remember that in the current file,
tv_arms()is called only in SQUAT mode. If you want upper-body IK during LOCOMOTION, change the loop deliberately and re-check stability.
A compact diagram:
Apple Vision Pro / OpenXR
        |
        v
TeleVisionWrapper.get_data()
  - OpenXR -> robot basis
  - XR wrist convention -> Unitree URDF
  - head-origin pose -> waist-origin pose
        |
        v
left_wrist, right_wrist
        |
        v
G1_29_ArmIK.solve_ik()
  - Pinocchio reduced model
  - CasADi + Ipopt
  - smooth filter
        |
        v
sol_q (14 arm joints)
        |
        v
clip around target_dof_pos[action_hl_idx] +/- 0.01
        |
        v
Runner_handle_mujoco_vision.run_squat()
        |
        v
PD torque -> mujoco.mj_step()
        |
        v
left_eye/right_eye render -> shared memory -> VR
Conclusion
OpenWBT is worth studying because it is more than a polished VR demo. It shows how several concrete layers fit together: XR tracking, coordinate conversion, dual-arm IK, target limiting, squat/loco policies, PD torque, MuJoCo stepping, and stereo rendering. For beginners, the main lesson is to keep the layers separate. VR does not command torque directly. IK does not control all 29 DOF. sol_tauff is not the final torque command in this script. And control_dt: 0.02 does not mean physics only runs at 50 Hz when control_decimation separates high-level target updates from simulation stepping.
The next article, Sim-to-Real Checklist, will use these exact details to prepare for moving from MuJoCo to the physical robot: joint order, network interface, DDS topics, gains, mode switching, emergency damping, and keeping target changes small enough that the robot never receives a surprising command.