Why the last article is a checklist
The first five articles gave us the pieces of the G1 pipeline: low-level DDS simulation bring-up in Part 1, MCAP playback for Foxglove in Part 2, PlotJuggler-based signal debugging in Part 3, the difference between posture PD and contact-aware control in Part 4, and upper-body VR/IK control in Part 5. This final article does not introduce a new controller. It turns the whole series into a deployment checklist: how to know whether you are still talking to MuJoCo, when you are really talking to hardware, what to log, what to compare, and which guard must stay quiet before you let a controller touch the physical robot.
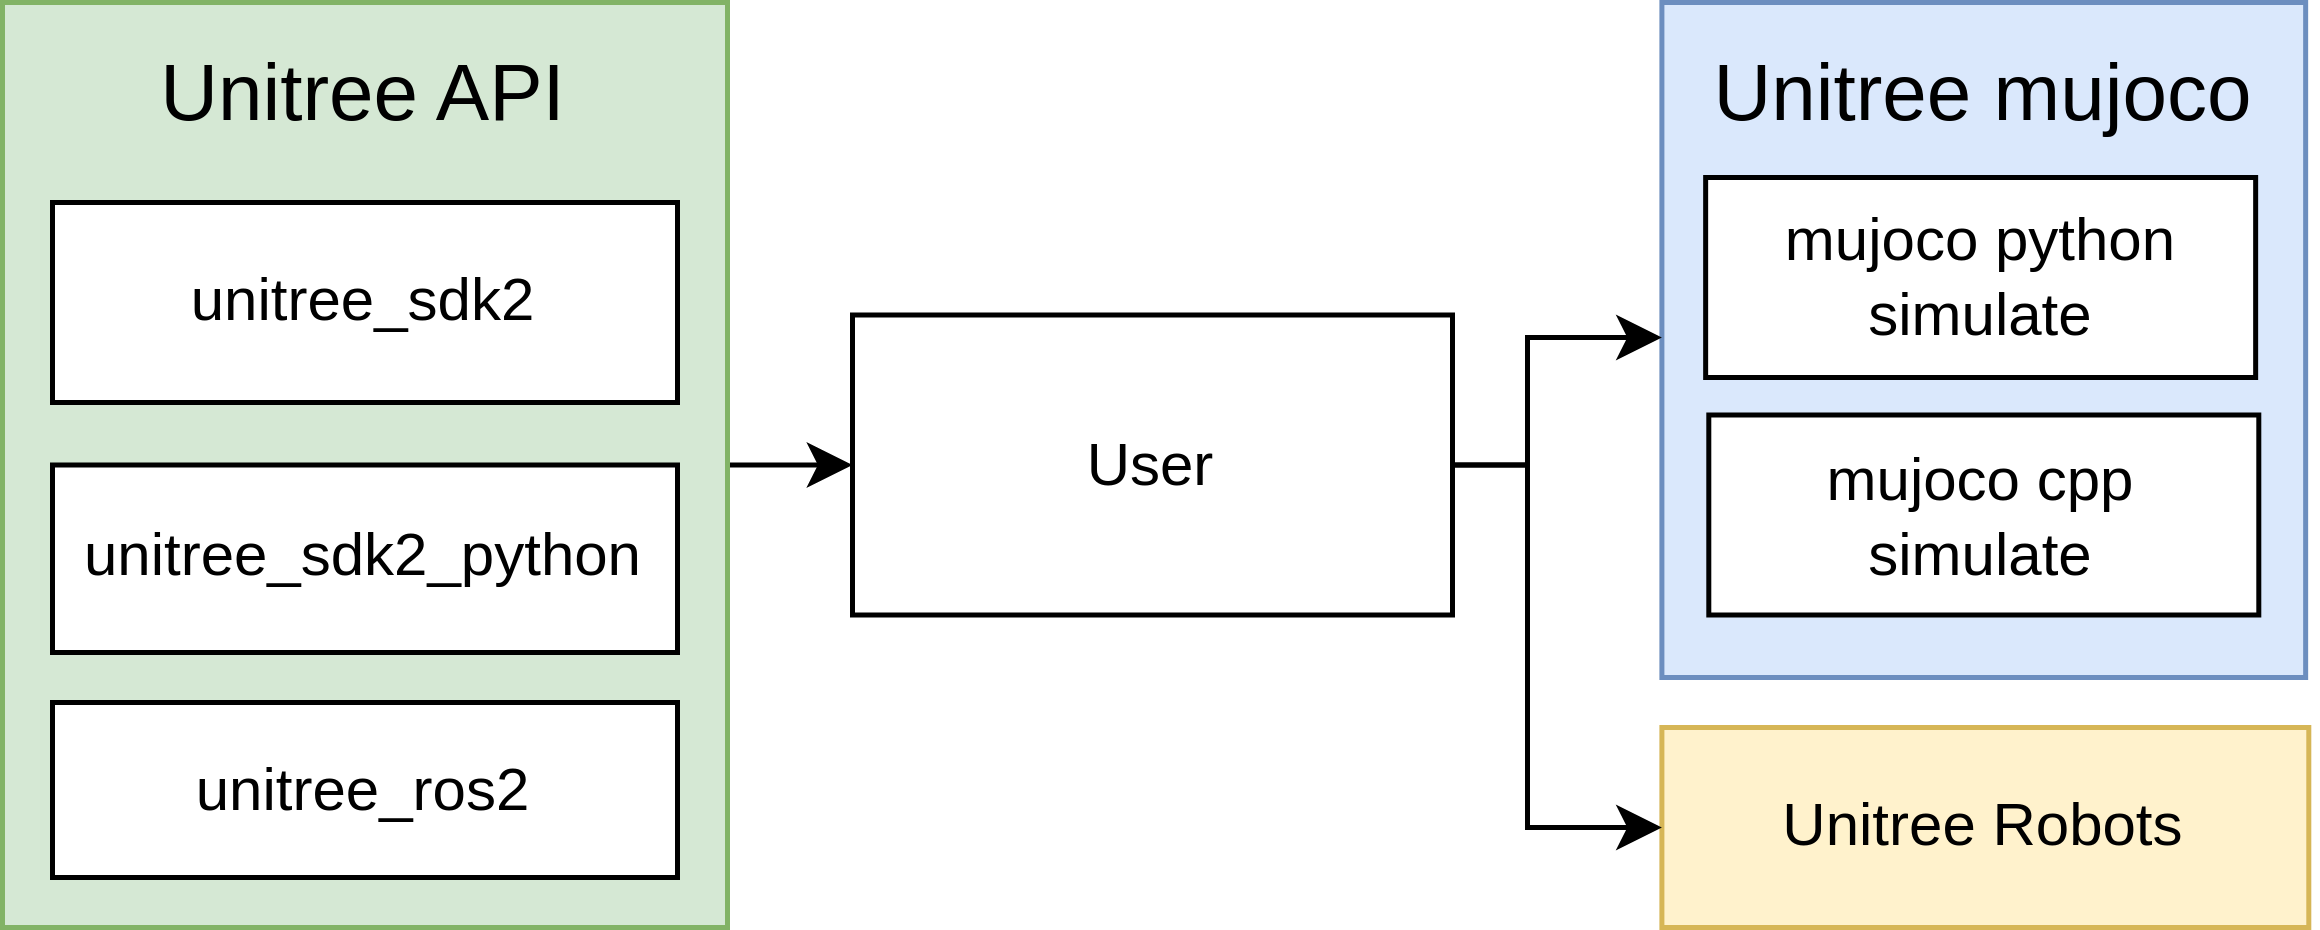
The two main technical sources are unitreerobotics/unitree_mujoco and GalaxyGeneralRobotics/OpenWBT. unitree_mujoco documents the official sim-to-real pattern through example/cpp, example/python, and example/ros2, all centered around the stand_go2 example. OpenWBT gives a more G1-specific deployment pattern: run_teleoperation.yaml uses msg_type: "hg", lowcmd_topic: "rt/lowcmd", lowstate_topic: "rt/lowstate", create_damping_cmd() for safe damping, save_rawdata() for .pkl logs, and a torque guard based on abs(tau_record).max() > 100.
The core rule is simple: without logs, you do not have sim2real. If the simulated robot stands beautifully but you cannot compare qj, dqj, gravity_orientation, target_dof_pos, and tau, you are not ready. If you can log everything but the torque guard still trips, you are not ready either. Hardware should be the final step of the pipeline, not the place where you discover your first indexing, gain, or frame-convention bug.
Series roadmap
The G1 MuJoCo: Control, Foxglove and PlotJuggler series has six parts:
| Part | Article | Role in the pipeline |
|---|---|---|
| 1 | Bring Up G1 MuJoCo with Low-Level DDS | DDS domain, low-level topics, and the simulation loop |
| 2 | Convert LAFAN1 G1 Motions to Foxglove MCAP | Package motion data for timeline playback |
| 3 | Debug G1 MPC/WBID with PlotJuggler | Inspect continuous signals, spikes, and phase mismatch |
| 4 | From Posture PD to Contact-Aware WBID | Understand torque, contact, and posture-control limits |
| 5 | G1 Upper Body: IK, VR and MuJoCo | Connect wrist poses, IK, arm targets, and MuJoCo |
| 6 | A Sim2Real Checklist for G1 Controllers | Check network, topics, logs, PlotJuggler, and guards before hardware |
If MuJoCo itself is still new to you, read Getting Started with MuJoCo. For a broader view of humanoid infrastructure, Humanoid Robot Software Stack: ROS 2, Isaac and LeRobot is a useful companion.
Checklist 1: know which interface you are using
In unitree_mujoco, the example folder has three deployment paths:
unitree_mujoco/
  example/
    cpp/      # unitree_sdk2
    python/   # unitree_sdk2_python
    ros2/     # unitree_ros2
The repository example is stand_go2: make the robot stand up, then lie down. Even though the example is named for Go2, the sim-to-real structure matters for G1 because it shows how Unitree expects you to separate control logic from transport. In C++ and Python, the same binary or script has two modes: no network-interface argument means simulation over loopback; passing a network-interface name means real hardware. In ROS 2, the switch is done through the setup script and ROS_DOMAIN_ID.
A beginner-friendly checklist:
| Path | When to use it | Main check |
|---|---|---|
example/cpp/stand_go2 |
You want the C++ unitree_sdk2 interface |
No argument is sim, NIC argument is real |
example/python/stand_go2.py |
You want a quick Python workflow | ChannelFactoryInitialize() selects domain/interface |
example/ros2/stand_go2 |
You want ROS 2 integration | setup_local.sh + ROS_DOMAIN_ID=1 for sim, setup.sh + ROS_DOMAIN_ID=0 for real |
The good part of this pattern is that the controller logic does not need to change in the middle. What changes is transport: DDS domain, network interface, and topics. When debugging an algorithm, keep the algorithm fixed and change only one transport layer at a time. If you change gains, DDS domain, robot model, topic names, and network interface in one pass, you will not know where the failure came from.
Checklist 2: DDS domain and network interface
In Unitree MuJoCo simulation, the README recommends separating the simulation DDS domain from the physical robot's default domain. In C++:
if (argc < 2)
{
    ChannelFactory::Instance()->Init(1, "lo");
}
else
{
    ChannelFactory::Instance()->Init(0, argv[1]);
}
In Python:
if len(sys.argv) < 2:
    ChannelFactoryInitialize(1, "lo")
else:
    ChannelFactoryInitialize(0, sys.argv[1])
Operationally, read the code like this:
| State | Domain | Interface | Meaning |
|---|---|---|---|
| Local MuJoCo | 1 |
"lo" |
The controller talks to the simulator on the same machine |
| Physical robot | 0 |
argv[1] or sys.argv[1] |
The controller talks through the Ethernet interface connected to the robot |
The values 1 and 0 are not cosmetic. The real robot uses the default domain 0. Simulation uses domain 1 so an experimental controller does not accidentally publish LowCmd to a real robot on the same network. "lo" is the local loopback interface, which keeps simulation DDS traffic inside the machine. When moving to hardware, you must pass the correct NIC, such as eno1, enp3s0, or whatever Ethernet interface your workstation uses for the robot.
For ROS 2, the equivalent checklist is:
# Simulation
source ~/unitree_ros2/setup_local.sh
export ROS_DOMAIN_ID=1
./install/stand_go2/bin/stand_go2

# Real robot
source ~/unitree_ros2/setup.sh
export ROS_DOMAIN_ID=0
./install/stand_go2/bin/stand_go2
A common mistake is sourcing the real robot setup while still exporting ROS_DOMAIN_ID=1, then wondering why the robot receives nothing. A more dangerous mistake is leaving an old shell with ROS_DOMAIN_ID=0 while assuming you are testing against simulation. Before every run, print three things: the script you are about to run, the current ROS_DOMAIN_ID, and the selected network interface. If you are using Python or C++, log clearly whether your process took the ChannelFactoryInitialize(1, "lo") branch or the ChannelFactoryInitialize(0, args.net) branch.
Checklist 3: OpenWBT must use the right G1 topics and message type
OpenWBT is more than a VR demo. It is a practical example of real deployment structure. In deploy/configs/run_teleoperation.yaml, the important lines are:
control_dt: 0.02
control_decimation: 4

msg_type: "hg"
imu_type: "pelvis"

lowcmd_topic: "rt/lowcmd"
lowstate_topic: "rt/lowstate"
For G1, msg_type: "hg" is a critical detail. The Unitree MuJoCo README states that G1 and H1-2 use the unitree_hg IDL for low-level communication, while robots such as Go2, B2, and older H1 variants use unitree_go. If you copy a Go2 example into a G1 workflow and forget the message type, some layers may still initialize, but the motor data will not match the schema you think you are controlling.
The two low-level topics form the input/output pair of the controller:
| Topic | Direction | Contents |
|---|---|---|
rt/lowstate |
robot/sim -> controller | joint position, joint velocity, IMU, mode machine |
rt/lowcmd |
controller -> robot/sim | joint targets, gains, damping, torque feedforward |
In controller.py, OpenWBT creates ChannelPublisher(self.config.lowcmd_topic, LowCmdHG) and ChannelSubscriber(self.config.lowstate_topic, LowStateHG) when msg_type == "hg". Then wait_for_low_state() waits until low_state.tick is nonzero before reporting that the robot is connected. This is a useful guard: no LowState, no command.

Before running OpenWBT on the real robot, check:
- The robot is already in damping mode through the Unitree remote.
- The workstation is connected to the robot via the correct Ethernet link.
--netnames the real NIC, for example--net eno1.- The config uses
msg_type: "hg"for G1. - The topics are
rt/lowcmdandrt/lowstate. - The first hardware run uses
--debugif you want the logic to run while commands are replaced by damping.
The real-robot command is:
source /opt/ros/foxy/setup.sh
source ~/unitree_ros2/setup.sh
python -m deploy.run_teleoperation_real --config run_teleoperation.yaml --net eno1 --debug
The MuJoCo command is:
source /opt/ros/foxy/setup.sh
source ~/unitree_ros2/setup.sh
python -m deploy.run_teleoperation_mujoco --config run_teleoperation.yaml --save_data
Checklist 4: damping is not decoration
In OpenWBT, create_damping_cmd() writes the following command pattern for each motor:
cmd.motor_cmd[i].q = 0
cmd.motor_cmd[i].dq = 0
cmd.motor_cmd[i].kp = 0
cmd.motor_cmd[i].kd = 8
cmd.motor_cmd[i].tau = 0
This means the controller is no longer trying to pull a joint to a specific position target. It applies damping against velocity. That is safer when the robot needs to stop, when the operator has not started the policy, or when the torque guard detects an abnormal command. In damping_state(), OpenWBT repeatedly publishes damping commands until the right joystick start signal arrives. In run_loco() and run_squat(), if debug=True, the code also calls create_damping_cmd(self.low_cmd) before sending. So --debug is not just verbose printing; it is a non-executing deployment mode for policy torque.
Separate the three states clearly:
| State | Goal | Suitable for first hardware run? |
|---|---|---|
| Damping | Keep the robot soft and do not run policy | Yes |
| Default position | Interpolate gently from current pose to default pose | Yes, after damping |
| Policy control | run_squat(), run_loco(), arm IK, PD torque |
Only after logs pass |
A good sim-to-real controller does not jump from boot straight into policy. It enters damping, moves to default pose, and only then starts the policy. This is why deploy_real() in OpenWBT calls runner.damping_state(), then runner.move_to_default_pos(), and only then enters the SQUAT/LOCOMOTION loop.
Checklist 5: log .pkl files with save_rawdata()
OpenWBT implements save_rawdata() in both the real and MuJoCo runners. When --save_data is enabled, it creates a directory under args.save_data_dir/config.exp_name and writes one frame per file:
rawdata = {
    "proprioception": {
        "qj": self.qj,
        "dqj": self.dqj,
        "gravity_orientation": get_gravity_orientation(self.quat),
        "ang_vel": self.ang_vel,
    },
    "squat_cmd": self.squat_controller.squat_cmd,
    "loco_cmd": self.loco_controller.loco_cmd,
    "target_dof_pos": self.target_dof_pos,
    "tau": self.tau_record,
}
pickle.dump(rawdata, open(filepath, "wb"))
time.sleep(0.02)
The filenames look like 00000001.pkl, 00000002.pkl, and so on, based on counter. With time.sleep(0.02), the logging rate is roughly 50 Hz, matching control_dt: 0.02. In MuJoCo, run_squat() and run_loco() update the policy target according to control_decimation; physics can run at a smaller timestep, but controller logs should be interpreted at the controller rhythm.
The minimum signals to preserve for PlotJuggler are:
| Signal | Why it matters |
|---|---|
qj[i] |
Where the joint actually is |
dqj[i] |
Whether the joint is oscillating, spiking, or lagging |
gravity_orientation[0:3] |
Whether the base/IMU tilt is plausible |
target_dof_pos[i] |
Where the policy or IK wants the joint to go |
tau[i] |
Whether the PD command is too aggressive before hardware |
The quickest way to get .pkl logs into PlotJuggler is to convert them to CSV:
import glob
import pickle
import pandas as pd

rows = []
for path in sorted(glob.glob("save_mujoco_data/run_teleoperation/*.pkl")):
    with open(path, "rb") as f:
        d = pickle.load(f)
    row = {}
    for i, v in enumerate(d["proprioception"]["qj"]):
        row[f"qj/{i}"] = float(v)
    for i, v in enumerate(d["proprioception"]["dqj"]):
        row[f"dqj/{i}"] = float(v)
    for i, v in enumerate(d["proprioception"]["gravity_orientation"]):
        row[f"gravity_orientation/{i}"] = float(v)
    for i, v in enumerate(d["target_dof_pos"]):
        row[f"target_dof_pos/{i}"] = float(v)
    for i, v in enumerate(d["tau"]):
        row[f"tau/{i}"] = float(v)
    rows.append(row)

pd.DataFrame(rows).to_csv("g1_openwbt_log.csv", index_label="sample")
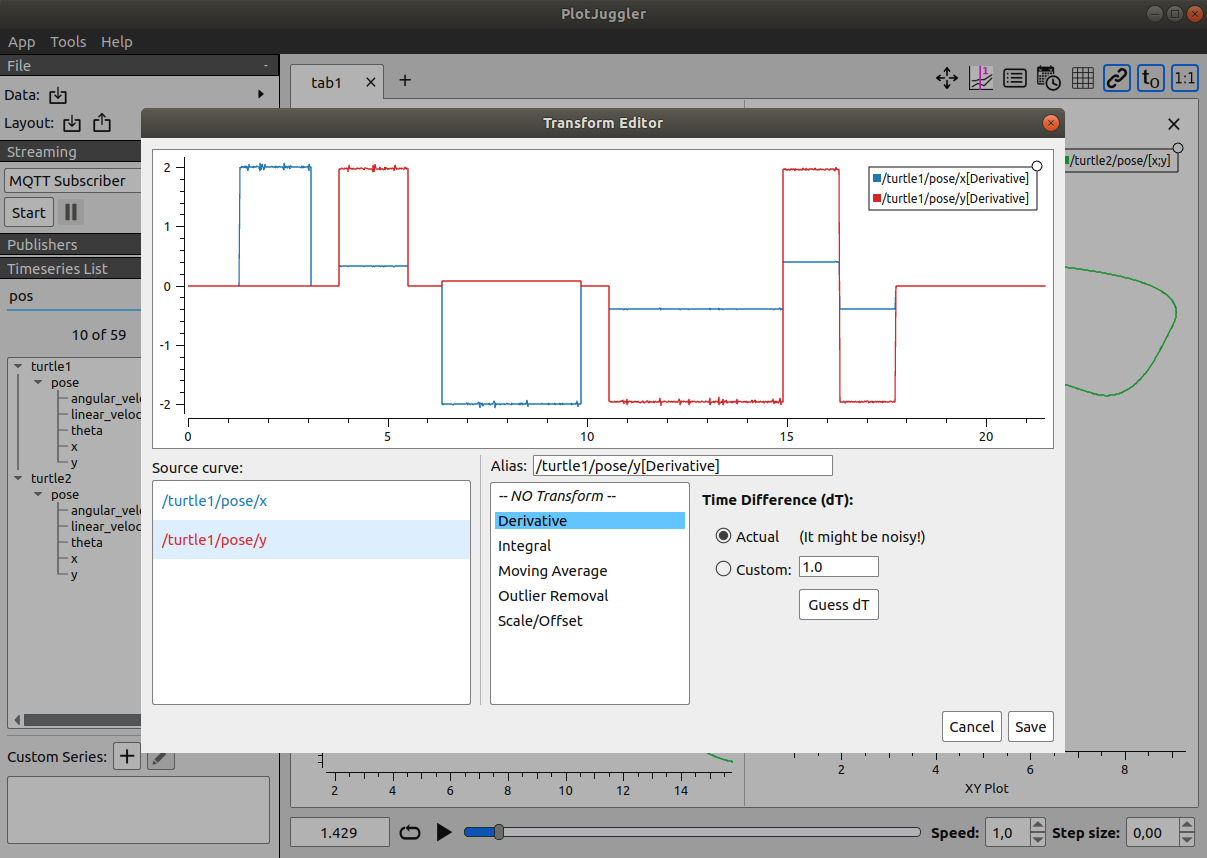
In PlotJuggler, place qj/<joint> and target_dof_pos/<joint> in the same panel. qj should follow the target with reasonable lag and no impossible jumps. Put dqj/<joint> in another panel to see oscillation. Put tau/<joint> in its own panel because torque spikes are often the earliest sign of bad gains, a target jump, a joint-index mismatch, or an IK frame error.
Checklist 6: compare sim and real with the same PlotJuggler layout
Do not inspect simulation logs one way and real logs another way. Create a fixed PlotJuggler layout:
| Panel | Curves |
|---|---|
| Leg tracking | qj/0..11 and target_dof_pos/0..11, grouped by hip/knee/ankle |
| Waist | qj/12..14, target_dof_pos/12..14 |
| Arm IK | qj/15..28, target_dof_pos/15..28 |
| Base orientation | gravity_orientation/0, /1, /2 |
| Velocity sanity | Important dqj/<joint> curves |
| Torque guard | tau/0..28 and a max curve if you compute one |
For the 29-DoF G1 layout used by OpenWBT, indices 0-11 are legs, 12-14 are waist, 15-21 are the left arm, and 22-28 are the right arm. OpenWBT uses action_hl_idx for the two arms:
action_hl_idx:
  [15, 16, 17, 18, 19, 20, 21,
   22, 23, 24, 25, 26, 27, 28]
In Part 5, we saw that VR IK only writes into this group after clipping sol_q around the current target by ±0.01 rad. In this article, your job is to check the effect of that clipping in logs. If target_dof_pos/15..28 is smooth but qj/15..28 oscillates, the issue may be gains or dynamics. If target_dof_pos itself jumps, the issue is more likely IK, VR tracking, frame transforms, or the rate limiter.
When comparing sim and real, do not expect perfect overlap. What you need is the same trend and no dangerous abnormality: no unexpected sign flips, no repeated torque spikes, no joint tracking target in the wrong direction, and no base-orientation drift while the robot is standing still. If a joint already has excessive torque in simulation, it usually will not magically become safe on the real robot. Simulation should be clean first.
Checklist 7: the torque guard is the final gate
In the real runner, OpenWBT computes tau_record from a PD expression:
self.tau_record[motor_idx] = (
    (target_pos[j] - self.low_state.motor_state[j].q) * controller.kps[j]
    - self.low_state.motor_state[j].dq * controller.kds[j]
)
Before publishing the command, send_cmd() checks:
if abs(self.tau_record).max() > 100:
    print("large tau: ", np.arange(29)[abs(self.tau_record) > 100])
    create_damping_cmd(self.low_cmd)
    cmd = self.low_cmd
This is the most important checkpoint in the article. If abs(tau_record).max() > 100 is triggered, the controller has not passed. It is asking at least one motor for too much torque under the current PD formula. The cause may be a target too far from the current position, a joint-index mismatch, a wrong default pose, overly high gains, excessive velocity, or stale state feedback. The right response is not to raise the threshold. The right response is to go back to the log, find the joint printed by "large tau", and inspect qj, dqj, target_dof_pos, and tau for that joint.
A practical pass/fail workflow:
- Run MuJoCo with
--save_data, without the real robot. - Convert
.pkllogs to CSV or another PlotJuggler-readable format. - Open the fixed layout and inspect tracking.
- Compute
max(abs(tau))per file and for the whole session. - If any sample exceeds 100, fix it in simulation first.
- Once simulation passes, run the real program with
--debugto verify network, topics, and state. - Remove
--debugonly after damping, default pose, logs, and torque all look sane.
A quick checker:
import glob
import pickle
import numpy as np

max_tau = 0.0
worst = None
for path in sorted(glob.glob("save_mujoco_data/run_teleoperation/*.pkl")):
    with open(path, "rb") as f:
        d = pickle.load(f)
    tau = np.asarray(d["tau"])
    value = float(np.abs(tau).max())
    if value > max_tau:
        max_tau = value
        worst = (path, np.where(np.abs(tau) > 100)[0].tolist())

print("max abs(tau):", max_tau)
print("samples over 100:", worst)
If worst contains joint indices, map them back to the robot. On G1, indices 15-28 are arms and upper body, so failures there often involve IK or arm targets. Indices 0-11 are legs, so failures there usually involve the squat/loco policy, joystick command, default pose, or contact in simulation.
Checklist for a complete deployment session
For beginners, this is the workflow I recommend:
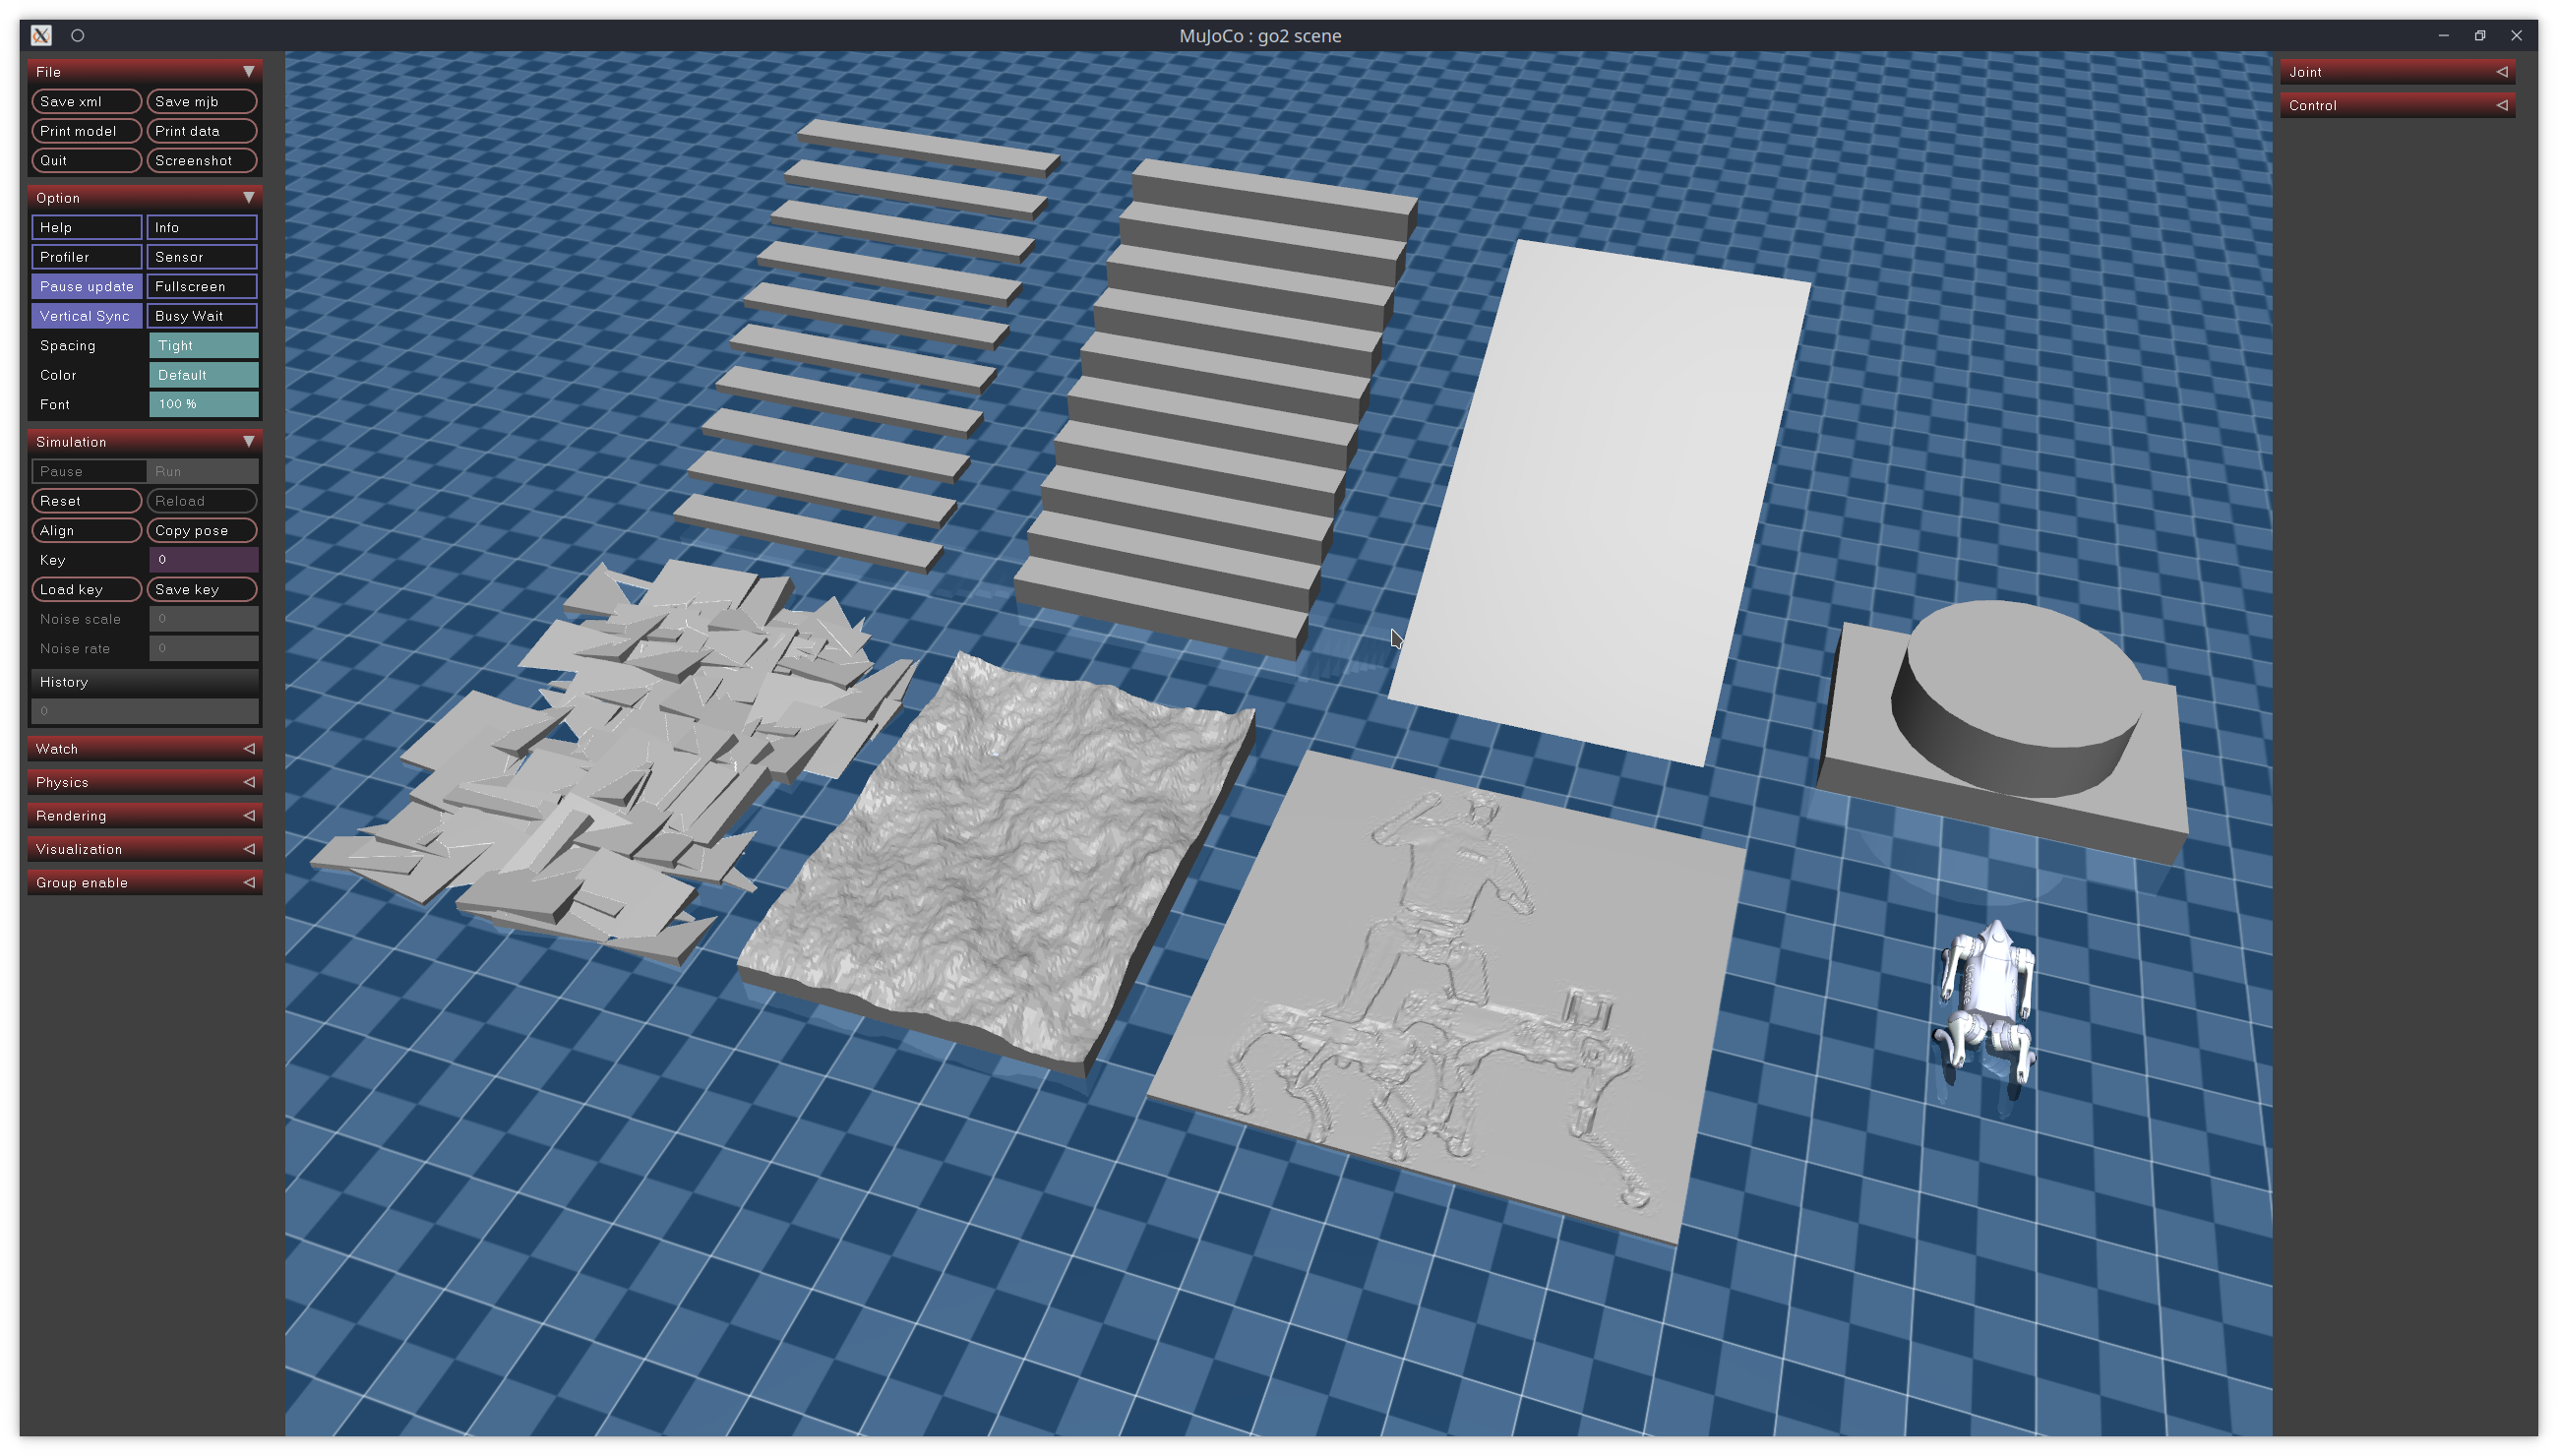
# 1. Run MuJoCo, domain 1, loopback
cd unitree_mujoco/simulate
./build/unitree_mujoco -r go2 -s scene_terrain.xml

# 2. Run the SDK2/Python or ROS 2 example on domain 1
cd ../example/python
python3 ./stand_go2.py

# 3. Run OpenWBT MuJoCo and record raw data
cd /path/to/OpenWBT
source /opt/ros/foxy/setup.sh
source ~/unitree_ros2/setup.sh
python -m deploy.run_teleoperation_mujoco --config run_teleoperation.yaml --save_data

# 4. Convert pkl to CSV, open PlotJuggler, inspect qj/dqj/gravity/target/tau
# 5. Only after passing, check the real robot in debug mode
python -m deploy.run_teleoperation_real --config run_teleoperation.yaml --net eno1 --debug --save_data
Before removing --debug, ask:
| Question | Pass condition |
|---|---|
| Is the robot in damping mode? | The Unitree remote entered damping and OpenWBT publishes damping before start |
Is LowState arriving? |
wait_for_low_state() does not hang and the log contains qj/dqj/imu |
| Are the topics correct? | rt/lowcmd, rt/lowstate, msg_type: "hg" |
| Is the domain correct? | Simulation is 1, real hardware is 0 |
| Is the NIC correct? | --net is the Ethernet interface connected to the robot |
| Is the torque guard clean? | abs(tau_record).max() stays below 100 during sim and dry run |
| Does the operator have a kill path? | Joystick damping signal works and people stay outside the danger zone |
Only then should you remove --debug. Even then, the first real session should be short: stand still, squat lightly, stop, inspect logs. Then increase command amplitude gradually. Sim-to-real is not one jump. It is a sequence of small measurements.
Conclusion
The final article in this series turns the work into an operating standard: use the correct transport (ChannelFactoryInitialize(1, "lo") for simulation, ChannelFactoryInitialize(0, argv[1]) for hardware), the correct ROS domain (ROS_DOMAIN_ID=1 for simulation, 0 for the real robot), the correct G1 message type (hg), the correct topics (rt/lowcmd, rt/lowstate), a real damping command, .pkl logging, PlotJuggler comparison of qj/dqj/gravity_orientation/target_dof_pos/tau, and a torque guard that does not trigger.
If you remember only one sentence, remember this: a controller that has not passed PlotJuggler should not meet the real robot. MuJoCo makes mistakes cheaper. PlotJuggler makes mistakes visible. The torque guard helps prevent a visible mistake from becoming dangerous behavior on hardware.