Why YUBI matters
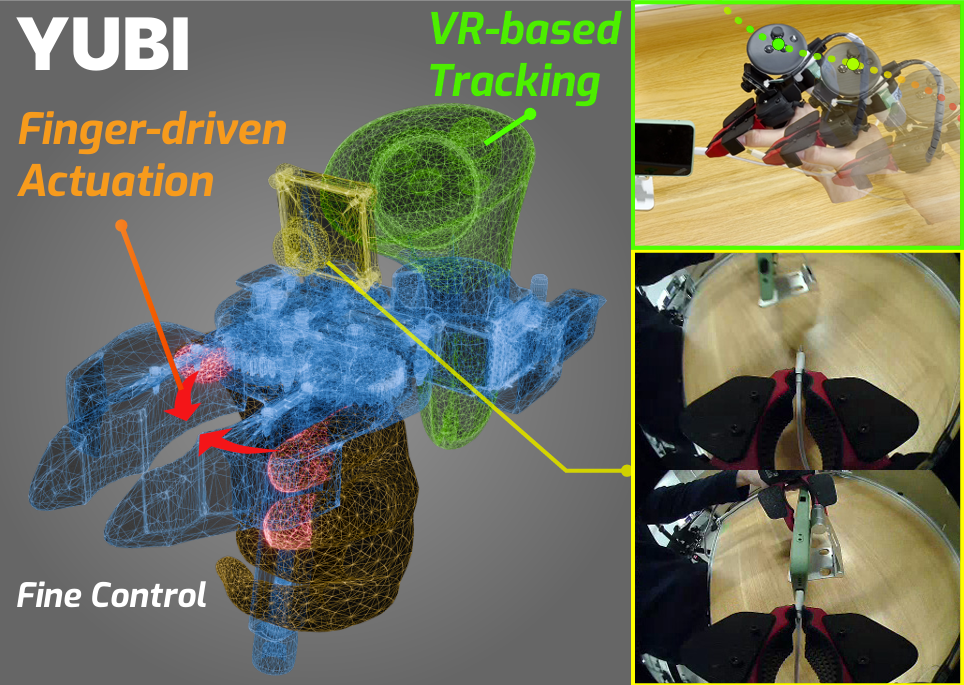
YUBI stands for Yielding Universal Bidigital Interface. It is an open-source bimanual gripper and data-collection stack introduced by Toyota Motor Corporation's Frontier Research Center and AIRoA in the June 2026 technical report arXiv 2606.10244. The core idea is simple and useful: instead of collecting demonstrations by driving a full robot, and instead of using a bulky pistol-grip UMI device, YUBI maps the operator's natural finger pinch motion directly to the gripper jaw opening.
Each operator holds two YUBI devices, one per hand. Each device carries a wrist camera, a Quest controller for 6 DoF pose tracking, and an encoder for gripper aperture. The stack records synchronized ROS 2 topics, converts the raw recordings into LeRobot format, and uses them to train robot policies. The paper reports a very large dataset: 8,434 hours, 1.20M episodes, 119 tasks, collected on 22 desks by 179 operators. A single VLA policy based on pi0.5 is then trained in an end-effector trajectory action space and deployed across multiple bimanual robots, including UR, Franka, and Toyota ELEY, by mounting the same YUBI gripper as the common end-effector.
This is important for VLA work because it attacks the data bottleneck. If the demonstration is recorded in the gripper's action space instead of a robot-specific joint space, the data can be reused more easily when you switch robot arms. This guide walks through the paper idea, hardware architecture, software setup, LeRobot conversion, training, inference, and reported results. It is not a replacement for the official assembly PDFs, but it gives you the engineering map you need before you start ordering parts and recording data.
Primary sources
Read these first:
- Paper: YUBI: Yielding Universal Bidigital Interface for Bimanual Dexterous Manipulation at Scale
- Project page: https://yubi.airoa.io/
- Hardware repo: Toyota/yubi-hw
- Software repo: airoa-org/yubi-sw
- Data app: airoa-org/yubi-app
- ROS bag to LeRobot converter: airoa-org/rebake
- LeRobot: huggingface/lerobot
The hardware repository publishes CAD, STL files, BOMs, and assembly instructions under CERN-OHL-W v2. The software repository provides the operator-side bringup, encoder firmware, ROS 2 nodes, Docker Compose workflow, Quest setup, and backend integration. rebake is the bridge from robot logging to machine learning: it decodes ROS bags or MCAP files into a queryable Parquet + video intermediate format, then exports a LeRobot v2.1 dataset. YUBI is therefore not just a gripper. It is a reproducible data-acquisition stack.
The paper idea in one diagram
Human finger motion
  -> YUBI gripper aperture
  -> wrist RGB + 6 DoF gripper pose + jaw angle
  -> ROS 2 topics
  -> rosbag2 / MCAP recording
  -> rebake intermediate: Parquet + videos
  -> LeRobot v2.1 dataset
  -> VLA / imitation policy training
  -> robot inference through IK + end-effector control
The original Universal Manipulation Interface, or UMI, reduces the embodiment gap by letting humans manipulate a handheld gripper that matches the robot end-effector. The demonstration is no longer a human hand motion that must be retargeted to a robot hand; it is already a robot-gripper motion. YUBI keeps that principle but changes the interface.
| Component | Pistol-grip UMI style | YUBI |
|---|---|---|
| Human input | Pistol-style handle | Thumb against index/middle fingers |
| Mass reported in paper | about 780 g | about 319 g: 200 g gripper + 119 g controller |
| Tracking | SLAM or VR, depending on system | VR-based Quest tracking |
| Haptic feel | Offset between hand and pinch point | Finger-aligned, more direct feedback |
| Main target | Robot-free demonstrations | Large-scale bimanual dexterous data |
The paper highlights two bottlenecks in previous UMI-style systems. First, pistol-grip devices place the user's fingers away from the actual pinch point, which hurts fine tasks such as picking small nuts, inserting objects, assembling boxes, folding, or cable-like manipulation. Second, SLAM tracking can drift, while VR tracking becomes tiring if the operator must wear a headset for long sessions. YUBI mounts the Quest controllers on the grippers and places the Quest HMD on a fixed rig for tabletop collection, keeping high-fidelity tracking without loading the operator's neck.
Hardware architecture
The Toyota/yubi-hw repository is organized around four hardware groups:
| Group | Role | Repository location |
|---|---|---|
| YUBI Glove | Wearable device for collecting finger motion during teleoperation | STEP/glove, STL/glove |
| YUBI Gripper | Robot-mounted gripper actuated by DYNAMIXEL servos | STEP/gripper, STL/gripper |
| Stationary desk | Desk-mounted rig for stable tabletop data collection | STL/stationary, docs |
| Portable rig | Wearable rig for household and in-the-wild collection | STEP/portable, STL/portable |
A tabletop setup in the paper includes:
- Two YUBI devices, left and right.
- A wrist camera on each gripper.
- A Quest controller mounted to each gripper for 6 DoF tracking at about 80 Hz.
- A magnetic encoder for jaw aperture at about 100 Hz.
- A RealSense D435 top-view camera at 30 Hz, capturing RGB + depth for workspace monitoring and preprocessing.
- A foot pedal for hands-free action segmentation.
- A laptop or workstation running Docker, ROS 2, the web UI, and storage/upload services.
The high-level wiring looks like this:
             RealSense D435
                  |
          fixed tabletop frame
                  |
Quest HMD ---- tracks ---- Quest controllers
                            |             |
                         YUBI L        YUBI R
                      wrist cam      wrist cam
                      encoder        encoder
                            \         /
                             ROS 2 graph
                                  |
                         recording + upload
For portable collection, the HMD is chest-mounted and the top camera is replaced with an egocentric fisheye camera. The data schema remains compatible with tabletop episodes. That means you can start with a fixed desk, debug the entire data path, and later collect tasks that require whole-body motion, such as putting a tray into a dishwasher, placing books on a shelf, or hanging a shirt.
Hardware build checklist
Start with the BOM and assembly instructions in Toyota/yubi-hw/docs. Do not print the whole system before checking the release version, because the hardware repo has already published STL fixes. For a beginner build, assemble and test one subsystem at a time.
1. Read the BOM
   - Check fasteners, bearings, sensors, cables, and servos.
   - Separate "must match exactly" parts from replaceable parts.

2. Print the 3D parts
   - Use the official STL files.
   - Print a small tolerance test before a full batch.
   - Follow the print orientation in the assembly guide when specified.

3. Assemble the gripper mechanics
   - Verify smooth jaw opening and closing.
   - Avoid overtightening small joints.
   - Make sure the finger path does not rub against the shell.

4. Mount camera, encoder, and Quest controller
   - Add strain relief to cables.
   - Physically label left and right cameras.
   - Make the encoder zero/min position repeatable.

5. Test by hand before software
   - Open and close the jaws 100 times.
   - Pick light objects, small objects, and moderate heavy objects.
   - Watch for backlash, flex, or mechanical sticking.
The paper states that each YUBI gripper can be fabricated for under 200 USD, excluding the Quest 3S tracking system. That is a major advantage compared with leader-follower teleoperation, where every collection station needs a physical robot. Still, the real station cost includes cameras, Quest hardware, laptop, desk frame, storage, cabling, 3D printing time, and calibration labor. If you are starting a small lab setup, build one desk and 10-20 tasks first instead of trying to reproduce the paper's 22-desk operation.
Software setup
The airoa-org/yubi-sw repository requires Docker, Docker Compose, and Make. It includes firmware for Seeed XIAO ESP32C6 boards reading AS5601 encoders, the ROS 2 bringup, stationary and portable configs, footpedal support, Quest bridge, web video server, and backend connectivity.
A practical setup flow:
# follow the official yubi-sw guide for exact details
git clone https://github.com/airoa-org/yubi-sw.git --recursive
cd yubi-sw

# flash encoder firmware once per board
# DEVICE_ID should be L### or R###, for example L003 / R003

cd tools
sudo -E bash yubi_udev_setup.sh
# for a portable rig:
sudo -E bash yubi_udev_setup.sh --variant portable
The udev setup script opens a GUI that lets you assign left/right cameras, assign left/right encoders, and capture the MIN value for each closed gripper. It writes /etc/yubi/encoder_limits.yaml and /etc/udev/rules.d/99-yubi.rules. This step deserves care. If cameras are swapped or encoder directions are wrong, you may still record episodes, but the dataset will be mislabeled.
Then configure the environment:
cp .env.example .env

# in .env:
ROBOT_VARIANT=stationary
# or:
ROBOT_VARIANT=portable
Build and run:
make docker
docker compose up -d
The yubi container launches ros2 launch yubi_bringup yubi_data_collection.launch.py. That starts USB cameras, the RealSense pipeline, the footpedal node, rosbridge websocket, and the task command dispatch node. For debugging inside the container:
ros2 topic list
ros2 topic hz /camera/left/image_raw
ros2 topic hz /encoder/left
ros2 launch yubi_bringup yubi_data_collection.launch.py
Quest setup is also required. YUBI uses a sideloaded Quest app. The software repo explains how to download the APK, enable Developer Mode, and install it with adb install -r. If you use wired DHCP over USB-Ethernet, tools/yubi_dhcp_setup.sh can make the operator machine serve a fixed IP to the headset. In local config, set quest_ip to the headset address and set the backend base_url when connecting to yubi-app.
Data app and episode recording
yubi-app is the web platform for managing robots, tasks, episodes, and storage. The backend uses Go, Gin, Bun, PostgreSQL, and Redis. The frontend uses Next.js, TypeScript, React, Radix UI, and Tailwind. A local setup looks like this:
git clone https://github.com/airoa-org/yubi-app.git
cd yubi-app
cp backend/.env.example backend/.env
cp frontend/.env.sample frontend/.env
make up
make migrate
make seed
Default service URLs:
| Service | URL | Purpose |
|---|---|---|
| Frontend | http://localhost:3000/web |
create tasks and inspect episodes |
| Backend API | http://localhost:8000 |
robot/backend API |
| LocalStack or MinIO | depends on compose | S3-compatible storage |
The recording workflow should be deliberately simple:
1. Create a robot in the web app.
2. Create a task, for example "pick up the cup and place it on the plate".
3. Assign the task to the robot/data station.
4. Operator holds left and right YUBI devices.
5. Foot pedal starts the segment.
6. Operator performs the sub-action.
7. Foot pedal ends the segment.
8. Episode uploads to storage.
9. Reviewer rejects broken episodes.
According to the paper, each YUBI episode stores two wrist camera streams, a top RealSense stream, relative poses expressed in wrist frames, task/sub-action metadata, translations t_right and t_left, Euler rotations r_right and r_left, and jaw angles d_right and d_left. Sensor streams are recorded at native frequency and later standardized to 30 Hz when converted to LeRobot. For VLA training, 30 Hz is a good compromise: high enough for visual-action alignment, but not so high that the dataset becomes unmanageable.
Convert to LeRobot with rebake
ROS bags are excellent for logging, but poor as a direct training format. Every training run would need to parse serialized messages, rebuild transforms, align clocks, and decode camera streams. rebake solves this by converting logs once into a queryable Parquet + video intermediate representation, then exporting LeRobot v2.1 datasets.
git clone --recursive https://github.com/airoa-org/rebake.git
cd rebake
docker compose -f docker/docker-compose.yml up -d --build
docker compose -f docker/docker-compose.yml exec rebake-dev bash
just build

# decode bags / MCAP files into an intermediate dataset
rebake-cli export ./yubi_recordings -o ./out -j 8

# bake a LeRobot dataset
rebake-cli run ./yubi_recordings -c config/pipeline/yubi.yaml -j 8
A LeRobot output should look like this:
lerobot_dataset/
├── meta/
│   ├── info.json
│   ├── episodes.jsonl
│   ├── tasks.jsonl
│   └── episodes_stats.jsonl
├── data/
│   └── episode_*.parquet
└── videos/
    ├── observation.images.left_wrist/
    └── observation.images.right_wrist/
Before training, load and inspect a few episodes:
from lerobot.datasets.lerobot_dataset import LeRobotDataset

dataset = LeRobotDataset("local/yubi_demo")
print(dataset.features)
print(dataset.num_episodes)
sample = dataset[0]
print(sample.keys())
Common data issues:
| Problem | Symptom | Fix |
|---|---|---|
| Left/right camera swap | Left hand appears in the right video | rerun udev setup and swap cameras |
| Encoder not changing | Jaw angle is constant | check USB, firmware DEVICE_ID, and MIN capture |
| Pose jumps | Quest loses tracking | check HMD field of view, lighting, and controller battery |
| Action/image misalignment | policy learns slowly | check timestamps, 30 Hz resampling, and footpedal segments |
| Wrong task label | model follows the wrong command | review task assignment and metadata |
Policy training
The paper uses a VLA policy based on pi0.5, conditioned on natural-language instructions and wrist RGB images at 30 Hz. The model predicts relative end-effector poses in action chunks, for example 32 future steps. This is a reasonable choice because the paper notes that diffusion policy converges quickly on simple single-arm tasks but struggles to generalize to complex bimanual tasks. A pretrained VLA brings language grounding and broader visual priors.
Do not train a full VLA from scratch for your first test. Use a staged plan:
Stage 1: sanity model
  - 1 task
  - 50-200 high-quality episodes
  - ACT or Diffusion Policy
  - goal: prove that observation/action formatting is correct

Stage 2: small multi-task model
  - 5-10 tasks
  - 100-300 episodes per task
  - train with language instructions
  - goal: verify task conditioning

Stage 3: VLA fine-tuning
  - 20+ tasks
  - many objects, backgrounds, and operators
  - pi0.5, OpenVLA, or SmolVLA depending on compute
  - goal: generalize across tasks and objects
A pseudo-config:
dataset:
  repo_id: local/yubi_demo
  fps: 30
  cameras:
    - observation.images.left_wrist
    - observation.images.right_wrist
  state:
    - left_gripper_pose
    - right_gripper_pose
    - left_jaw_angle
    - right_jaw_angle

policy:
  type: vla
  backbone: pi0_5_or_openvla
  action_space: relative_end_effector_pose
  action_chunk_size: 32
  language_conditioning: true

training:
  batch_size: 16
  lr: 1e-5
  augmentations:
    - color_jitter
    - random_crop
    - mild_camera_noise
For a beginner project, the first metrics should not be real-robot success rate. Measure cheaper signals first: per-task loss, action reconstruction error, jaw-angle error, predicted trajectory replay on videos, and the percentage of rejected episodes. Once offline metrics look sane, move to slow real-robot rollouts.
Real-robot inference
YUBI makes deployment cleaner because the policy predicts gripper trajectories rather than robot-specific joint commands. During inference:
instruction + wrist images
  -> VLA policy
  -> relative end-effector pose chunk
  -> safety filter
  -> per-robot IK solver
  -> joint targets
  -> low-level robot controller
The paper reports inference using wrist camera and trajectory data, not the top-view observations. Predicted trajectories are executed at a lower control rate, for example 10 Hz, so the commanded motion stays inside robot velocity and acceleration limits. This matters. Human demonstrations can be fast and sharp, but real robot arms have joint limits, singularities, collision constraints, and controller bandwidth limits.
Safety checklist:
- Run dry rollouts without objects.
- Enforce a workspace bounding box.
- Clamp delta position and delta rotation per step.
- Limit jaw closing force or servo current when possible.
- Keep a physical E-stop reachable.
- Log every command and observation.
- Increase speed only after 20-50 stable rollouts.
Across UR, Franka, and ELEY, the robot-specific pieces are IK, collision model, controller interface, and safety limits. The shared piece is the YUBI gripper action space. That is why the paper can train one multi-task policy and deploy it across kinematically different platforms after mounting the same gripper.
Reported results
Key numbers from the paper:
| Item | Result |
|---|---|
| Dataset duration | 8,434 hours |
| Episodes | 1.20M |
| Video-language-action triplets | 6.80M demos/sub-actions |
| Tasks | 119 |
| Average sub-actions per task | 7.99 |
| Collection stations | 22 desks |
| Operators | 179 |
| YUBI handheld mass | about 319 g |
| Per-gripper fabrication | under 200 USD, excluding Quest 3S |
The user study uses 10 operators with no prior UMI or YUBI experience. In the dexterity test, operators pick and place hex nuts from M10 down to M3. Both UMI and YUBI perform well on larger nuts, but YUBI is better on smaller objects: the paper reports a +20 percentage point advantage at M6, +10 percentage points at M5, and roughly 3x performance at M3. In the operational efficiency test, YUBI is faster than UMI on all five tasks, with speedups from 1.37x to 4.19x.
Robot deployment is evaluated over 20 rollouts per task:
| Robot | Task | Success |
|---|---|---|
| Bimanual UR | Ball in basket | 20/20 |
| Bimanual UR | Stack cup pyramid | 13/20 |
| Bimanual Franka | Unfold glasses | 9/20 |
| Bimanual Franka | Pick and place socks | 18/20 |
| ELEY | Tape in box | 18/20 |
| ELEY | Cup placement | 11/20 |
These numbers do not mean every manipulation task is solved. The paper is explicit about limitations: sub-millimeter precision, tactile-sensitive tasks, tight cable insertion, and fragile material handling remain difficult. The best recipe for combining YUBI data with in-the-wild video and real robot datasets is still open. Using the entire 8,434-hour dataset for large-scale VLA pretraining is also left as future work. Still, the evidence is strong enough to show that YUBI is more than a hardware gadget: it is a practical path to robot-executable data at scale.
A small-lab starting plan
For a first build, use a two-week plan:
Day 1-2: read the BOM, order parts, print tolerance tests.
Day 3-5: assemble one YUBI and test camera/encoder.
Day 6-7: assemble the second YUBI, run udev setup, verify ROS topics.
Day 8-9: start yubi-app, create tasks, record 20 episodes.
Day 10: convert with rebake and load LeRobotDataset.
Day 11-12: train a sanity ACT or Diffusion Policy on one task.
Day 13: replay predictions offline.
Day 14: if you have a robot, run slow inference inside a safety box.
Pick an easy first task: move a cup onto a plate, place tape into a box, or stack two blocks. Do not start with deformable folding. Bimanual manipulation is hard because failures can come from mechanics, tracking, cameras, timestamps, task labels, policy learning, IK, or the low-level controller. YUBI lowers the data-collection barrier, but it does not remove the need for disciplined data inspection.