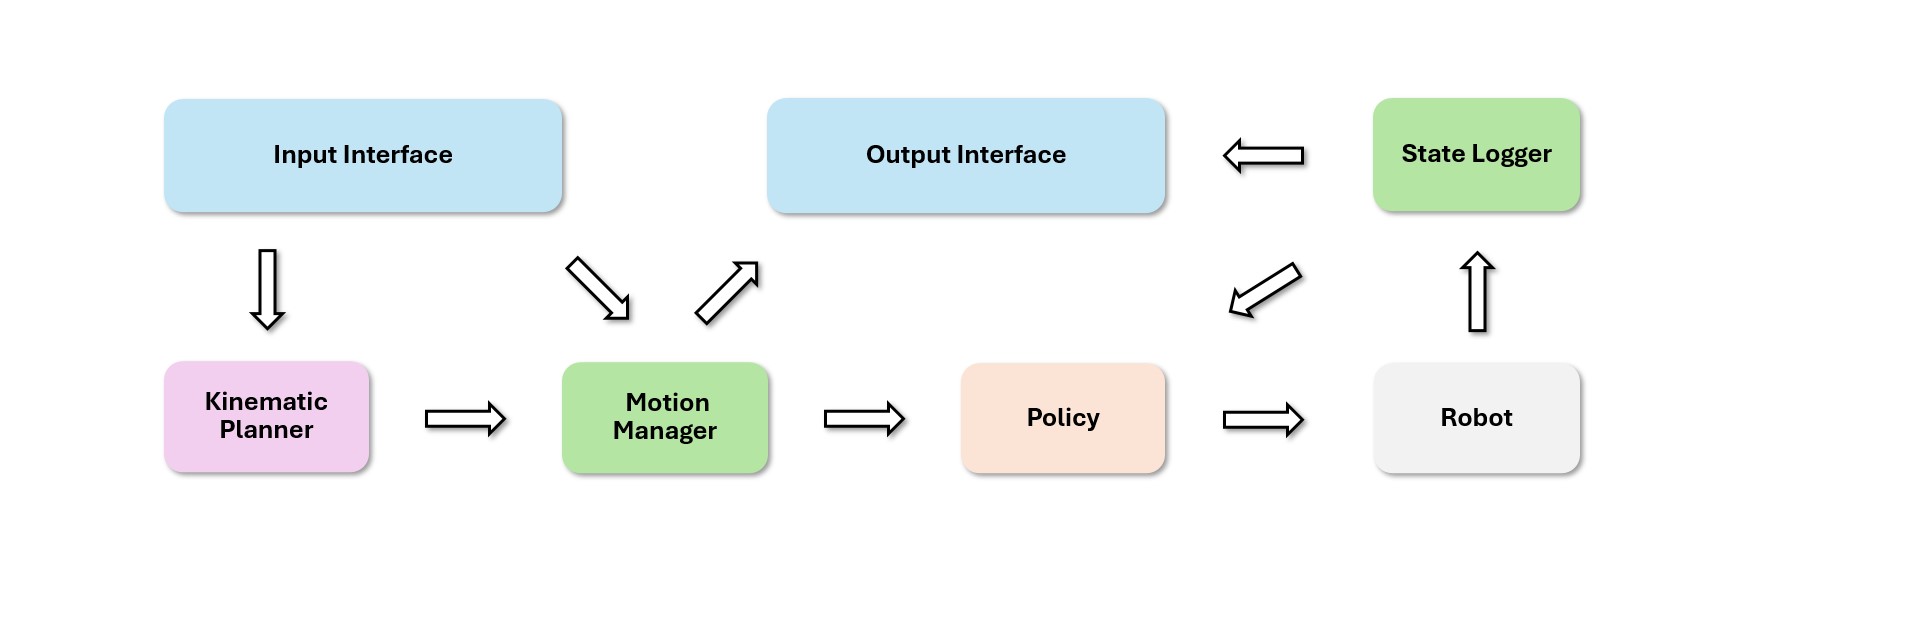
In part 1 of this series, we treated SONIC as a whole-body control architecture: a robot motion encoder, an SMPL human-motion encoder, a hybrid teleop encoder, a shared token space, and a decoder that outputs target joint positions for a humanoid robot. Part 2 moves from architecture to execution.
This article walks through the main simulation path in NVlabs/GR00T-WholeBodyControl: install the lightweight MuJoCo simulation environment with bash install_scripts/install_mujoco_sim.sh, run the simulator loop with python gear_sonic/scripts/run_sim_loop.py, run the C++ deployment stack with bash gear_sonic_deploy/deploy.sh sim, and then evaluate the policy in Isaac Lab with gear_sonic/eval_agent_trl.py.
The goal is not to retrain the large model. The goal is to verify that a downloaded SONIC policy runs correctly, understand how to use sample_data/robot_filtered and sample_data/smpl_filtered, know when ++eval_callbacks=im_eval matters, turn on video rendering with ++manager_env.config.render_results=True, and read the basic evaluation targets: success_rate > 0.97, mpjpe_l < 30 mm, and mpjpe_g < 200 mm.
Keep these technical sources open while you work:
| Source | Why it matters |
|---|---|
| GR00T-WholeBodyControl Quick Start | MuJoCo sim2sim commands, keyboard controls, and the two-terminal simulator/deployment flow |
| SONIC Training Guide | Isaac Lab eval command, sample-data overrides, render-video mode, and expected metrics |
| NVlabs/GR00T-WholeBodyControl repo | Folder layout, checkpoints, media, deployment scripts, and training stack |
| SONIC paper on arXiv | Benchmark context: success rate, MPJPE-L, sim-to-real transfer, and baseline comparisons |
1. The big picture: sim2sim versus eval
Before typing commands, separate two modes that are easy to confuse:
| Mode | Purpose | Main tool | Expected output |
|---|---|---|---|
| MuJoCo sim2sim | Watch the deployment policy control a robot in MuJoCo instead of on hardware | run_sim_loop.py + deploy.sh sim |
A MuJoCo viewer with a controllable humanoid |
| Isaac Lab evaluation | Run many reference motions in parallel and collect metrics | gear_sonic/eval_agent_trl.py |
Logs with success_rate, mpjpe_l, mpjpe_g; optional videos |
MuJoCo sim2sim is the “look at it with your own eyes” step. It checks the runtime path: simulator, policy loop, communication between simulator and deployment, keyboard control, motion selection, and emergency stop. If the robot stands still, falls immediately, or does not react to T, the issue is often environment setup, checkpoint loading, data paths, or startup order.
Isaac Lab evaluation is the “measure it with numbers” step. It does not replace sim2sim, because a metric can look good while a rendered clip reveals foot sliding or unstable recovery. The opposite is also true: one nice clip does not prove the policy is robust across many motions. For SONIC, the official training guide treats success_rate, mpjpe_l, and mpjpe_g as practical indicators of whether a checkpoint is converged and whether your local setup is reading the right data.
A simple mental model: sim2sim answers “does it run?”; eval answers “how well does it run?”.
2. Prepare the repo and checkpoint
This tutorial assumes you have cloned the repo:
git clone https://github.com/NVlabs/GR00T-WholeBodyControl.git
cd GR00T-WholeBodyControl
The repo uses Git LFS for several large assets. If you clone without pulling LFS objects, a file may exist on disk but contain only a tiny pointer. That creates confusing failures: meshes may not load, checkpoints may be incomplete, and media or ONNX files may look present while not being real binary files.
Run the LFS step before deeper debugging:
git lfs install
git lfs pull
For the SONIC release, you also need the model checkpoint and sample data described by the repo documentation. The training guide uses sonic_release/last.pt in its eval examples. The sample reference motions are usually addressed as:
sample_data/robot_filtered
sample_data/smpl_filtered
These two folders represent different reference formats. robot_filtered contains motion already represented as Unitree G1 robot trajectories. smpl_filtered contains processed human SMPL motion. The sonic_release configuration supports multiple encoders, so both paths often need to be available even if you are only trying one control route.
A beginner trap: the released checkpoint was trained in NVIDIA's internal environment, so the config.yaml embedded in the checkpoint may contain internal paths that do not exist on your machine. When evaluating the released checkpoint, override the motion paths with sample_data/robot_filtered and sample_data/smpl_filtered. If you are evaluating a checkpoint you trained locally and its config already points to valid local data, you can usually omit those overrides.
3. Install the MuJoCo simulator environment
From the repo root, run:
bash install_scripts/install_mujoco_sim.sh
The official Quick Start explains that this creates a lightweight .venv_sim virtual environment with only the packages needed by the simulator, including MuJoCo, Pinocchio, Unitree SDK2, and related runtime dependencies. That separation is intentional. SONIC training needs Isaac Lab and a heavier GPU simulation stack. The MuJoCo runtime should stay small so it is easier to debug and less likely to be broken by training dependencies.
After installation, verify the environment:
source .venv_sim/bin/activate
python -c "import mujoco; print('mujoco ok')"
If this import fails, do not start editing deployment scripts. Fix the sim environment first. In the official flow, the MuJoCo simulator runs on the host in .venv_sim. The deployment binary can run natively on the host or inside Docker, but the simulator side should stay on the host.
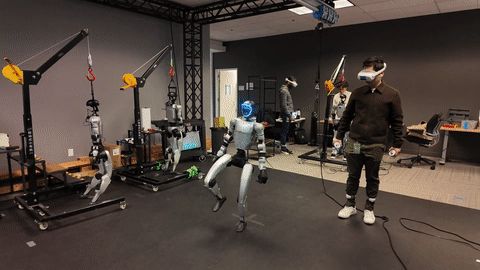
4. Run the MuJoCo sim loop in Terminal 1
Open your first terminal at the repo root:
cd GR00T-WholeBodyControl
source .venv_sim/bin/activate
python gear_sonic/scripts/run_sim_loop.py
This terminal owns the MuJoCo viewer and robot simulation. Leave it running. If the viewer does not appear immediately, wait a few seconds and check the log for missing assets, XML loading issues, or dynamic-library errors.
When the viewer appears, you are not yet controlling the policy. The simulator is like a virtual robot waiting for the deployment process to connect. This is a common source of confusion: run_sim_loop.py is not the full policy runtime. It is the simulation side. The policy runtime is started by the deployment process in a second terminal.
5. Run deployment in Terminal 2
Open a second terminal. The docs run this from gear_sonic_deploy/:
cd GR00T-WholeBodyControl/gear_sonic_deploy
bash deploy.sh sim
The sim argument tells the deployment stack to talk to the simulator rather than to a physical G1 robot. This is the correct place to test policy loading, interface-manager behavior, reference-motion selection, and stop commands before touching hardware.
If you use Docker for the deployment stack, keep Terminal 1 on the host with .venv_sim. Terminal 2 can be inside the container or run natively depending on your setup. The debugging principle stays the same: simulator first, deployment second, control start last.
6. Keyboard sequence for starting control
Once both terminals are ready, use this exact order:
- In Terminal 2, press
]to start the policy. - Click the MuJoCo viewer window.
- In the viewer, press
9to drop the robot to the ground. - Return to Terminal 2 and press
Tto play the current reference motion. - Press
NorPto switch to the next or previous motion sequence. - Press
Tagain to play the newly selected motion. - To replay a completed motion, press
Tagain. - To stop the current motion and return to its first frame, press
R. - For full stop or emergency stop, press
O.
Avoid random key presses until you understand the current state. For a humanoid policy, “waiting”, “policy started”, “robot dropped”, and “motion playing” are different states. If you press T before starting the policy, or forget to drop the robot, the logs may look like the policy is broken even though the startup sequence is the real issue.
7. How to read common sim2sim failures
When sim2sim does not work, classify the failure by layer:
| Symptom | Likely cause | What to check |
|---|---|---|
| MuJoCo cannot be imported | .venv_sim is not active or installation failed |
which python, python -c "import mujoco" |
| Viewer opens but robot does not react | Deployment is not connected or policy has not started | Check Terminal 2 and press ] |
| Robot falls immediately when motion starts | Wrong motion, wrong checkpoint, missing asset, or bad startup order | Try N/P, restart with R, inspect logs |
| Keys do nothing | Keyboard focus is on the wrong window or terminal | Click the viewer for viewer keys; use Terminal 2 for deployment keys |
| Docker run has no visible sim | Simulator is running in an environment without viewer/display support | Keep Terminal 1 on the host as recommended |
Do not tune the policy when the viewer or virtual environment is broken. Whole-body humanoid control is complex, but many first-day failures are basic: wrong Python, missing Git LFS assets, missing checkpoint, or running commands from the wrong directory.
8. Run Isaac Lab eval with sample data
After sim2sim is healthy, run quantitative evaluation. A practical metrics command for the released checkpoint is:
python gear_sonic/eval_agent_trl.py \
    +checkpoint=sonic_release/last.pt \
    +headless=True \
    ++eval_callbacks=im_eval \
    ++run_eval_loop=False \
    ++num_envs=128 \
    "+manager_env/terminations=tracking/eval" \
    "++manager_env.commands.motion.motion_lib_cfg.max_unique_motions=512" \
    "++manager_env.commands.motion.motion_lib_cfg.motion_file=sample_data/robot_filtered" \
    "++manager_env.commands.motion.motion_lib_cfg.smpl_motion_file=sample_data/smpl_filtered"
What each part means:
| Argument | Meaning |
|---|---|
+checkpoint=sonic_release/last.pt |
Load the released checkpoint |
+headless=True |
Run without an interactive viewer, useful for metrics |
++eval_callbacks=im_eval |
Enable imitation-evaluation callbacks and tracking metrics |
++run_eval_loop=False |
Run a finite evaluation instead of an interactive loop |
++num_envs=128 |
Run 128 environments in parallel |
+manager_env/terminations=tracking/eval |
Use the evaluation termination rule for tracking |
max_unique_motions=512 |
Limit the number of unique motions for a faster eval pass |
motion_file=sample_data/robot_filtered |
Override the robot-motion path |
smpl_motion_file=sample_data/smpl_filtered |
Override the SMPL-motion path |
If your GPU is small, start with num_envs=16 or num_envs=32. Increase it only after the command runs cleanly. Out-of-memory errors should first be handled by reducing num_envs, not by assuming the checkpoint or code is wrong.
9. Render videos from Isaac Lab eval
Metrics are not enough. Render a few clips:
python gear_sonic/eval_agent_trl.py \
    +checkpoint=sonic_release/last.pt \
    +headless=True \
    ++eval_callbacks=im_eval \
    ++run_eval_loop=False \
    ++num_envs=8 \
    ++manager_env.config.render_results=True \
    "++manager_env.config.save_rendering_dir=/tmp/sonic_renders" \
    ++manager_env.config.env_spacing=10.0 \
    "~manager_env/recorders=empty" "+manager_env/recorders=render" \
    ++manager_env.observations.policy.enable_corruption=False \
    ++manager_env.observations.tokenizer.enable_corruption=False \
    "++manager_env.commands.motion.motion_lib_cfg.motion_file=sample_data/robot_filtered" \
    "++manager_env.commands.motion.motion_lib_cfg.smpl_motion_file=sample_data/smpl_filtered"
Here ++manager_env.config.render_results=True is the key switch. save_rendering_dir chooses where videos are written. num_envs=8 is enough for a small batch of clips without producing too many files. env_spacing=10.0 keeps robots apart in the scene. The two enable_corruption=False overrides make render inspection cleaner, because when you are visually checking behavior you usually want noise and corruption disabled.
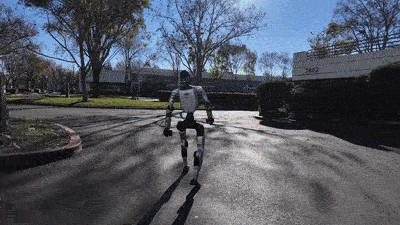
The rendered files are saved as 000000.mp4, 000001.mp4, and so on under /tmp/sonic_renders. When you watch them, check four things: whether the robot follows the reference, whether the feet slide excessively, whether the torso jitters, and whether the motion terminates early.
10. Understand success_rate, mpjpe_l, and mpjpe_g
Start with these three metrics:
| Metric | Expected target | Practical interpretation |
|---|---|---|
success_rate |
> 0.97 |
Fraction of motions tracked without early termination |
mpjpe_l |
< 30 mm |
Local mean per-joint position error, measuring pose accuracy relative to the body/root frame |
mpjpe_g |
< 200 mm |
Global mean per-joint position error, sensitive to overall position drift |
Low success_rate is the most serious warning. If many episodes terminate early, the policy is not merely “a little inaccurate”; it may be unstable, violating contacts, or drifting far from the reference. With the released checkpoint and correct sample data, you should expect to clear 0.97. If you see 0.6 or 0.7, suspect data paths, checkpoint mismatch, config overrides, assets, or environment versioning.
mpjpe_l tells you whether the robot keeps the correct motion shape. Because it is local, it reduces the effect of small global position errors. A target below 30 mm is tight for whole-body imitation. The SONIC paper reports MPJPE-L values around the 20-30 mm range across several evaluation splits, and the official training guide treats < 30 mm as a practical convergence target.
mpjpe_g is stricter in a different way because it is measured in the global frame. A robot can have good local pose matching but drift across the scene over time. In that case mpjpe_l may look acceptable while mpjpe_g is poor. In real deployment, global drift matters because the robot may step away from the intended workspace, collide with a table, or fail to reach the manipulation zone.
11. Smoke test or full evaluation?
Do not start with a full dataset when the repo is fresh. Use three layers:
| Layer | Configuration | When to use |
|---|---|---|
| Smoke test | sample_data, num_envs=8-32, max_unique_motions=32-128 |
Validate setup quickly |
| Serious sample eval | sample_data, num_envs=128, max_unique_motions=512 |
Compare small config or checkpoint changes |
| Full eval | data/motion_lib_bones_seed/robot_filtered and data/smpl_filtered |
Evaluate a trained or finetuned checkpoint |
Sample data does not represent the entire 142K+ motion set from BONES-SEED. It is for pipeline validation and examples. If you want to claim strong generalization, use the full dataset or a clearly defined held-out split. Still, sample eval is valuable because it gives you a fast regression test after changing configs, checkpoints, Isaac Lab environments, or deployment assets.
12. Checklist before trusting the numbers
Before writing “the policy reaches 98% success”, ask:
- Are you loading the intended checkpoint, not an old local file?
- Did you override the motion paths when evaluating the release checkpoint?
- Do
sample_data/robot_filteredandsample_data/smpl_filteredexist and contain real files? - Are you using the Isaac Lab environment version expected by the repo?
- Is
num_envshigh enough that the sample is not too noisy? - Did you render at least a few clips to inspect failure cases?
- Did you save the full eval command so someone else can reproduce the result?
In robotics, a metric without its command is not very useful. Changing the termination rule, motion split, or max_unique_motions can change the result. Record the checkpoint path, data path, number of environments, number of motions, and repo state whenever you use the result for research or internal benchmarking.
13. How this connects to the next parts
This article stops at running and measuring. In part 3, we will move into data and training: converting BONES-SEED CSVs, filtering motions, preparing SMPL/SOMA data, and understanding why motion tracking scales well as a humanoid learning task. Part 4 will then connect simulation to deployment runtime: ZMQ, C++ inference, ONNX export, and the checks you should run before sending a policy to real hardware. For broader simulator context, read MuJoCo for robotics simulation and Isaac Lab for robot learning.
The main habit from part 2 is simple: every whole-body policy needs both visual inspection and quantitative evaluation. MuJoCo sim2sim lets you see runtime behavior. Isaac Lab eval lets you measure stability and tracking error. When both agree, you have a reliable base for training, teleoperation, VLA integration, or real robot deployment.
References
- GR00T-WholeBodyControl Quick Start
- SONIC Training Guide
- NVlabs/GR00T-WholeBodyControl GitHub repo
- SONIC: Supersizing Motion Tracking for Natural Humanoid Whole-Body Control