BitVLA asks a practical robotics question: can a policy still understand images and instructions and control a manipulator when its main weight matrices have only three possible values? With robot.cpp, there is now a concrete deployment path: download four I2S GGUF files, start a C++ server, send two images and a robot state, and receive an action chunk.
On November 9, 2026, the authors announced robot.cpp as BitVLA's official inference framework. For two-image LIBERO inputs, they report 39 ms per action chunk on an RTX 3090 and 17 ms on an RTX 4090. These are developer-reported measurements, not new measurements performed for this tutorial. Source: robot.cpp announcement.
This guide covers the model idea, installation, inference, a small LIBERO rollout, training, and result interpretation. Keep three things together throughout: the checkpoint, its observation preprocessing, and its action conventions. A process that exits successfully does not establish that a robot policy was deployed correctly.
1. What BitVLA changes
A Vision-Language-Action model turns visual observations and a language instruction into robot actions. It may also receive proprioception: information about the robot's own physical configuration. In a manipulation task, the inputs describe both what the robot sees and where its end-effector and gripper currently are.
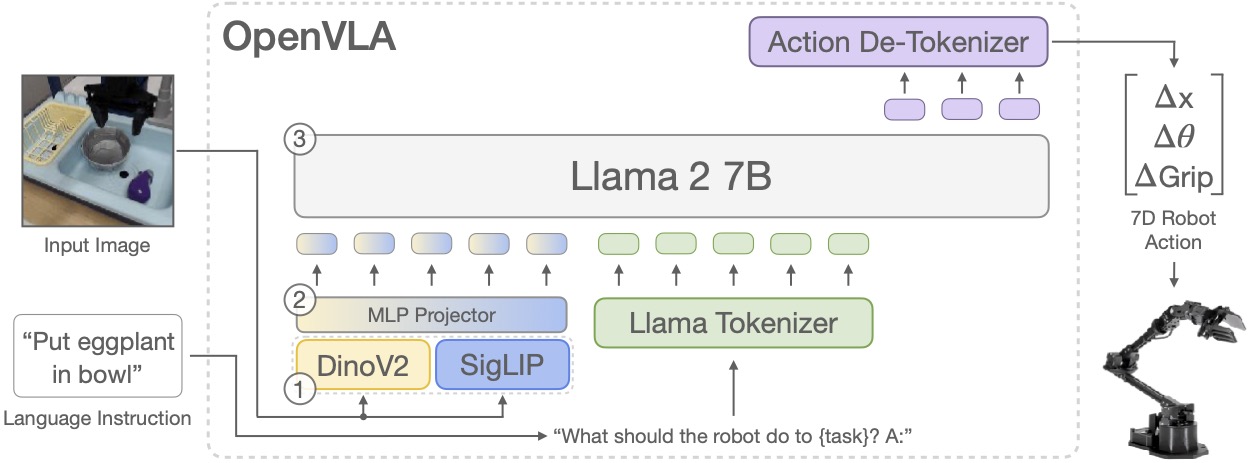
Large VLA models can be expensive to store and execute. BitVLA addresses this during learning. Its language backbone is BitNet b1.58 2B4T, while a SigLIP-L vision encoder is compressed through Quantize-then-Distill. The main low-bit weights take ternary values, conventionally written as negative one, zero, and positive one, with scaling applied as needed.
Three states correspond to a theoretical information content of log2(3) ≈ 1.585 bits. The phrase “1-bit VLA” therefore does not mean that every parameter in a deployed file occupies exactly one bit. Small components, including the vision-language connector and continuous action head, retain higher precision. Runtime GGUF files also contain BF16/F32 tensors outside the packed matrix groups. Source: BitVLA architecture and training.

2. Architecture: two cameras, one action chunk
For the LIBERO configuration discussed here, the data flow is:
External camera + wrist camera, RGB 224×224
                     |
              Low-bit SigLIP-L
                     |
              Feature connector ---- Tokenized instruction
                     |                        |
                     +----- BitNet b1.58 ------+
                                  ^
                        8D robot-state projector
                                  |
                        Continuous action head
                                  |
                           8 × 7 action chunk
The paper's vision encoder produces 256 visual tokens for each 224×224 image. The external camera provides scene context; the wrist camera provides a closer view around the gripper. The eight state values comprise three end-effector coordinates, three axis-angle orientation components, and two gripper values.
An action chunk contains eight rows of seven control values. A typical client executes one row per environment step, consumes the whole chunk, and then requests another prediction. This reduces inference calls but introduces a short open-loop interval. Changing how many rows are executed before replanning changes the evaluation protocol.
robot.cpp separates the policy into language, vision, proprioception, and action GGUF components. A persistent model-server holds the components in memory, and a model-client exchanges observations and predictions over TCP. The C++ inference runtime does not require PyTorch. Simulation, conversion, and training still have their own Python dependencies. Source: robot-server documentation.
3. What I2S actually packs
The paper describes absmean weight quantization and per-token absmax activation quantization. During training, higher-precision master weights remain available for optimization, while the forward pass uses the low-bit representation. Downloading a BF16 training checkpoint does not itself provide the storage and runtime savings of a packed inference checkpoint.
The robot.cpp converter applies BitVLA's WeightQuant and packs verified ternary matrices into i2s-matrix-v1. The current packer stores four two-bit codes per byte and includes a matrix scale. It asserts that reconstructing the codes and scale recovers the input ternary matrix. This is a specialized representation of a model trained with low-bit constraints, rather than a generic instruction to compress any BF16 VLA to the same precision.
Use the patched robot.cpp runtime. These files are not intended for an unrelated standalone llama.cpp executable. Keep all four components from the same checkpoint: mixing a Spatial backbone with a Goal action head or normalization statistics creates a different, unsupported policy. Sources: I2S packing implementation, Spatial GGUF model card.

4. Prepare the machine and checkpoint
Linux with an NVIDIA GPU is the most direct starting point for comparison with the published CUDA measurements. Install a working driver, CUDA Toolkit with nvcc, a C/C++ compiler, CMake 3.16 or newer, and Conda for the Python tools. Check the basics first:
nvidia-smi
nvcc --version
cmake --version
Leave memory headroom for activations, backend workspaces, and rendering. The research table's 1.4 GB model-memory figure is not a guarantee that the complete simulator and inference application will occupy only 1.4 GB of VRAM.
Fetch robot.cpp and prepare its patched dependencies:
git clone https://github.com/Robot-cpp/robot.cpp
cd robot.cpp
git submodule update --init --recursive
./tools/apply_patches.sh
export ROBOT_CPP_ROOT="$PWD"
The model card points to compatible revision cf0712c2751fdd8519de22f822b7baa1b08b5937 or a later compatible revision. Record the source revision and checkpoint checksums with your results so that future comparisons refer to the same implementation.
Create the benchmark environment and download the Spatial model:
conda env create -f eval/libero/environment.yaml
conda activate robotcpp-libero
pip install -U huggingface_hub
hf download robotcpp/bitvla-libero-spatial-i2s \
  --include '*.gguf' \
  --local-dir ckpts/bitvla-libero-spatial-i2s
export GGUF_DIR="$ROBOT_CPP_ROOT/ckpts/bitvla-libero-spatial-i2s"
ls "$GGUF_DIR"/*.gguf
Check that the directory contains all four components:
| File | Purpose |
|---|---|
bitvla-llm-i2s.gguf |
Language backbone and associated metadata |
bitvla-vision-i2s.gguf |
Exported vision encoder and connector components |
bitvla-proprio-i2s.gguf |
State projection and normalization information |
bitvla-action-i2s.gguf |
Action head, chunk metadata, and action statistics |
Checkpoint provenance matters: the public Spatial I2S model card says this conversion comes from the fine-tuned version without robotics pre-training. Its normalization key is libero_spatial_no_noops. Do not attribute the newer pre-trained variant's 96.0% average success rate to this bundle. The conversion model card explicitly does not claim a new success-rate measurement.
5. Start inference and measure latency
From the robot.cpp root, use the launcher that explicitly supports BitVLA:
export MODEL_TYPE=bitvla
export HOST=127.0.0.1
export PORT=5555
bash robot_server/shell/launch_robot_server_linux_cuda.sh
The launcher configures CMake, builds model-server, and loads the four components. Keep this terminal running when connecting the rollout client later. A missing CUDA compiler usually requires checking the Toolkit installation and nvcc path; a missing GGUF usually requires checking the absolute model directory and component filenames.
For the standalone latency test, stop that server with Ctrl+C and run the benchmark below. The script manages its own server, using port 5569 by default:
WARMUP=5 LOOPS=100 \
bash robot_server/test/test_server_latency.sh \
  bitvla linux-cuda bitvla-libero
The BitVLA preset sends two 224×224 images named full_image and wrist_image, together with an eight-dimensional state. This checks model loading, the request path, and inference timing. It does not measure manipulation success. Default output includes a TSV and server logs under debug/artifacts/robot_server_latency_linux_cuda. Source: latency benchmark script.
Use linux-cpu instead of linux-cuda to explore CPU execution. For the tested M4 Pro configuration, the project currently recommends CPU rather than Metal for BitVLA. Backend support and speed should be checked for the actual device, rather than inferred from the CUDA result.
6. Connect LIBERO without losing preprocessing
The inspected eval/libero/scripts/run_model_server.sh wrapper accepts only pi0 and SmolVLA. Setting MODEL_TYPE=bitvla there is rejected. Its general adapter also should not be assumed to reproduce BitVLA's image crop and gripper transformations. The example below uses model-client directly and reuses the original BitVLA helpers.
Create a separate BitVLA environment following the upstream setup. Keep its transformers fork out of the benchmark environment:
# Begin in the parent directory where you want the BitVLA repository.
git clone https://github.com/ustcwhy/BitVLA
conda create -n bitvla python=3.10 -y
conda activate bitvla
pip install torch==2.5.0 torchvision==0.20.0 torchaudio==2.5.0 \
  --index-url https://download.pytorch.org/whl/cu124
cd BitVLA
pip install -e openvla-oft/
pip install -e transformers
cd openvla-oft
git clone https://github.com/Lifelong-Robot-Learning/LIBERO.git
pip install -e LIBERO/
pip install -r experiments/robot/libero/libero_requirements.txt
pip install -e bitvla/
export PYTHONPATH="$ROBOT_CPP_ROOT:$PWD${PYTHONPATH:+:$PYTHONPATH}"
ROBOT_CPP_ROOT must still point to robot.cpp in this terminal. Export its absolute path again if you opened a new shell. The original LIBERO installation may prompt for dataset and asset paths; follow that repository's setup instead of mixing its editable install with a second hf-libero installation in the same environment.
Restart the BitVLA server from section 5 in a separate terminal. From BitVLA/openvla-oft, run this one-task smoke rollout. It is an illustrative integration adapter, not an independently validated reproduction of the full benchmark:
MUJOCO_GL=egl python - <<'PY'
from collections import deque
from types import SimpleNamespace
import numpy as np
from libero.libero import benchmark
from robot_client.python.model_client import ModelClient
from experiments.robot.libero.libero_utils import (
    get_libero_env, get_libero_image, get_libero_wrist_image,
    get_libero_dummy_action, quat2axisangle,
)
from experiments.robot.openvla_utils import prepare_images_for_vla
from experiments.robot.robot_utils import (
    normalize_gripper_action, invert_gripper_action,
)

suite = benchmark.get_benchmark_dict()["libero_spatial"]()
env, instruction = get_libero_env(
    suite.get_task(0), "bitnet", resolution=256
)
client = ModelClient(host="127.0.0.1", port=5555)
queue = deque()
cfg = SimpleNamespace(center_crop=True)
try:
    env.reset()
    obs = env.set_init_state(suite.get_task_init_states(0)[0])
    client.reset()
    for _ in range(10):
        obs, _, _, _ = env.step(get_libero_dummy_action("bitnet"))
    success = False
    for step in range(220):
        if not queue:
            images = prepare_images_for_vla(
                [get_libero_image(obs), get_libero_wrist_image(obs)],
                cfg, image_size=224,
            )
            state = np.concatenate([
                obs["robot0_eef_pos"],
                quat2axisangle(obs["robot0_eef_quat"]),
                obs["robot0_gripper_qpos"],
            ]).astype(np.float32)
            response = client.predict({
                "images": [
                    {"name": name, "image": np.asarray(im, dtype=np.uint8).copy()}
                    for name, im in zip(["full_image", "wrist_image"], images)
                ],
                "state": state,
                "prompt": instruction,
            })
            actions = np.asarray(response.actions, dtype=np.float32)
            assert actions.shape == (8, 7), actions.shape
            queue.extend(actions)
        action = queue.popleft().copy()
        action = normalize_gripper_action(action, binarize=True)
        action = invert_gripper_action(action)
        obs, _, done, _ = env.step(action.tolist())
        if done:
            success = True
            break
    print({"task": instruction, "success": success, "steps": step + 1})
finally:
    env.close()
PY
The image helpers restore the training camera orientation, resize, and center-crop. Send RGB uint8 data. The server handles image/state normalization and action denormalization, so do not normalize the robot state a second time in the client. Gripper values still need conversion from the dataset convention to LIBERO's convention, which is why the final two action transformations remain necessary. Source: original BitVLA evaluator.
If EGL fails, inspect NVIDIA EGL availability and device visibility. Software rendering through OSMesa is a fallback requiring its system libraries, and can substantially increase rollout wall time. For a failed episode, inspect camera order, crop, state layout, gripper sign, and suite-checkpoint matching before blaming quantization.
7. Training: understand the stages before fine-tuning
BitVLA has three broad training stages. Multimodal training first connects a higher-precision vision encoder to BitNet and learns visual-language alignment. Quantize-then-Distill then trains a low-bit vision student against a fixed higher-precision teacher. The language backbone and connector remain frozen during this stage. A language-modeling objective is combined with teacher-student feature matching so that quantized visual features remain useful to the language model.
Robotics training follows. Pre-training uses autoregressive next-action prediction, with each action dimension discretized into 256 bins. OFT-style adaptation instead predicts continuous action chunks and optimizes an L1 regression loss. BitVLA retains causal attention: the authors report that replacing it with bidirectional attention hurts real-world performance. Sharing the phrase “action chunking” with another policy does not make their attention masks interchangeable.
The reported robotics pre-training uses 200K steps and a global batch of 2048, taking approximately 14 days on sixteen H800 80 GB GPUs. Beginners do not need to reproduce this to run inference. The repository still lists full pre-training code as a planned release item; the practical starting point is an existing checkpoint followed by supervised fine-tuning.
For Spatial fine-tuning, obtain openvla/modified_libero_rlds and the recommended lxsy/bitvla-bf16 pre-trained checkpoint. In the BitVLA environment, edit the placeholder model, data, and output paths in the supplied script before running it:
# Run from BitVLA/openvla-oft.
sh ft_script/ft_bitvla_libero_spatial.sh
The inspected launcher uses four GPUs, batch size two per GPU, and eight accumulation steps, giving an effective global batch of 4 × 2 × 8 = 64. It enables L1 regression, disables LoRA, uses two input images and proprioception, and sets a learning rate of 1e-4. The Spatial launcher specifies 10001 steps. With one GPU, adjust process count, batch size, and accumulation to available memory; reducing process count alone does not guarantee that full fine-tuning fits.
Preserve the projector and action-head checkpoints, configuration files, and dataset_statistics.json. The converter needs more than the backbone safetensors. For a complete Spatial fine-tune, export with:
cd "$ROBOT_CPP_ROOT"
conda env create -f tools/hf2gguf/environment.yaml
conda activate gguf_converter
CHECKPOINT_DIR=/absolute/path/to/complete-finetuned-checkpoint \
OUTPUT_DIR=/absolute/path/to/new-bitvla-spatial-i2s \
DATASET_KEY=libero_spatial_no_noops \
PYTHON_BIN="$(command -v python)" \
bash tools/hf2gguf/bitvla/convert_bitvla_all.sh
The output directory must be new. The wrapper creates BF16 intermediates, packs I2S, and removes the intermediate directory after successful packing; failed conversions retain intermediates for diagnosis. Read the actual statistics key from your checkpoint instead of assuming every dataset uses the example key. Source: conversion documentation.
8. Read results without mixing experiments
The following success rates are author-reported research results, not measurements from the illustrative adapter:
| Variant | Spatial | Object | Goal | Long | Average |
|---|---|---|---|---|---|
| BitVLA without robotics pre-training | 97.4 | 99.6 | 94.4 | 87.6 | 94.8 |
| BitVLA with robotics pre-training | 96.6 | 99.0 | 95.4 | 92.8 | 96.0 |
| OpenVLA-OFT reference baseline | 97.6 | 98.4 | 97.9 | 94.5 | 97.1 |
The paper draws baseline results from the respective studies. This table does not establish that a newly converted I2S checkpoint preserves those success rates. That requires measuring the same checkpoint under matched preprocessing and evaluation conditions.

For latency, robot.cpp lists 17 ms on RTX 4090, 39 ms on RTX 3090, 87 ms on RTX 3060, and 1168 ms on M4 Pro CPU. The reported 9.7× and 5.4× RTX 3090 speedups come from 377.8/39 and 209.2/39, compared with PyTorch eager and compile. They describe the complete implementation comparison and do not isolate the contribution of I2S alone.
1000/17 ≈ 58.8 is the chunk-generation rate. Eight actions per chunk do not establish a physical feedback control rate of 58.8 × 8 Hz. Cameras, communication, simulation, and action execution all contribute time. The paper also reports 73 ms on A100 using three images, a 14D state, and chunk size 25; that is a different workload from robot.cpp's two-image, eight-action LIBERO measurement. Source: robot.cpp performance table.
For your own evaluation, save the checkpoint revision, source revision, backend, image configuration, warmup count, and measurement count. After the smoke test, evaluate multiple tasks and initial states, record success separately from latency, and compare against a PyTorch baseline with matching preprocessing. That makes the difference between a working demonstration and a result another engineer can meaningfully reproduce.