LeRobot: Democratizing Robot Learning
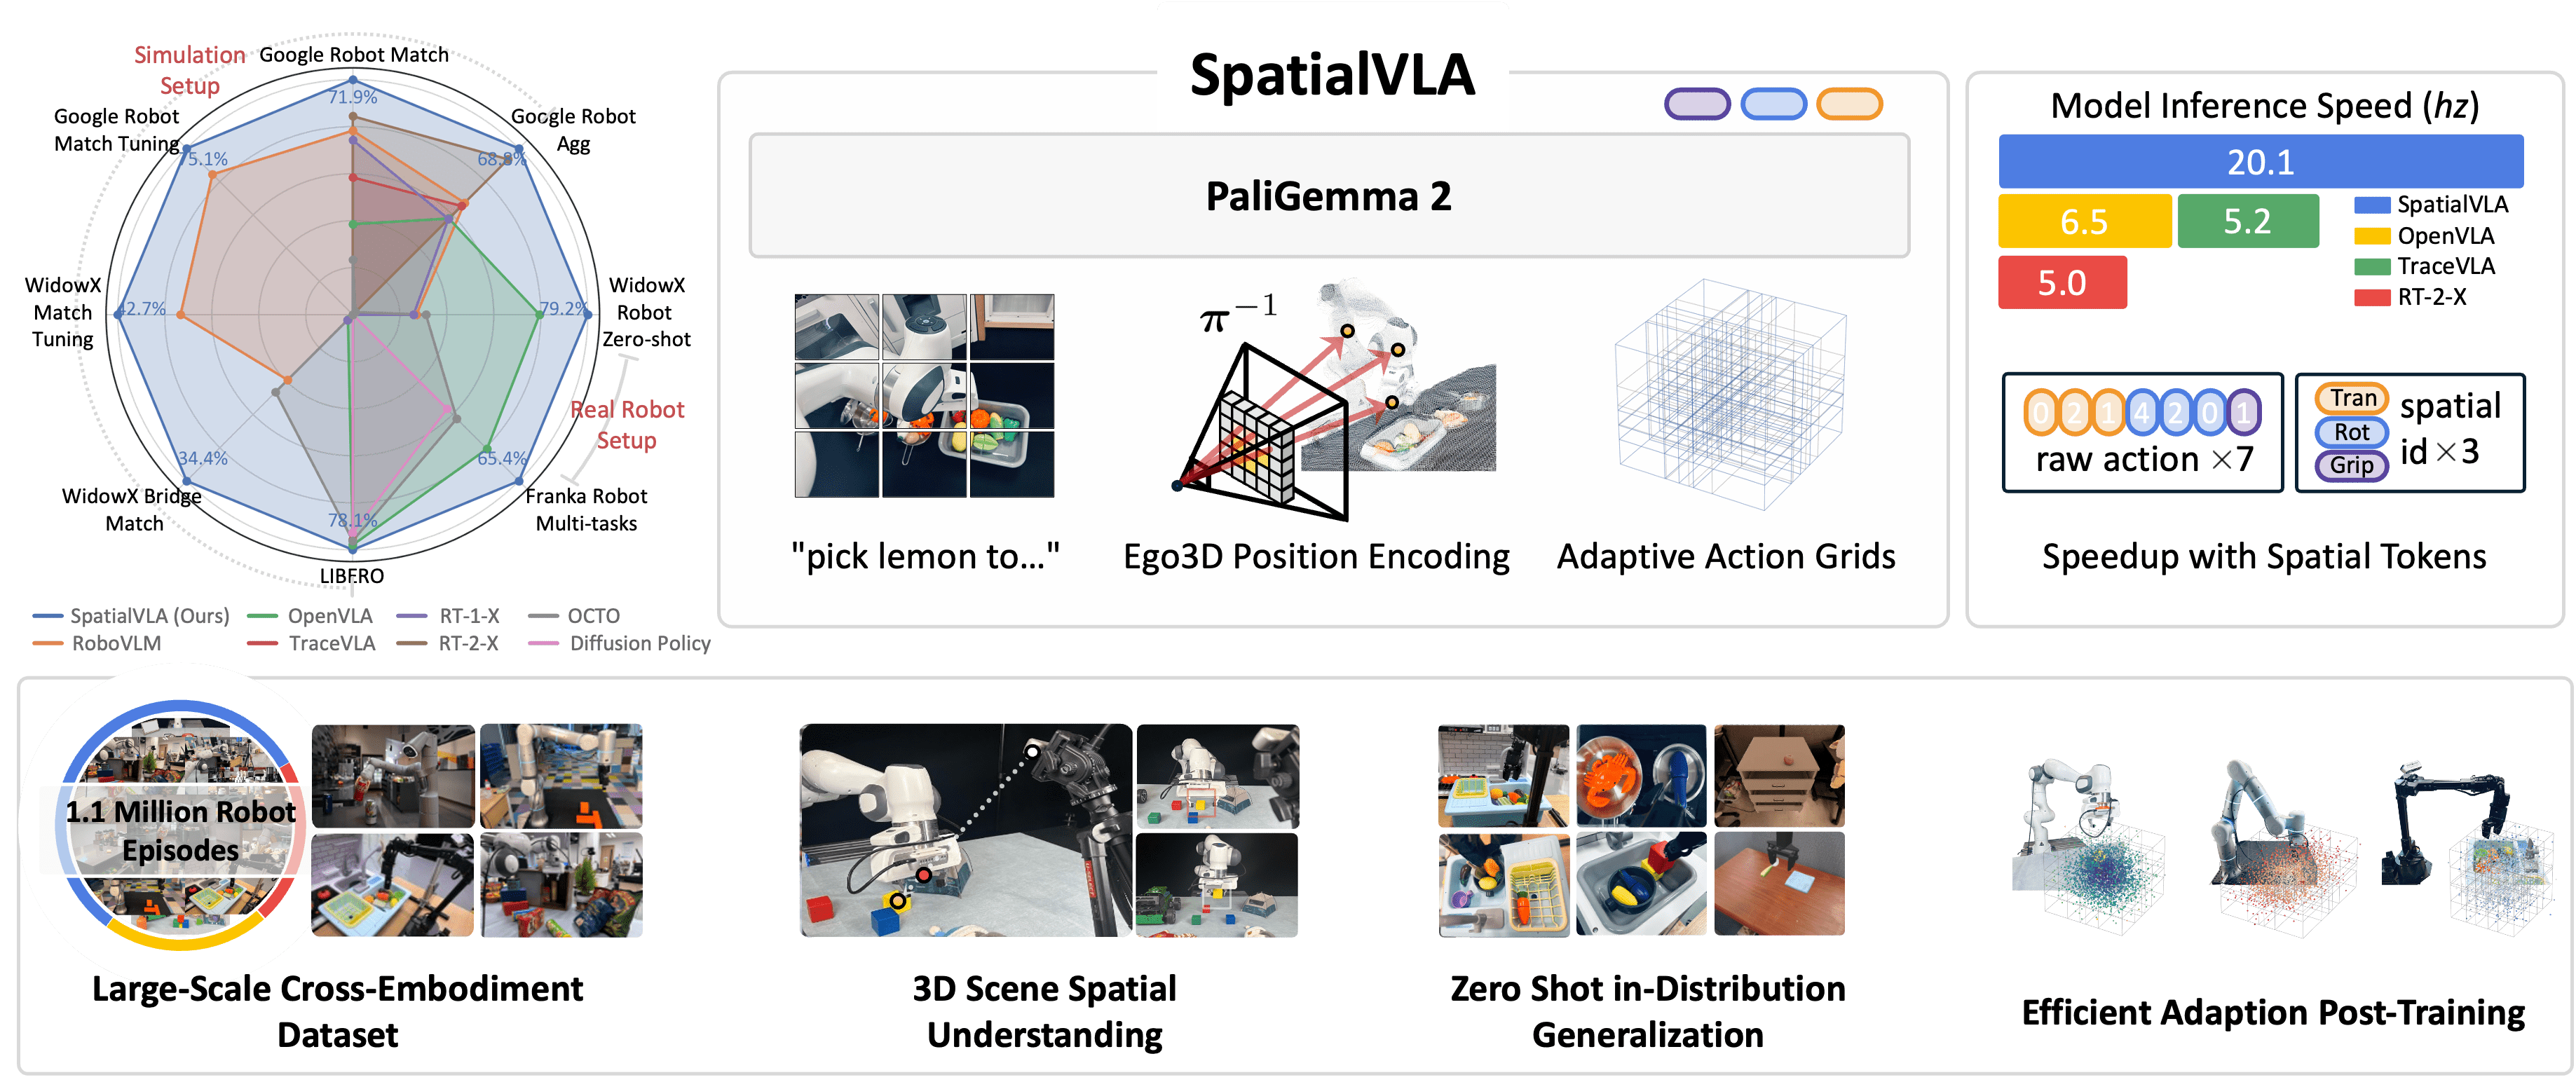
If you've read the post on Foundation Models for Robots and SpatialVLA, the natural next question is: "How do I actually run these models on a real robot?"
The answer: LeRobot — Hugging Face's open-source framework providing a complete pipeline from recording demonstrations, training policies, to deploying on real robots. LeRobot is "Hugging Face Transformers for robotics" — standardizing everything from dataset format, training loop, to hardware interface.
In this post, we'll go through the entire pipeline: setting up LeRobot, recording data with the SO-100 arm, fine-tuning OpenVLA with LoRA + 8-bit quantization, evaluating the policy, and deploying via ROS 2.

What does LeRobot support?
LeRobot doesn't just support OpenVLA — it provides a unified API for many policy architectures:
| Policy | Type | Params | Use Case |
|---|---|---|---|
| ACT | Imitation Learning | ~10M | Single-task, fast inference |
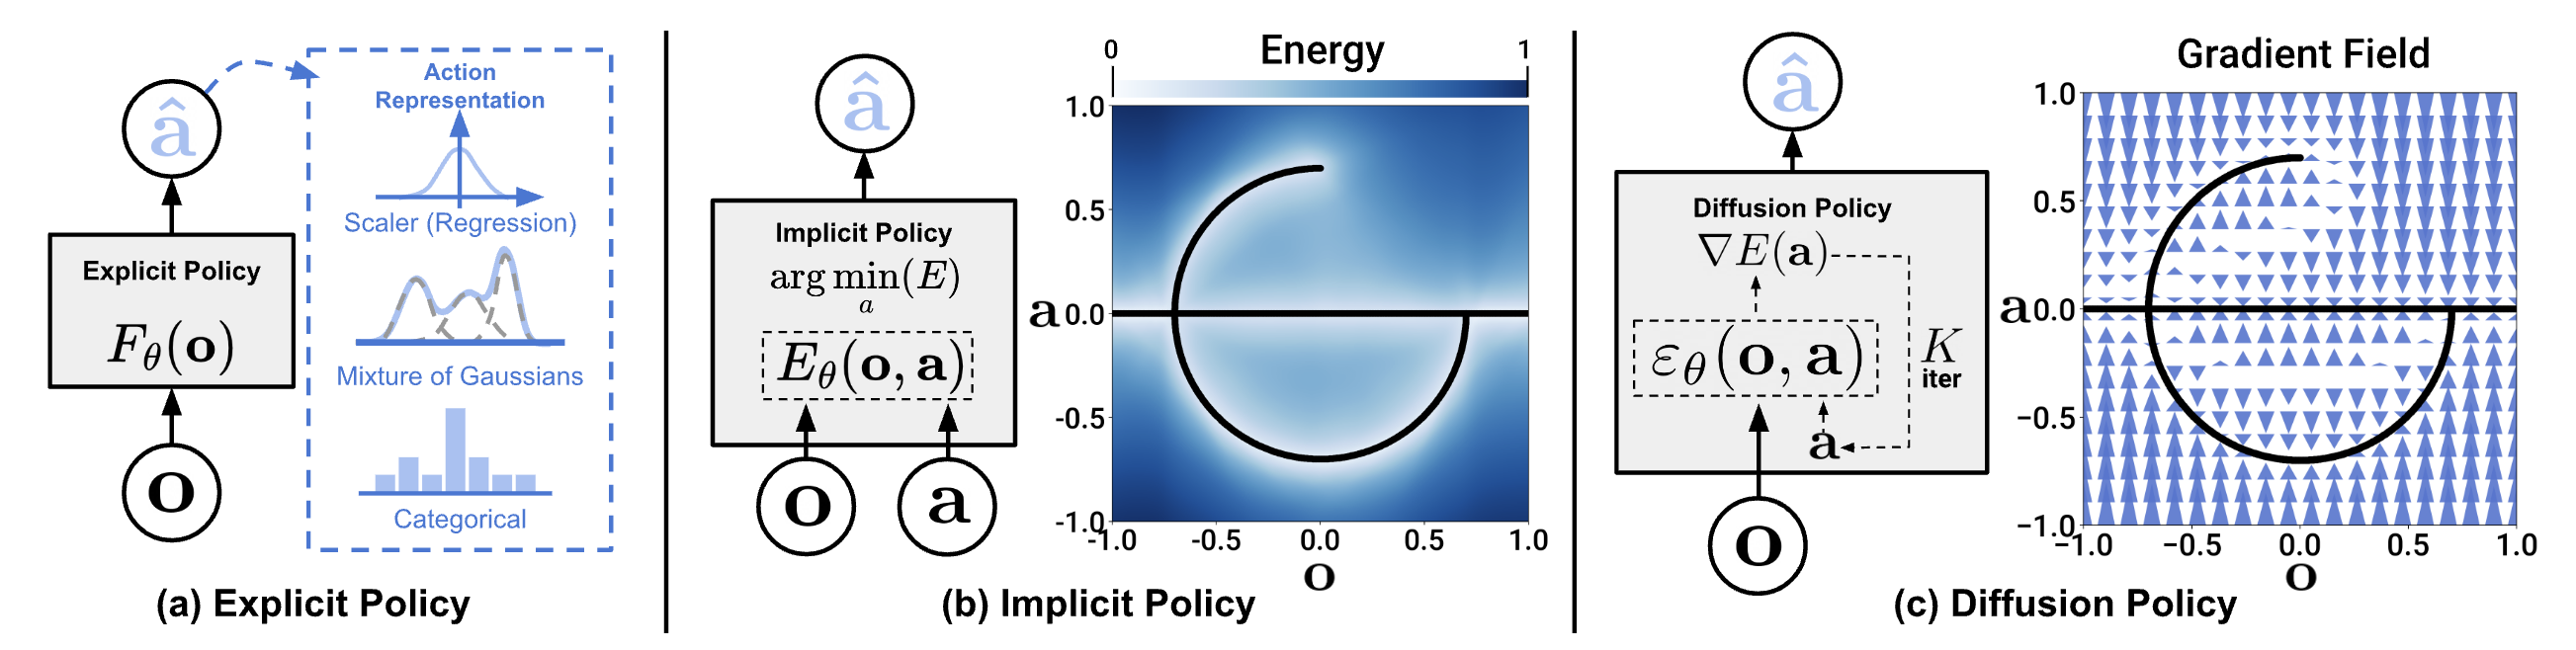
| Diffusion Policy | Diffusion-based IL | ~50M | Multi-modal actions, precise manipulation |
| Pi0 / Pi0.5 | VLA (base) | Varies | General manipulation |
| SmolVLA | Lightweight VLA | ~250M | Edge deployment, fine-tune on consumer GPU |
| GR00T N1.5 | Foundation Model | Large | Humanoid, cross-embodiment |
| OpenVLA | VLA | 7B | General-purpose, strong language grounding |
Why OpenVLA for this tutorial? OpenVLA offers the best balance between language understanding (thanks to Llama 2 backbone) and manipulation performance. With LoRA + quantization, it can be fine-tuned on RTX 3090/4090. If you have weaker GPU, SmolVLA (~250M params) is a good alternative.
Step 1: Setup LeRobot
System Requirements
| Component | Minimum | Recommended |
|---|---|---|
| GPU | RTX 3090 (24GB) | RTX 4090 (24GB) or A100 (40GB) |
| RAM | 32GB | 64GB |
| Storage | 100GB SSD | 500GB NVMe |
| Python | 3.10+ | 3.10 (conda recommended) |
| OS | Ubuntu 22.04 | Ubuntu 22.04/24.04 |
Installation
# 1. Create conda environment
conda create -n lerobot python=3.10 -y
conda activate lerobot

# 2. Install PyTorch (CUDA 12.1)
pip install torch torchvision torchaudio --index-url https://download.pytorch.org/whl/cu121

# 3. Install LeRobot
pip install lerobot

# 4. Verify GPU
python -c "import torch; print(f'CUDA: {torch.cuda.is_available()}, GPU: {torch.cuda.get_device_name(0)}')"
# Output: CUDA: True, GPU: NVIDIA GeForce RTX 4090

# 5. Install additional packages for OpenVLA fine-tuning
pip install peft bitsandbytes accelerate
Important note: When installing LeRobot via pip, it may overwrite PyTorch GPU version with CPU version. Always verify torch CUDA after install and reinstall GPU version if needed.
Verify LeRobot
import lerobot
from lerobot.common.policies.act.modeling_act import ACTPolicy

print(f"LeRobot version: {lerobot.__version__}")
# List available datasets
print(lerobot.available_datasets[:5])
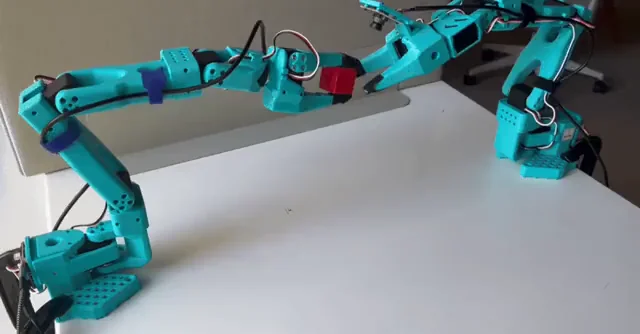
Step 2: Hardware — SO-100 Robot Arm ($100)
SO-100 (Spectral Open 100) is a low-cost robot arm designed for the LeRobot ecosystem. At just ~$100 BOM (bill of materials), it's the best entry point to start robot learning.
Specs
| Feature | SO-100 |
|---|---|
| DOF | 6 (5 joints + gripper) |
| Reach | ~25cm |
| Payload | ~200g |
| Actuators | 6x Feetech STS3215 servos |
| Interface | USB (serial) |
| Frame | 3D printed |
| Cost | ~$100 |
Hardware Setup
You need 2 arms for teleoperation: 1 leader (you control) + 1 follower (robot copies movements):
# Detect servo ports
python -m lerobot.find_port
# Output: /dev/ttyACM0 (leader), /dev/ttyACM1 (follower)

# Calibrate servos (run once per arm)
python -m lerobot.calibrate \
    --robot.type=so100 \
    --robot.port=/dev/ttyACM0 \
    --robot.id=leader

python -m lerobot.calibrate \
    --robot.type=so100 \
    --robot.port=/dev/ttyACM1 \
    --robot.id=follower
Camera Setup
LeRobot supports USB webcam and Intel RealSense. For this tutorial, one USB camera is sufficient:
# Check camera
python -m lerobot.find_port --type=camera
# Output: /dev/video0

# Test camera stream
python -m lerobot.view_camera --port=0 --fps=30
Step 3: Record Demonstrations
This is the most critical step — demonstration quality determines policy quality.
Data Collection
# Record 50 episodes for task "pick up red block"
python -m lerobot.record \
    --robot.type=so100 \
    --robot.port=/dev/ttyACM1 \
    --robot.id=follower \
    --leader.type=so100 \
    --leader.port=/dev/ttyACM0 \
    --leader.id=leader \
    --camera.port=0 \
    --camera.fps=30 \
    --camera.width=640 \
    --camera.height=480 \
    --repo-id=your-username/so100-pick-red-block \
    --task="pick up the red block and place it in the bin" \
    --num-episodes=50 \
    --episode-time-s=15
Each episode lasts 15 seconds. Between episodes, LeRobot pauses for you to reset the scene. Target: 50 episodes for single task, 200+ for multi-task.
Tips for Good Data Collection
- Consistent setup: Keep camera angle, lighting, and scene layout consistent across episodes
- Diverse demonstrations: Vary object position slightly between episodes — helps model generalize
- Smooth motions: Teleoperate slowly and smoothly — jerky movements create noisy data
- Filter failures: If episode fails (drop object, miss grasp), record again — bad demos hurt performance
- 50 demos minimum: Fewer often underfit, more (100-200) always better

Inspect Dataset
from lerobot.common.datasets.lerobot_dataset import LeRobotDataset

# Load newly recorded dataset
dataset = LeRobotDataset("your-username/so100-pick-red-block")

print(f"Episodes: {dataset.num_episodes}")
print(f"Total frames: {len(dataset)}")
print(f"FPS: {dataset.fps}")
print(f"Keys: {dataset.features.keys()}")
# Keys: dict_keys(['observation.image', 'observation.state', 'action', ...])

# View 1 frame
sample = dataset[0]
print(f"Image shape: {sample['observation.image'].shape}")  # (3, 480, 640)
print(f"State shape: {sample['observation.state'].shape}")   # (6,) - joint positions
print(f"Action shape: {sample['action'].shape}")             # (6,) - target joint positions
Step 4: Fine-tune OpenVLA with LoRA + Quantization
This is the core pipeline — fine-tune the 7B model on consumer GPU using 2 techniques:
- LoRA (Low-Rank Adaptation): Train only ~0.2% of parameters, keep pre-trained weights frozen
- 8-bit quantization: Reduce memory footprint from ~28GB to ~10GB
Full Training Script
"""
Fine-tune OpenVLA 7B on custom SO-100 data
LoRA + 8-bit quantization
Requires: 1x RTX 3090/4090 (24GB VRAM)
"""
import torch
from torch.utils.data import DataLoader
from transformers import (
    AutoModelForVision2Seq,
    AutoProcessor,
    BitsAndBytesConfig,
)
from peft import LoraConfig, get_peft_model, TaskType
from lerobot.common.datasets.lerobot_dataset import LeRobotDataset

# ============================
# 1. Load model with 8-bit quantization
# ============================
model_id = "openvla/openvla-7b"

# 8-bit quantization config — reduce VRAM from ~28GB to ~10GB
bnb_config = BitsAndBytesConfig(
    load_in_8bit=True,
    llm_int8_threshold=6.0,
    llm_int8_has_fp16_weight=False,
)

processor = AutoProcessor.from_pretrained(
    model_id,
    trust_remote_code=True,
)

model = AutoModelForVision2Seq.from_pretrained(
    model_id,
    quantization_config=bnb_config,
    torch_dtype=torch.bfloat16,
    device_map="auto",
    trust_remote_code=True,
)

print(f"Model loaded. Memory: {torch.cuda.memory_allocated()/1e9:.1f}GB")
# Output: Model loaded. Memory: ~10.2GB

# ============================
# 2. Apply LoRA
# ============================
lora_config = LoraConfig(
    r=32,                          # LoRA rank
    lora_alpha=32,                 # Scaling factor
    target_modules=[
        "q_proj", "v_proj",        # Attention projections
        "k_proj", "o_proj",
    ],
    lora_dropout=0.05,
    bias="none",
    task_type=TaskType.CAUSAL_LM,
)

model = get_peft_model(model, lora_config)
model.print_trainable_parameters()
# trainable: 13.1M || total: 7.6B || trainable%: 0.17%

# ============================
# 3. Prepare dataset
# ============================
dataset = LeRobotDataset("your-username/so100-pick-red-block")

def collate_fn(batch):
    """Convert LeRobot batch to OpenVLA format"""
    images = [sample["observation.image"] for sample in batch]
    states = [sample["observation.state"] for sample in batch]
    actions = [sample["action"] for sample in batch]

    # OpenVLA expects language instruction
    instruction = "pick up the red block and place it in the bin"

    inputs = processor(
        images=images,
        text=[f"In: What action should the robot take to {instruction}?\n"] * len(images),
        return_tensors="pt",
        padding=True,
    ).to("cuda")

    # Tokenize actions (256 bins per dimension)
    action_tensor = torch.stack(actions)
    action_tokens = tokenize_actions(action_tensor, n_bins=256)
    inputs["labels"] = action_tokens.to("cuda")

    return inputs

def tokenize_actions(actions, n_bins=256):
    """
    Discretize continuous actions into 256 bins.
    actions: tensor shape (B, action_dim)
    """
    # Normalize to [0, 1] range
    a_min, a_max = actions.min(dim=0).values, actions.max(dim=0).values
    normalized = (actions - a_min) / (a_max - a_min + 1e-8)
    # Map to bin indices
    tokens = (normalized * (n_bins - 1)).long()
    return tokens

dataloader = DataLoader(
    dataset,
    batch_size=4,              # Batch size 4 for 24GB GPU
    shuffle=True,
    collate_fn=collate_fn,
    num_workers=4,
    pin_memory=True,
)

# ============================
# 4. Training loop
# ============================
optimizer = torch.optim.AdamW(
    model.parameters(),
    lr=2e-5,
    weight_decay=0.01,
    betas=(0.9, 0.95),
)

# Learning rate scheduler — warmup + cosine decay
from transformers import get_cosine_schedule_with_warmup
num_epochs = 10
total_steps = len(dataloader) * num_epochs
scheduler = get_cosine_schedule_with_warmup(
    optimizer,
    num_warmup_steps=100,
    num_training_steps=total_steps,
)

model.train()
for epoch in range(num_epochs):
    epoch_loss = 0
    for step, batch in enumerate(dataloader):
        outputs = model(**batch)
        loss = outputs.loss

        loss.backward()

        # Gradient clipping — important for stability
        torch.nn.utils.clip_grad_norm_(model.parameters(), max_norm=1.0)

        optimizer.step()
        scheduler.step()
        optimizer.zero_grad()

        epoch_loss += loss.item()

        if step % 50 == 0:
            lr = scheduler.get_last_lr()[0]
            print(f"Epoch {epoch} Step {step}: loss={loss.item():.4f}, lr={lr:.2e}")

    avg_loss = epoch_loss / len(dataloader)
    print(f"Epoch {epoch} complete: avg_loss={avg_loss:.4f}")

# ============================
# 5. Save LoRA weights
# ============================
output_dir = "/models/openvla-so100-pick-lora"
model.save_pretrained(output_dir)
processor.save_pretrained(output_dir)
print(f"LoRA weights saved to {output_dir}")
print(f"Size: ~52MB (vs 14GB for full model)")
Training Tips
| Parameter | Value | Note |
|---|---|---|
| Learning rate | 2e-5 | Higher → unstable, lower → slow |
| Batch size | 4 | Increase if GPU > 24GB |
| LoRA rank | 32 | 16 for faster training, 64 for better quality |
| Epochs | 10 | Monitor loss — stop early if plateau |
| Gradient clipping | 1.0 | Critical for 8-bit training stability |
| Training time | ~3-4 hours | RTX 4090, 50 episodes, 10 epochs |
Step 5: Evaluate Policy
Before deploying to real robot, evaluate in controlled setting:
"""
Evaluate fine-tuned OpenVLA policy
"""
from peft import PeftModel
import numpy as np

# Load base model + LoRA weights
base_model = AutoModelForVision2Seq.from_pretrained(
    "openvla/openvla-7b",
    quantization_config=bnb_config,
    torch_dtype=torch.bfloat16,
    device_map="auto",
    trust_remote_code=True,
)
model = PeftModel.from_pretrained(base_model, "/models/openvla-so100-pick-lora")
model.eval()

def predict_action(image, instruction):
    """Inference: image + instruction → robot action"""
    inputs = processor(
        images=image,
        text=f"In: What action should the robot take to {instruction}?\n",
        return_tensors="pt",
    ).to("cuda")

    with torch.no_grad():
        output = model.generate(
            **inputs,
            max_new_tokens=7,    # 7 action dimensions
            do_sample=False,
        )

    # Decode action tokens → continuous values
    action_tokens = output[0, -7:]  # Last 7 tokens
    action = detokenize_actions(action_tokens, n_bins=256)
    return action.cpu().numpy()

# Run evaluation on held-out episodes
eval_dataset = LeRobotDataset("your-username/so100-pick-red-block", split="test")
successes = 0
total = 20

for i in range(total):
    sample = eval_dataset[i * eval_dataset.fps * 15]  # First frame of each episode
    image = sample["observation.image"]

    predicted_action = predict_action(image, "pick up the red block")
    ground_truth = sample["action"].numpy()

    # L2 error between predicted and ground truth
    error = np.linalg.norm(predicted_action - ground_truth)
    if error < 0.05:  # Threshold for "correct"
        successes += 1
    print(f"Episode {i}: L2 error = {error:.4f}")

print(f"Success rate: {successes}/{total} = {successes/total*100:.0f}%")
Step 6: Deploy on Real Robot via ROS 2
Finally — deploy the policy to real robot. We use lerobot-ros bridge to connect LeRobot policy with ROS 2 control stack.
Install ROS 2 Bridge
# Within conda environment that has LeRobot
pip install lerobot-ros

# Or build from source (if you need custom modifications)
cd ~/ros2_ws/src
git clone https://github.com/ycheng517/lerobot-ros.git
cd ~/ros2_ws
colcon build --packages-select lerobot_ros
source install/setup.bash
Deploy Pipeline
"""
Deploy OpenVLA policy on SO-100 via ROS 2
Requires: ROS 2 Humble/Jazzy, lerobot-ros
"""
import rclpy
from rclpy.node import Node
from sensor_msgs.msg import Image, JointState
from cv_bridge import CvBridge
import numpy as np
import torch
from peft import PeftModel
from transformers import AutoModelForVision2Seq, AutoProcessor

class OpenVLANode(Node):
    def __init__(self):
        super().__init__("openvla_policy")

        # Load model (once at startup)
        self.get_logger().info("Loading OpenVLA + LoRA weights...")
        self.processor = AutoProcessor.from_pretrained(
            "openvla/openvla-7b", trust_remote_code=True
        )
        base_model = AutoModelForVision2Seq.from_pretrained(
            "openvla/openvla-7b",
            load_in_8bit=True,
            device_map="auto",
            trust_remote_code=True,
        )
        self.model = PeftModel.from_pretrained(
            base_model, "/models/openvla-so100-pick-lora"
        )
        self.model.eval()
        self.get_logger().info("Model loaded!")

        # ROS 2 subscribers/publishers
        self.bridge = CvBridge()
        self.latest_image = None

        self.image_sub = self.create_subscription(
            Image, "/camera/color/image_raw", self.image_callback, 10
        )
        self.joint_pub = self.create_publisher(
            JointState, "/joint_commands", 10
        )

        # Control loop at 5 Hz (inference speed ~6Hz for OpenVLA)
        self.timer = self.create_timer(0.2, self.control_loop)
        self.instruction = "pick up the red block and place it in the bin"

    def image_callback(self, msg):
        self.latest_image = self.bridge.imgmsg_to_cv2(msg, "rgb8")

    def control_loop(self):
        if self.latest_image is None:
            return

        # Predict action
        action = self.predict(self.latest_image, self.instruction)

        # Publish joint commands
        msg = JointState()
        msg.header.stamp = self.get_clock().now().to_msg()
        msg.name = [
            "joint_1", "joint_2", "joint_3",
            "joint_4", "joint_5", "gripper",
        ]
        msg.position = action.tolist()
        self.joint_pub.publish(msg)

    def predict(self, image, instruction):
        inputs = self.processor(
            images=image,
            text=f"In: What action should the robot take to {instruction}?\n",
            return_tensors="pt",
        ).to("cuda")

        with torch.no_grad():
            output = self.model.generate(
                **inputs, max_new_tokens=7, do_sample=False
            )

        action_tokens = output[0, -7:]
        return detokenize_actions(action_tokens).cpu().numpy()

def main():
    rclpy.init()
    node = OpenVLANode()
    rclpy.spin(node)
    rclpy.shutdown()

if __name__ == "__main__":
    main()
Run Complete Pipeline
# Terminal 1: Camera driver
ros2 run usb_cam usb_cam_node_exe --ros-args \
    -p video_device:="/dev/video0" \
    -p framerate:=30.0

# Terminal 2: SO-100 driver
python -m lerobot.control \
    --robot.type=so100 \
    --robot.port=/dev/ttyACM1 \
    --control-mode=ros2

# Terminal 3: OpenVLA policy
python openvla_deploy_node.py
Hardware Requirements Summary
| Stage | GPU | RAM | Time |
|---|---|---|---|
| Record data | None | 8GB | ~15 min (50 eps) |
| Fine-tune (LoRA 8-bit) | RTX 3090 (24GB) | 32GB | 3-4 hours |
| Fine-tune (full) | A100 (80GB) | 64GB | 8-12 hours |
| Inference | RTX 3060 (12GB) | 16GB | ~6 Hz |
| Inference (CPU) | None | 32GB | ~0.5 Hz |
Budget option: If you don't have powerful GPU, use SmolVLA (~250M params) instead of OpenVLA — can fine-tune on RTX 3060 12GB, faster inference, still good results for single-task.
Common Troubleshooting
1. CUDA OOM when fine-tuning
# Reduce batch size
--batch-size=2
# Or use gradient accumulation
--gradient-accumulation-steps=8
2. LeRobot overwrites PyTorch GPU
# Check
python -c "import torch; print(torch.cuda.is_available())"
# If False, reinstall:
pip install torch torchvision --index-url https://download.pytorch.org/whl/cu121
3. Servo jitter when deployed
# Add exponential moving average for action smoothing
alpha = 0.7
smoothed_action = alpha * new_action + (1 - alpha) * prev_action
4. Policy only works at one location
- Collect more demonstrations with object at different positions
- Augment data: random crop, color jitter
- Consider using SpatialVLA if task requires spatial generalization
Next Steps
After completing this tutorial, you can:
- Multi-task: Record data for multiple tasks, fine-tune with mixed dataset
- Better hardware: Upgrade to ALOHA 2 for bimanual manipulation
- SmolVLA: Try SmolVLA — lighter, faster fine-tune, edge deployment-friendly
- Sim pre-training: Use Isaac Lab to pre-train in simulation before fine-tuning on real data
- 3D-aware: Integrate depth information following SpatialVLA to improve spatial reasoning
Robot learning is at a very exciting stage — tools like LeRobot, cheap hardware like SO-100, and pre-trained models like OpenVLA mean anyone can get started. Build something, share your dataset on Hugging Face Hub, and contribute back to the community!
Related Posts
- Foundation Models for Robots: RT-2, Octo, OpenVLA in Practice -- Overview and comparison of VLA models
- SpatialVLA: 3D Understanding for Robot Manipulation -- Why 3D spatial awareness matters for VLA
- Sim-to-Real Transfer: Train in Simulation, Run in Reality -- Techniques for transferring models from sim to real
- Deploy YOLOv8 on Jetson Orin Nano -- Edge AI deployment for robot perception
- Robotics Research Trends 2025 -- Overview of research landscape