ROS 2 — Bắt đầu từ đâu?
Nếu bạn đang muốn học ROS 2 để xây dựng robot, bài viết này chính là điểm khởi đầu. Chúng ta sẽ đi từ cài đặt ROS 2 Jazzy trên Ubuntu 24.04, tạo workspace, viết node publisher/subscriber đầu tiên (cả Python và C++), cho đến khi bạn build và chạy được package của riêng mình. Cứ làm theo từng bước, bạn sẽ nắm được nền tảng rất nhanh.
Nếu bạn chưa biết ROS 2 là gì hay tại sao nên dùng ROS 2 thay vì ROS 1, hãy đọc bài Giới thiệu ROS 2: Nền tảng lập trình robot thế hệ mới trước nhé.
Chọn bản ROS 2 nào (cập nhật 6/2026)? Có 4 lựa chọn phổ biến: Jazzy Jalisco (LTS, 5/2024, Ubuntu 24.04) — khuyến nghị cho người mới vì ổn định + tài liệu đầy đủ; Lyrical Luth (LTS mới nhất, 5/2026, Ubuntu 24.04) — mới nhất nhưng hệ sinh thái còn đang theo kịp; Kilted Kaiju (5/2025, non-LTS); Humble (LTS, 2022, Ubuntu 22.04, EOL 5/2027) — vẫn rất phổ biến. Series này dùng Jazzy. Nếu bạn dùng Humble, chỉ cần đổi
jazzy→humblevà Ubuntu 24.04 → 22.04.
Lộ trình series (7 phần): (1) Cài đặt & Node đầu tiên (bài này) → (2) Topics, Services, Actions → (3) Parameters, Launch, Lifecycle → (4) TF2, URDF, RViz2 → (5) ros2_control & Hardware → (6) Nav2 → (7) Simulation, rosbag2, Debug.
Cài đặt ROS 2 Jazzy trên Ubuntu 24.04
Yêu cầu hệ thống
- OS: Ubuntu 24.04 LTS (Noble Numbat) — bản desktop hoặc server đều được
- RAM: Tối thiểu 4GB, khuyến nghị 8GB trở lên
- Disk: Ít nhất 10GB trống cho bản
desktop, 5GB cho bảnbase - CPU: x86_64 hoặc ARM64 (Raspberry Pi 4/5 cũng chạy được)
Bước 1: Cấu hình locale
ROS 2 yêu cầu locale hỗ trợ UTF-8:
sudo apt update && sudo apt install locales
sudo locale-gen en_US en_US.UTF-8
sudo update-locale LC_ALL=en_US.UTF-8 LANG=en_US.UTF-8
export LANG=en_US.UTF-8

# Kiểm tra
locale
Bước 2: Thêm ROS 2 repository
# Cài đặt dependencies
sudo apt install -y software-properties-common curl
sudo add-apt-repository universe

# Thêm GPG key
sudo curl -sSL https://raw.githubusercontent.com/ros/rosdistro/master/ros.key \
  -o /usr/share/keyrings/ros-archive-keyring.gpg

# Thêm repository
echo "deb [arch=$(dpkg --print-architecture) signed-by=/usr/share/keyrings/ros-archive-keyring.gpg] \
  http://packages.ros.org/ros2/ubuntu $(. /etc/os-release && echo $UBUNTU_CODENAME) main" \
  | sudo tee /etc/apt/sources.list.d/ros2.list > /dev/null
Bước 3: Cài đặt ROS 2 Jazzy
sudo apt update
sudo apt upgrade -y

# Bản đầy đủ (bao gồm RViz2, rqt tools, demos)
sudo apt install -y ros-jazzy-desktop

# Hoặc bản tối thiểu (chỉ libraries + CLI, không GUI)
# sudo apt install -y ros-jazzy-ros-base

# Công cụ phát triển (compiler, cmake, colcon...) — cần cho build C++
sudo apt install -y ros-dev-tools
Quá trình cài đặt mất khoảng 5-15 phút tuỳ tốc độ mạng.
Bước 4: Cài đặt công cụ build
# colcon — build tool chính của ROS 2
sudo apt install -y python3-colcon-common-extensions

# rosdep — quản lý dependencies (đã có sẵn trong ros-dev-tools ở bước 3)
sudo rosdep init
rosdep update
Bước 5: Source environment
# Thêm vào .bashrc để tự động source mỗi khi mở terminal
echo "source /opt/ros/jazzy/setup.bash" >> ~/.bashrc
source ~/.bashrc

# Kiểm tra cài đặt thành công
ros2 --version
# Kết quả: ros2 0.xx.x
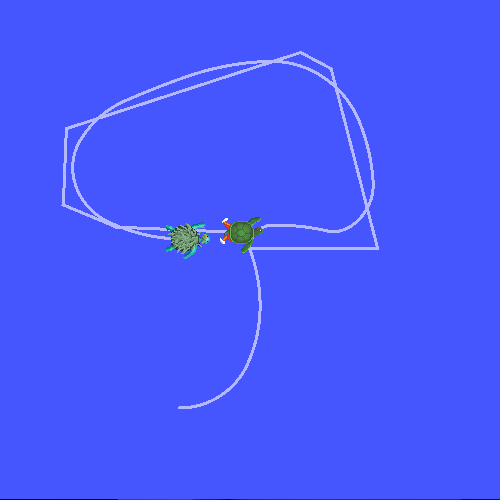
Kiểm tra nhanh với Turtlesim
Trước khi đi tiếp, hãy chắc chắn mọi thứ hoạt động:
# Terminal 1: Chạy turtlesim
ros2 run turtlesim turtlesim_node

# Terminal 2: Điều khiển rùa bằng bàn phím
ros2 run turtlesim turtle_teleop_key
Nếu thấy cửa sổ con rùa hiện ra và bạn điều khiển được bằng phím mũi tên — chúc mừng, ROS 2 đã sẵn sàng!
Repo tham khảo thực hành: dottantgal/ROS2_learning là bộ ví dụ C++ và Python đầy đủ nhất cho ROS 2 Jazzy — node, timer, topic, service, action, TF2, tất cả đều có song song cả hai ngôn ngữ. Clone branch
jazzyđể theo series này.
Tạo ROS 2 Workspace
Workspace là nơi chứa toàn bộ source code của bạn. ROS 2 sử dụng colcon làm build system (thay thế catkin của ROS 1).
# Tạo cấu trúc workspace
mkdir -p ~/ros2_ws/src
cd ~/ros2_ws

# Build workspace rỗng (tạo thư mục build, install, log)
colcon build
source install/setup.bash
Cấu trúc sau khi build:
~/ros2_ws/
├── build/          # Build artifacts
├── install/        # Installed packages (source cái này)
├── log/            # Build logs
└── src/            # Source code của bạn
Tip quan trọng: Luôn source workspace sau khi build:
# Thêm vào .bashrc
echo "source ~/ros2_ws/install/setup.bash" >> ~/.bashrc
Tạo Package đầu tiên
ROS 2 hỗ trợ 2 loại package: ament_python (Python thuần) và ament_cmake (C++). Series này dùng cả hai: bài đầu tiên này viết node bằng Python cho dễ tiếp cận, còn từ Phần 3 trở đi bạn sẽ thấy song song cả ví dụ C++ (rclcpp) lẫn Python (rclpy) — vì robot thật thường chạy node điều khiển bằng C++ để tối ưu hiệu năng.
cd ~/ros2_ws/src

# Tạo package Python
ros2 pkg create --build-type ament_python my_first_robot \
  --dependencies rclpy std_msgs

# (Tham khảo) Tạo package C++ — sẽ dùng ở các phần sau
# ros2 pkg create --build-type ament_cmake my_first_robot_cpp \
#   --dependencies rclcpp std_msgs

# Kết quả:
# my_first_robot/
# ├── my_first_robot/
# │   └── __init__.py
# ├── package.xml          # Metadata + dependencies
# ├── setup.py             # Python package config
# ├── setup.cfg            # Entry points config
# ├── resource/
# │   └── my_first_robot
# └── test/
Viết Node Publisher đầu tiên
Node là đơn vị xử lý cơ bản trong ROS 2. Mỗi node là một process làm một nhiệm vụ cụ thể. Hãy viết một node giả lập sensor nhiệt độ, publish dữ liệu lên topic /temperature.
Tạo file publisher
# ~/ros2_ws/src/my_first_robot/my_first_robot/temperature_publisher.py
import rclpy
from rclpy.node import Node
from std_msgs.msg import Float32
import random


class TemperaturePublisher(Node):
    """Node giả lập sensor nhiệt độ, publish mỗi giây."""

    def __init__(self):
        super().__init__('temperature_publisher')

        # Tạo publisher: msg type, topic name, queue size
        self.publisher_ = self.create_publisher(Float32, '/temperature', 10)

        # Timer gọi callback mỗi 1 giây
        self.timer = self.create_timer(1.0, self.timer_callback)

        # Nhiệt độ ban đầu
        self.base_temp = 25.0

        self.get_logger().info('Temperature publisher node started!')

    def timer_callback(self):
        msg = Float32()
        # Giả lập nhiệt độ dao động quanh 25°C
        msg.data = self.base_temp + random.uniform(-2.0, 2.0)

        self.publisher_.publish(msg)
        self.get_logger().info(f'Published temperature: {msg.data:.1f}°C')


def main(args=None):
    rclpy.init(args=args)

    node = TemperaturePublisher()

    try:
        rclpy.spin(node)  # Giữ node chạy liên tục
    except KeyboardInterrupt:
        pass
    finally:
        node.destroy_node()
        rclpy.shutdown()


if __name__ == '__main__':
    main()
Giải thích code
create_publisher(Float32, '/temperature', 10): Tạo publisher gửi message kiểuFloat32lên topic/temperature, queue size 10 (nếu subscriber chậm, giữ tối đa 10 message)create_timer(1.0, self.timer_callback): Gọitimer_callbackmỗi 1 giâyrclpy.spin(node): Giữ node chạy, lắng nghe callbacks — tương tự event loop
Viết Node Subscriber
Bây giờ viết node nhận dữ liệu nhiệt độ và xử lý (ví dụ: cảnh báo khi quá nóng):
# ~/ros2_ws/src/my_first_robot/my_first_robot/temperature_subscriber.py
import rclpy
from rclpy.node import Node
from std_msgs.msg import Float32


class TemperatureSubscriber(Node):
    """Node nhận nhiệt độ và cảnh báo khi vượt ngưỡng."""

    def __init__(self):
        super().__init__('temperature_subscriber')

        # Tạo subscription
        self.subscription = self.create_subscription(
            Float32,
            '/temperature',
            self.listener_callback,
            10
        )

        # Ngưỡng cảnh báo
        self.warning_threshold = 26.5
        self.critical_threshold = 27.5

        self.get_logger().info('Temperature subscriber node started!')

    def listener_callback(self, msg):
        temp = msg.data

        if temp >= self.critical_threshold:
            self.get_logger().error(
                f'CRITICAL: Temperature {temp:.1f}°C exceeds {self.critical_threshold}°C!'
            )
        elif temp >= self.warning_threshold:
            self.get_logger().warn(
                f'WARNING: Temperature {temp:.1f}°C above normal'
            )
        else:
            self.get_logger().info(f'Temperature OK: {temp:.1f}°C')


def main(args=None):
    rclpy.init(args=args)
    node = TemperatureSubscriber()

    try:
        rclpy.spin(node)
    except KeyboardInterrupt:
        pass
    finally:
        node.destroy_node()
        rclpy.shutdown()


if __name__ == '__main__':
    main()
Đăng ký entry points và build
Cập nhật setup.py
Để ROS 2 biết cách chạy các node, cần đăng ký chúng trong setup.py:
# ~/ros2_ws/src/my_first_robot/setup.py
from setuptools import find_packages, setup

package_name = 'my_first_robot'

setup(
    name=package_name,
    version='0.1.0',
    packages=find_packages(exclude=['test']),
    data_files=[
        ('share/ament_index/resource_index/packages',
            ['resource/' + package_name]),
        ('share/' + package_name, ['package.xml']),
    ],
    install_requires=['setuptools'],
    zip_safe=True,
    maintainer='your_name',
    maintainer_email='[email protected]',
    description='My first ROS 2 robot package',
    license='Apache-2.0',
    entry_points={
        'console_scripts': [
            'temp_pub = my_first_robot.temperature_publisher:main',
            'temp_sub = my_first_robot.temperature_subscriber:main',
        ],
    },
)
Build và chạy
# Về workspace root
cd ~/ros2_ws

# Build chỉ package của mình (nhanh hơn build all)
colcon build --packages-select my_first_robot --symlink-install

# Source lại workspace
source install/setup.bash

# Terminal 1: Chạy publisher
ros2 run my_first_robot temp_pub

# Terminal 2: Chạy subscriber
ros2 run my_first_robot temp_sub
Flag --symlink-install rất hữu ích: nó tạo symlink thay vì copy file, nên khi bạn sửa code Python, không cần build lại (chỉ cần restart node).
Kết quả bạn sẽ thấy:
[INFO] [temperature_publisher]: Published temperature: 24.3°C
[INFO] [temperature_publisher]: Published temperature: 26.8°C
[INFO] [temperature_subscriber]: Temperature OK: 24.3°C
[WARN] [temperature_subscriber]: WARNING: Temperature 26.8°C above normal
Introspect với CLI tools
ROS 2 CLI rất mạnh cho việc debug:
# Xem danh sách nodes đang chạy
ros2 node list
# /temperature_publisher
# /temperature_subscriber

# Xem thông tin chi tiết một node
ros2 node info /temperature_publisher

# Xem danh sách topics
ros2 topic list
# /temperature
# /parameter_events
# /rosout

# Xem dữ liệu trên topic (real-time)
ros2 topic echo /temperature

# Xem tần suất publish
ros2 topic hz /temperature
# average rate: 1.000

# Xem kiểu message
ros2 topic type /temperature
# std_msgs/msg/Float32

# Xem cấu trúc message
ros2 interface show std_msgs/msg/Float32
# float32 data
Launch Files — Chạy nhiều node cùng lúc
Thay vì mở nhiều terminal, hãy dùng launch file:
# ~/ros2_ws/src/my_first_robot/launch/temperature_system.launch.py
from launch import LaunchDescription
from launch_ros.actions import Node


def generate_launch_description():
    return LaunchDescription([
        Node(
            package='my_first_robot',
            executable='temp_pub',
            name='temperature_publisher',
            output='screen',
            parameters=[{
                'publish_rate': 1.0,
            }],
        ),
        Node(
            package='my_first_robot',
            executable='temp_sub',
            name='temperature_subscriber',
            output='screen',
        ),
    ])
Để launch file được nhận, thêm vào setup.py:
import os
from glob import glob

# Thêm vào data_files:
data_files=[
    ('share/ament_index/resource_index/packages',
        ['resource/' + package_name]),
    ('share/' + package_name, ['package.xml']),
    # Thêm dòng này cho launch files
    (os.path.join('share', package_name, 'launch'),
        glob(os.path.join('launch', '*launch.[pxy][yma]*'))),
],
Tạo thư mục launch và build lại:
mkdir -p ~/ros2_ws/src/my_first_robot/launch
# Copy file launch vào đây

cd ~/ros2_ws
colcon build --packages-select my_first_robot --symlink-install
source install/setup.bash

# Chạy cả hệ thống
ros2 launch my_first_robot temperature_system.launch.py

Visualize với rqt_graph
# Cài đặt rqt (nếu chưa có trong desktop install)
sudo apt install -y ros-jazzy-rqt ros-jazzy-rqt-graph

# Mở graph viewer
ros2 run rqt_graph rqt_graph
Bạn sẽ thấy sơ đồ trực quan: node temperature_publisher nối với temperature_subscriber qua topic /temperature. Đây là cách debug rất hiệu quả khi hệ thống phức tạp.
Tổng kết và bước tiếp theo
Trong bài này, bạn đã:
- Cài đặt ROS 2 Jazzy hoàn chỉnh trên Ubuntu 24.04
- Tạo workspace và package Python đầu tiên
- Viết node publisher và subscriber giao tiếp qua topic
- Sử dụng colcon build, launch files, và CLI tools để debug
Đây là nền tảng cho mọi thứ tiếp theo. Trong Phần 2, chúng ta sẽ đi sâu vào 3 primitives giao tiếp của ROS 2: Topics, Services và Actions — để bạn biết khi nào dùng cái gì khi thiết kế hệ thống robot.
Bài viết liên quan
- Giới thiệu ROS 2: Nền tảng lập trình robot thế hệ mới — Tổng quan kiến trúc, so sánh ROS 1 vs ROS 2
- SLAM và Navigation cho robot tự hành — Áp dụng ROS 2 để robot lập bản đồ và di chuyển
- Python trong điều khiển robot — Nền tảng Python cần thiết cho ROS 2