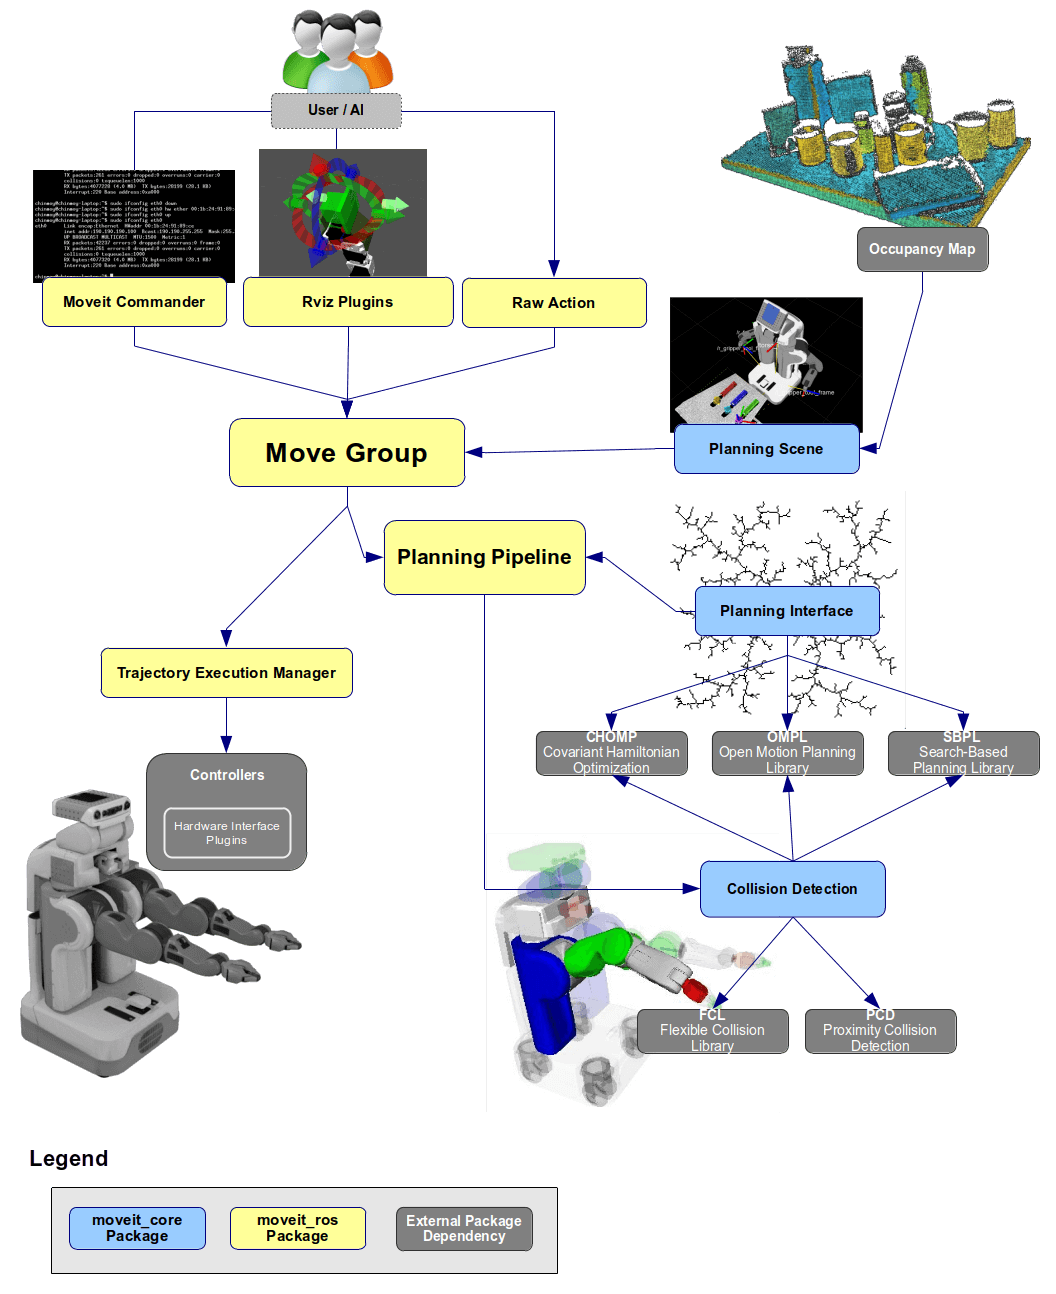
Tại sao Python cho Robotics?
Python không phải ngôn ngữ nhanh nhất, nhưng là ngôn ngữ hiệu quả nhất cho phát triển robot. Lý do: hệ sinh thái thư viện khổng lồ (OpenCV, NumPy, SciPy), tích hợp tốt với ROS 2, và thời gian phát triển nhanh gấp 3-5 lần so với C++. Trong thực tế, phần lớn logic điều khiển cấp cao đều viết bằng Python, chỉ các vòng lặp điều khiển tốc độ cao mới cần C++. Python cũng là ngôn ngữ chính khi triển khai Edge AI trên NVIDIA Jetson.

Điều khiển phần cứng cơ bản
GPIO với Raspberry Pi
import RPi.GPIO as GPIO
import time

# Cấu hình pin
MOTOR_PIN_1 = 17
MOTOR_PIN_2 = 27
ENABLE_PIN = 22

GPIO.setmode(GPIO.BCM)
GPIO.setup(MOTOR_PIN_1, GPIO.OUT)
GPIO.setup(MOTOR_PIN_2, GPIO.OUT)
GPIO.setup(ENABLE_PIN, GPIO.OUT)

# PWM cho điều khiển tốc độ
pwm = GPIO.PWM(ENABLE_PIN, 1000)  # 1kHz
pwm.start(0)

def set_motor(speed: float, direction: str = "forward"):
    """Điều khiển motor DC. speed: 0-100, direction: forward/backward"""
    GPIO.output(MOTOR_PIN_1, direction == "forward")
    GPIO.output(MOTOR_PIN_2, direction == "backward")
    pwm.ChangeDutyCycle(min(max(speed, 0), 100))

# Chạy motor 50% tốc độ trong 3 giây
set_motor(50, "forward")
time.sleep(3)
set_motor(0)
Giao tiếp Serial với Arduino
import serial
import struct

class RobotSerial:
    def __init__(self, port="/dev/ttyUSB0", baudrate=115200):
        self.ser = serial.Serial(port, baudrate, timeout=1)

    def send_velocity(self, linear: float, angular: float):
        """Gửi vận tốc tuyến tính và góc cho robot"""
        packet = struct.pack('<ff', linear, angular)
        checksum = sum(packet) & 0xFF
        self.ser.write(b'\xAA' + packet + bytes([checksum]))

    def read_encoders(self) -> tuple:
        """Đọc giá trị encoder từ Arduino"""
        self.ser.write(b'\xBB\x01')
        data = self.ser.read(8)
        if len(data) == 8:
            left, right = struct.unpack('<ii', data)
            return left, right
        return None
Vòng lặp điều khiển PID
PID controller là thuật toán điều khiển cơ bản nhất nhưng cực kỳ hiệu quả:
class PIDController:
    def __init__(self, kp: float, ki: float, kd: float, output_limits=(-100, 100)):
        self.kp, self.ki, self.kd = kp, ki, kd
        self.limits = output_limits
        self.integral = 0.0
        self.prev_error = 0.0

    def compute(self, setpoint: float, measurement: float, dt: float) -> float:
        error = setpoint - measurement
        self.integral += error * dt
        derivative = (error - self.prev_error) / dt if dt > 0 else 0
        self.prev_error = error

        output = self.kp * error + self.ki * self.integral + self.kd * derivative
        return max(self.limits[0], min(self.limits[1], output))

# Ví dụ: giữ robot đi thẳng theo line
pid = PIDController(kp=2.0, ki=0.1, kd=0.5)
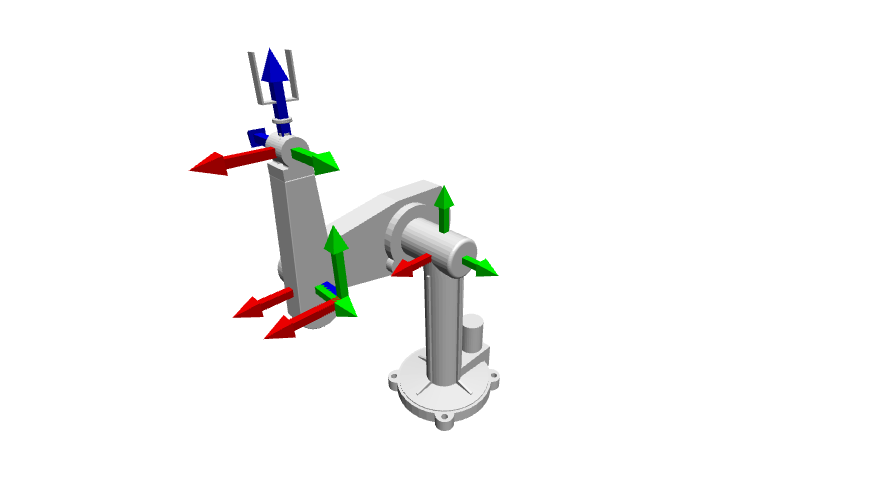
Inverse Kinematics với NumPy
Tính toán góc khớp để đưa end-effector đến vị trí mong muốn:
import numpy as np

def ik_2dof(x: float, y: float, l1: float, l2: float):
    """Inverse kinematics cho robot 2 bậc tự do"""
    dist = np.sqrt(x**2 + y**2)
    if dist > l1 + l2:
        raise ValueError("Vị trí ngoài tầm với")

    cos_q2 = (x**2 + y**2 - l1**2 - l2**2) / (2 * l1 * l2)
    q2 = np.arccos(np.clip(cos_q2, -1, 1))
    q1 = np.arctan2(y, x) - np.arctan2(l2 * np.sin(q2), l1 + l2 * np.cos(q2))

    return np.degrees(q1), np.degrees(q2)

# Robot arm với 2 link, mỗi link 15cm
theta1, theta2 = ik_2dof(x=0.2, y=0.1, l1=0.15, l2=0.15)
print(f"Joint 1: {theta1:.1f}°, Joint 2: {theta2:.1f}°")

Computer Vision cho Robot
Kết hợp OpenCV để robot nhận diện đối tượng, tương tự kỹ thuật trong kiểm tra chất lượng tự động bằng Computer Vision:
import cv2

def detect_colored_object(frame, lower_hsv, upper_hsv):
    """Phát hiện vật thể theo màu, trả về tâm (cx, cy)"""
    hsv = cv2.cvtColor(frame, cv2.COLOR_BGR2HSV)
    mask = cv2.inRange(hsv, lower_hsv, upper_hsv)
    contours, _ = cv2.findContours(mask, cv2.RETR_EXTERNAL, cv2.CHAIN_APPROX_SIMPLE)

    if contours:
        largest = max(contours, key=cv2.contourArea)
        M = cv2.moments(largest)
        if M["m00"] > 0:
            cx = int(M["m10"] / M["m00"])
            cy = int(M["m01"] / M["m00"])
            return cx, cy
    return None
Lời khuyên thực tế
- Bắt đầu với simulation: Dùng Gazebo hoặc PyBullet trước khi chạy trên robot thật
- Tách logic thành module: sensor, controller, planner nên là các class riêng biệt
- Logging mọi thứ: Ghi lại sensor data để debug offline, dùng
loggingmodule thay vìprint - Type hints: Luôn dùng type annotation để code dễ bảo trì
Python cho phép bạn đi từ prototype đến sản phẩm nhanh chóng. Kết hợp với ROS 2 và các thư viện khoa học, bạn có đủ công cụ để xây dựng hệ thống robot hoàn chỉnh.