OpenArm — A Training Roadmap for 7-DoF Robot Manipulation with SimpleVLA-RL
Over the first 5 parts of this SimpleVLA-RL series, we explored the theory: from the framework overview to the training pipeline and results, then comparing it with LeRobot. Now it is time to ask the most practical question: How do we apply this knowledge to a real robot?
In this post, we will analyze OpenArm in detail — a 7-DoF open-source humanoid arm with native LeRobot support since v0.5 — and chart a roadmap for training it to grasp carton boxes. This is the article for anyone ready to move from "reading papers" to "running real robots."
1. What Is OpenArm? Why Choose It?

OpenArm is a 7 degree-of-freedom humanoid robot arm designed specifically for AI and robotics research. Unlike rigid industrial arms such as the UR5 or Fanuc series, OpenArm uses Damiao QDD (Quasi-Direct Drive) motors — backdrivable actuators that allow you to physically push the arm without encountering significant resistance. This property is critical for teleoperation and manipulation research.
Key Specifications
| Specification | Value |
|---|---|
| Degrees of Freedom | 7 joints + gripper = 8 DoF |
| Reach | 633mm |
| Payload | 4.1 kg |
| Shoulder motors | DM8009 |
| Elbow/shoulder rotation motors | DM4340 |
| Wrist/gripper motors | DM4310 |
| Communication interface | CAN bus |
| Bimanual system price | ~$6,500 |
| LeRobot support | Native from v0.5+ |
Why OpenArm Is a Strong Research Platform
First, OpenArm is natively integrated into LeRobot from version v0.5. This means you do not need to write drivers or deal with low-level hardware communication — everything is standardized through commands like lerobot-calibrate, lerobot-teleoperate, and lerobot-record.
Second, the QDD backdrivable motors enable natural leader-follower teleoperation. You move the leader arm by hand, and the follower arm mirrors your movements precisely — this is the most popular method for collecting demonstration data today.
Third, at $6,500 for a bimanual system, the price is very reasonable compared to alternatives. For reference: Google ALOHA costs ~$32,000, and a Franka Emika Panda runs $30,000+.
2. The Goal: Teaching OpenArm to Grasp Carton Boxes
Let us set a concrete objective: teach OpenArm to pick up a carton box from a table and place it at a designated location. This is a task similar to what SimpleVLA-RL demonstrated in its paper (pick, stack, place objects).
Why this task? It is complex enough to be interesting — carton boxes come in various sizes, textures, and random placements — but not so difficult that it is unreachable for beginners. It also has high practical value in logistics and warehouse automation.
Technical Challenges
Before mapping out the roadmap, let us enumerate the key challenges:
- OpenArm is relatively new — no public dataset exists for box grasping tasks
- No standard simulation environment — SimpleVLA-RL requires simulation, but OpenArm lacks an official MuJoCo or Isaac Lab model (though an experimental
openarm_isaac_labrepo exists) - Action space mismatch — OpenArm has 8 DoF (7 joints + 1 gripper) versus the 14-DoF bimanual Piper used in the SimpleVLA-RL paper
- No pretrained VLA for OpenArm — OpenVLA-OFT was trained on different robots
3. Three Training Paths — Detailed Analysis
Given these challenges, there are three clear paths forward. Each suits a different audience and experience level.
PATH A — LeRobot Native (Recommended for Beginners)

This is the simplest path, leveraging the LeRobot ecosystem directly without requiring simulation.
Step 1: Hardware Setup + LeRobot
Set up the CAN bus interfaces on your Linux machine:
# Setup CAN interfaces for leader and follower
lerobot-setup-can --mode=setup --interfaces=can0,can1
Calibrate the robot — this mandatory step tells LeRobot the zero position of each joint:
# Calibrate the follower arm (the arm that performs tasks)
lerobot-calibrate \
  --robot.type=openarm_follower \
  --robot.port=can0 \
  --robot.side=right

# Calibrate the leader arm (the arm you control by hand)
lerobot-calibrate \
  --robot.type=openarm_leader \
  --robot.port=can1 \
  --robot.side=right
Step 2: Collect Demonstrations via Teleoperation
This is the most important step. You control the leader arm to perform the box grasping task while the follower arm mirrors your movements. LeRobot records the entire trajectory.
# Test teleoperation before recording
lerobot-teleoperate \
  --robot.type=openarm_follower \
  --teleop.type=openarm_leader

# Record dataset: 50+ episodes at 30 FPS
lerobot-record \
  --robot.type=openarm_follower \
  --teleop.type=openarm_leader \
  --repo-id=your-username/openarm-box-grasping \
  --fps=30 \
  --num-episodes=50
Important tip: Collect at least 50 episodes, but 100+ will yield significantly better results. Each episode should include variation — change the box position, orientation angle, and box size.
Step 3: Train a Model with LeRobot
LeRobot supports multiple policy architectures. For box grasping, the two best options are:
- ACT (Action Chunking with Transformers) — stable, easy to train, well-suited for straightforward tasks
- SmolVLA — a compact VLA model with better generalization thanks to its vision-language backbone
# Train ACT policy on collected dataset
python lerobot/scripts/train.py \
  --dataset.repo_id=your-username/openarm-box-grasping \
  --policy.type=act \
  --training.num_epochs=2000

# Or train SmolVLA for better generalization
python lerobot/scripts/train.py \
  --dataset.repo_id=your-username/openarm-box-grasping \
  --policy.type=smolvla \
  --training.num_epochs=500
For more details on SmolVLA training, see the dedicated SmolVLA training guide.
Step 4: Deploy and Iterate
# Run trained policy on real robot
python lerobot/scripts/eval.py \
  --policy.type=act \
  --policy.path=outputs/train/act_openarm/checkpoints/last/pretrained_model \
  --robot.type=openarm_follower
Observe the results, collect additional demos for failure cases, and retrain. This loop typically requires 3-5 iterations to achieve satisfactory results.
Pros of PATH A
- No simulation required — work directly with the real robot
- Beginner-friendly — LeRobot handles the complex parts
- Fast time-to-results — from setup to first results in 1-2 days
- Real data — no sim-to-real gap to worry about
Cons of PATH A
- Quality capped by demo quality — the robot cannot exceed the quality of your demonstrations
- No RL improvement — cannot discover novel behaviors beyond what you demonstrated
- Time-consuming data collection — each episode must be performed manually
- Poor scalability — adding new tasks requires entirely new demonstration sets
PATH B — SimpleVLA-RL Style (Advanced)
This follows the exact methodology from the SimpleVLA-RL paper: SFT first, RL second, everything in simulation.
Step 1: Find or Create a Simulation Environment for OpenArm
Good news: an openarm_isaac_lab repository already exists on GitHub, providing URDF/USD models of OpenArm for NVIDIA Isaac Lab. However, this is still experimental and does not include ready-made task environments.
# Concept: Create a task environment in Isaac Lab
# 1. Import OpenArm USD model
# 2. Create scene: table + carton box + target zone
# 3. Define reward: binary (box in target zone = 1, otherwise = 0)
# 4. Domain randomization: box position, size, texture
Step 2: Collect Simulation Demos
You can use scripted policies (code that controls the robot to grasp at known positions) or teleoperation within the simulation.
Step 3: SFT, then RL, then Sim-to-Real
This is the core SimpleVLA-RL pipeline:
- SFT (Supervised Fine-Tuning) on sim demos — teaches the VLA model "basic grasping"
- RL (GRPO) in simulation — lets the model discover better grasping strategies than the demos
- Sim-to-real transfer — deploy the trained model to the physical OpenArm
A major challenge here is the action space mismatch. OpenVLA-OFT (7B) in SimpleVLA-RL was pretrained for the bimanual Piper robot with 14 DoF. OpenArm only has 8 DoF. You would need to fine-tune the action head or use a different model entirely.
Pros of PATH B
- RL can discover novel behaviors — the SimpleVLA-RL paper showed emergent "pushcut" behaviors
- Excellent scalability — train thousands of episodes in sim with no human time cost
- Multiple tasks simultaneously — adding tasks in sim is easier than collecting real demos
Cons of PATH B
- Sim-to-real gap — simulation results do not guarantee real-world performance
- Requires a simulation environment — none exists off-the-shelf; you must build one or wait for the community
- Much more complex — requires familiarity with Isaac Lab, veRL, and GRPO
- Long setup time — potentially 2-4 weeks before you can begin training
PATH C — Hybrid (Best of Both Worlds)
This is the optimal path for experienced practitioners, combining the strengths of both approaches.
The 4-Step Process
- Collect real demos via LeRobot (50 episodes) — same as PATH A
- Train SmolVLA/ACT via LeRobot SFT — establish a working baseline on the real robot
- Fine-tune in simulation with RL — if a sim environment is available, use RL to improve beyond demo quality
- Deploy back to the real robot — validate sim-to-real transfer
Why Hybrid Is the Best Approach
- You get a working baseline immediately from PATH A (no waiting for simulation)
- When a sim environment becomes available, you can further improve with RL
- Real demos help reduce the sim-to-real gap since the model has already seen real data
- Flexible: if RL in sim does not improve performance, you still have a solid baseline
4. Action Space Comparison: OpenArm vs Piper
Understanding the action space difference is critical for adapting SimpleVLA-RL to OpenArm.
| Parameter | OpenArm (single arm) | Piper (bimanual - SimpleVLA-RL) |
|---|---|---|
| DoF | 7 joints + 1 gripper = 8 | 2 x (6 joints + 1 gripper) = 14 |
| Motor type | Damiao QDD | Servo |
| Action format | [j1, j2, j3, j4, j5, j6, j7, grip] |
[left_j1..j6, left_grip, right_j1..j6, right_grip] |
| Control mode | Position (joint angle) | Position (joint angle) |
| Backdrivable | Yes | No |
What does this mean in practice?
If you want to use OpenVLA-OFT (the pretrained model from SimpleVLA-RL), you need to modify the action head output dimension from 14 to 8. This is not a trivial change — the action head needs to be fine-tuned from scratch.
The more practical solution: use SmolVLA or ACT from LeRobot, as these are designed to be trained from scratch on any action space.
5. Hardware Checklist — What Beginners Need
If you decide to start with PATH A (recommended), here is the hardware you will need:
Required
| Item | Estimated Cost | Notes |
|---|---|---|
| OpenArm follower arm | ~$3,000 | The arm that performs tasks |
| OpenArm leader arm | ~$3,000 | The arm you control by hand |
| CAN-to-USB adapter x2 | ~$50 | Connect robot to computer |
| Linux computer + GPU | ~$1,500+ | NVIDIA GPU for training |
| USB camera (Logitech C920+) | ~$70 | Record visual observations |
Recommended
| Item | Estimated Cost | Notes |
|---|---|---|
| Intel RealSense D435 camera | ~$350 | Depth perception |
| Sturdy table + mount | ~$200 | Securely attach the robot |
| Carton boxes (various sizes) | ~$30 | Grasping targets |
| UPS (backup power) | ~$150 | Prevent data loss during outages |
Minimum total cost: ~$7,600 (bimanual system + computer + accessories)
For comparison: Google ALOHA costs around $35,000+. OpenArm saves nearly 5x while providing sufficient functionality for research.
6. Reference Results: Piper on Real Hardware
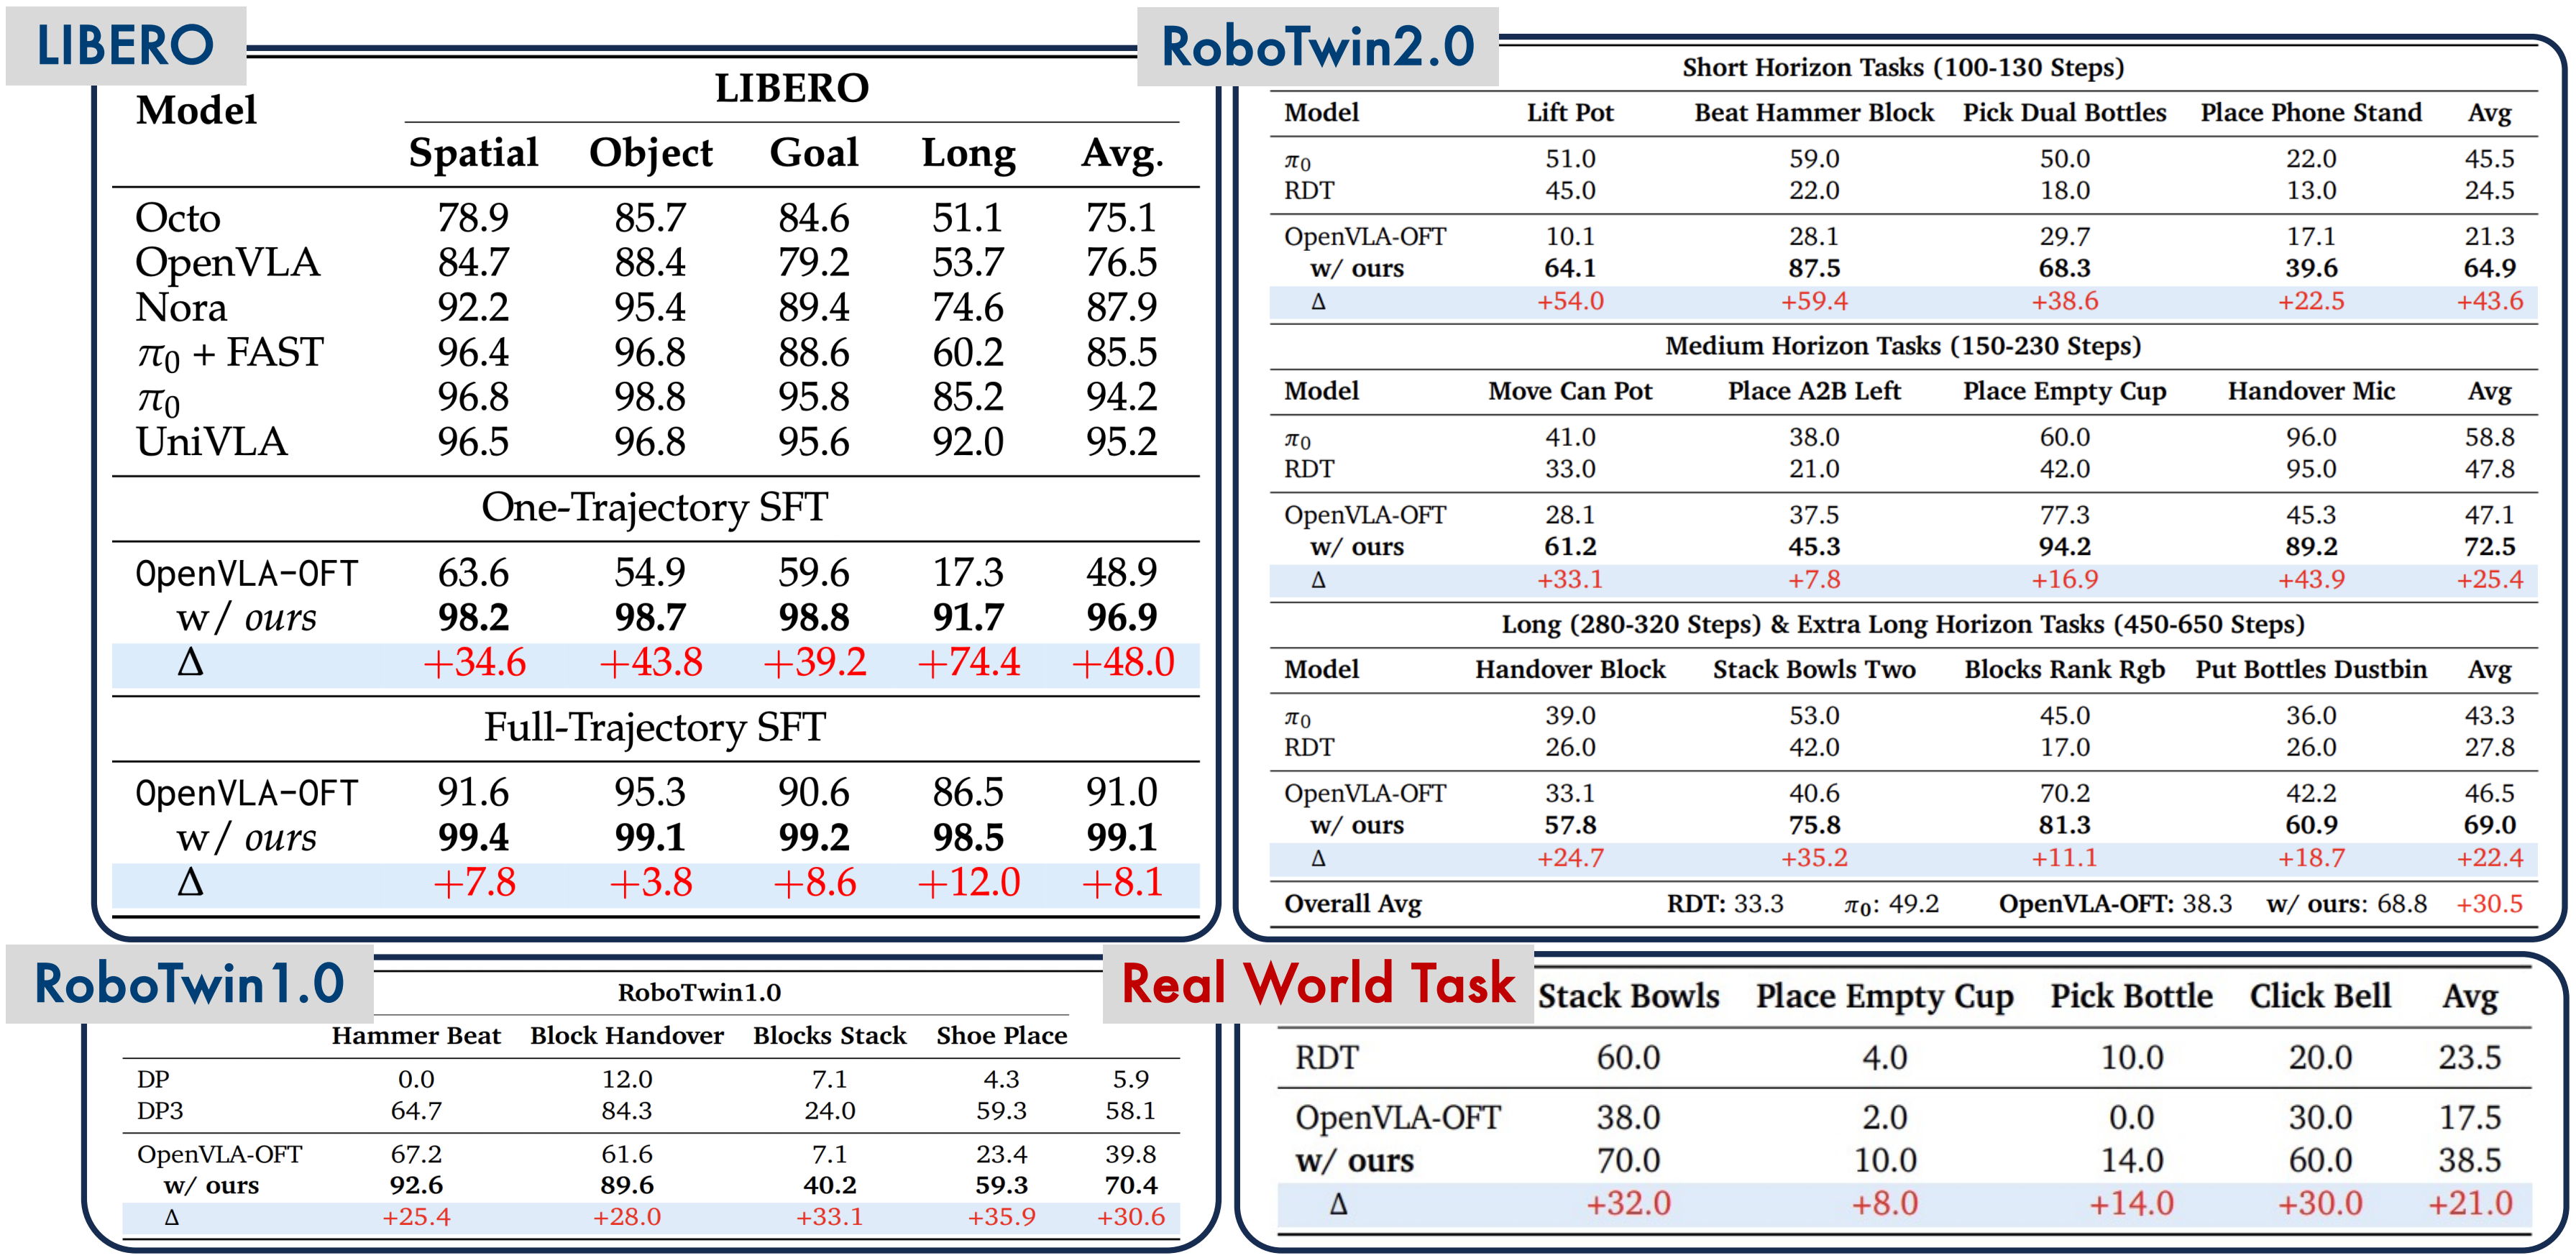
To set realistic expectations, let us look at SimpleVLA-RL's real-world results on the Piper robot (from the original paper):
| Task | Success Rate |
|---|---|
| Stack Bowls | 70% |
| Click Bell | 60% |
| Pick Bottle | 14% |
These numbers are after RL improvement. Before RL (SFT only), the results were significantly lower. Key takeaways:
- RL genuinely helps — but it is not magic
- Simple tasks (stacking) are easier than complex ones (picking bottles)
- Sim-to-real gap remains a major challenge — 14% for pick bottle
For OpenArm with box grasping (roughly similar in difficulty to Pick Bottle), realistic expectations for PATH A (SFT only) are around 30-50% success rate with 100+ demos. PATH C (hybrid with RL) could push this to 50-70%.
7. Bimanual: Scaling to Two Arms
OpenArm supports bimanual setups through LeRobot:
# Bimanual teleoperation
lerobot-teleoperate \
  --robot.type=bi_openarm_follower \
  --teleop.type=bi_openarm_leader

# Bimanual recording
lerobot-record \
  --robot.type=bi_openarm_follower \
  --teleop.type=bi_openarm_leader \
  --repo-id=your-username/openarm-bimanual-box \
  --fps=30 \
  --num-episodes=50
Bimanual operation opens up far more complex tasks: opening box lids, folding boxes, moving large objects. However, this is an advanced step — master single-arm manipulation first.
8. Series Roadmap — What Comes Next

This post provided the strategic overview. In the upcoming parts of this series, we will dive into hands-on implementation:
- Part 7: Data Collection — A step-by-step guide to setting up OpenArm + LeRobot, calibration, and collecting 50+ episodes of carton box grasping
- Part 8: Training & Deployment — Training SmolVLA/ACT on real data, deploying to the robot, evaluating results, and iterating
Conclusion
OpenArm is an excellent choice for anyone looking to begin robot manipulation research with VLA and RL. With its reasonable price, native LeRobot support, and backdrivable motors that make teleoperation effortless, it significantly lowers the barrier to entry.
Practical advice: Start with PATH A (LeRobot native). Collect 50 demos, train ACT, and observe the results. Only move to PATH C once you understand the pipeline and want to improve further with RL. PATH B (pure simulation) should only be attempted if you have prior experience with Isaac Lab.
Do not wait for the perfect setup — robot manipulation is a field where you learn the most from failures on real hardware.