Một robot là tập hợp nhiều bộ phận chuyển động: bánh xe, cánh tay, camera, LiDAR. Câu hỏi cốt lõi luôn là: vật mà camera nhìn thấy đang ở đâu so với tâm robot? So với bánh xe? Để trả lời, ROS 2 cần biết quan hệ toạ độ giữa mọi bộ phận. Đó là ba công cụ của bài này: URDF (mô tả hình dạng), TF2 (theo dõi quan hệ toạ độ), và RViz2 (nhìn thấy tất cả).
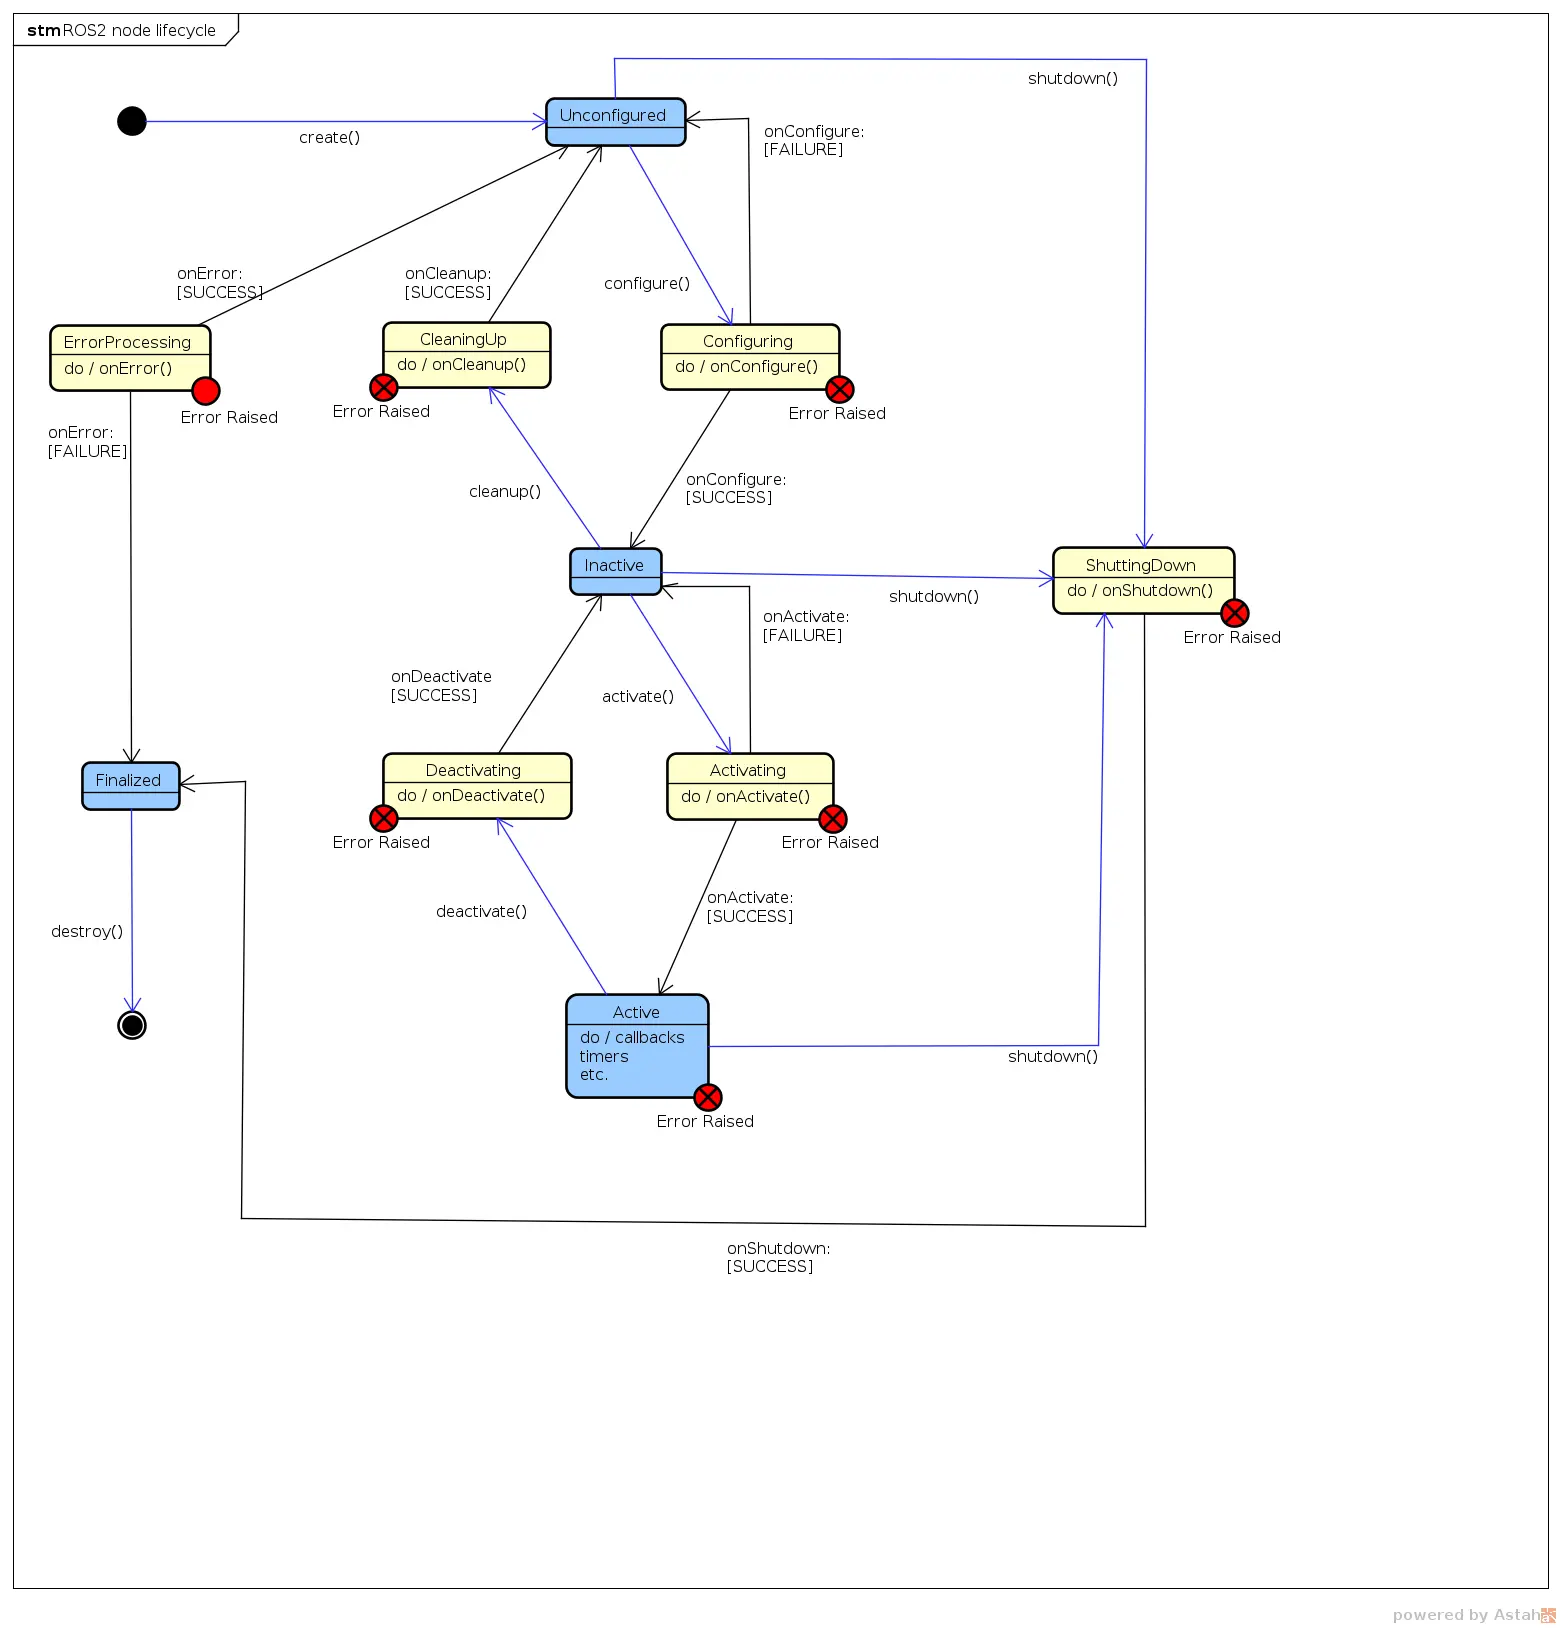
Bài này nối tiếp Phần 3: Parameters, Launch, Lifecycle.
Phiên bản (6/2026): ROS 2 Jazzy (Ubuntu 24.04). Ví dụ có cả C++ và Python. RViz2 là công cụ visualize chính. Trên Humble đổi
jazzy→humble.
1. TF2 — cây quan hệ toạ độ
Mỗi bộ phận robot có một frame (hệ toạ độ riêng): base_link (tâm robot), laser (LiDAR), camera_link, left_wheel… TF2 duy trì một cây transform mô tả vị trí + hướng (translation + rotation) của frame con so với frame cha, theo thời gian thực.
            map
             │
            odom
             │
         base_link
        ┌────┼─────────┐
     laser  camera   left_wheel
Nhờ cây này, bạn hỏi "điểm trong frame laser nằm ở đâu trong frame map?" và TF2 tự tính chuỗi phép biến đổi — bạn không phải nhân ma trận bằng tay.
Static transform — frame gắn cứng
LiDAR bắt vít cố định lên thân robot → quan hệ base_link → laser không đổi. Đó là static transform.
# Cách nhanh nhất: phát static TF bằng CLI
# args: x y z yaw pitch roll  frame_cha  frame_con
ros2 run tf2_ros static_transform_publisher \
  0.1 0 0.2 0 0 0 base_link laser
Trong launch file (cách thực tế):
from launch_ros.actions import Node

Node(
    package='tf2_ros',
    executable='static_transform_publisher',
    arguments=['0.1', '0', '0.2', '0', '0', '0', 'base_link', 'laser'],
)
Dynamic transform — frame chuyển động (code)
Quan hệ odom → base_link thay đổi liên tục khi robot di chuyển → cần broadcast transform trong code.
Python:
import rclpy
from rclpy.node import Node
from tf2_ros import TransformBroadcaster
from geometry_msgs.msg import TransformStamped
import math


class OdomBroadcaster(Node):
    def __init__(self):
        super().__init__('odom_broadcaster')
        self.br = TransformBroadcaster(self)
        self.timer = self.create_timer(0.05, self.tick)  # 20 Hz
        self.x = 0.0

    def tick(self):
        self.x += 0.01  # giả lập robot tiến lên
        t = TransformStamped()
        t.header.stamp = self.get_clock().now().to_msg()
        t.header.frame_id = 'odom'
        t.child_frame_id = 'base_link'
        t.transform.translation.x = self.x
        # Quaternion cho yaw = 0
        t.transform.rotation.w = 1.0
        self.br.sendTransform(t)
C++:
#include "rclcpp/rclcpp.hpp"
#include "tf2_ros/transform_broadcaster.h"
#include "geometry_msgs/msg/transform_stamped.hpp"

class OdomBroadcaster : public rclcpp::Node
{
public:
  OdomBroadcaster() : Node("odom_broadcaster")
  {
    br_ = std::make_unique<tf2_ros::TransformBroadcaster>(*this);
    timer_ = create_wall_timer(std::chrono::milliseconds(50),
                               std::bind(&OdomBroadcaster::tick, this));
  }
private:
  void tick()
  {
    x_ += 0.01;
    geometry_msgs::msg::TransformStamped t;
    t.header.stamp = now();
    t.header.frame_id = "odom";
    t.child_frame_id = "base_link";
    t.transform.translation.x = x_;
    t.transform.rotation.w = 1.0;
    br_->sendTransform(t);
  }
  std::unique_ptr<tf2_ros::TransformBroadcaster> br_;
  rclcpp::TimerBase::SharedPtr timer_;
  double x_ = 0.0;
};
Tra cứu transform — frame A so với frame B
Python (lookup):
from tf2_ros import TransformException
from tf2_ros.buffer import Buffer
from tf2_ros.transform_listener import TransformListener

class FrameLookup(Node):
    def __init__(self):
        super().__init__('frame_lookup')
        self.buffer = Buffer()
        self.listener = TransformListener(self.buffer, self)
        self.create_timer(1.0, self.lookup)

    def lookup(self):
        try:
            tf = self.buffer.lookup_transform('map', 'laser', rclpy.time.Time())
            self.get_logger().info(
                f'laser trong map: x={tf.transform.translation.x:.2f}')
        except TransformException as e:
            self.get_logger().warn(f'Chưa có transform: {e}')
Công cụ debug TF2
# Vẽ cây frame ra file PDF
ros2 run tf2_tools view_frames

# In ra transform giữa 2 frame liên tục
ros2 run tf2_ros tf2_echo base_link laser
Lỗi kinh điển: "lookup would require extrapolation into the future". Nghĩa là bạn hỏi transform ở thời điểm chưa có dữ liệu. Dùng
rclpy.time.Time()(rỗng = "mới nhất") thay vì timestamp cụ thể khi mới học.
2. URDF — mô tả hình dạng robot
URDF (Unified Robot Description Format) là file XML mô tả robot gồm links (bộ phận cứng) nối với nhau qua joints (khớp).
<!-- robot.urdf -->
<?xml version="1.0"?>
<robot name="my_robot">

  <!-- Thân robot -->
  <link name="base_link">
    <visual>
      <geometry><box size="0.3 0.2 0.1"/></geometry>
      <material name="blue"><color rgba="0 0 0.8 1"/></material>
    </visual>
  </link>

  <!-- LiDAR -->
  <link name="laser">
    <visual>
      <geometry><cylinder radius="0.03" length="0.04"/></geometry>
    </visual>
  </link>

  <!-- Khớp gắn LiDAR lên thân (cố định) -->
  <joint name="laser_joint" type="fixed">
    <parent link="base_link"/>
    <child link="laser"/>
    <origin xyz="0.1 0 0.1" rpy="0 0 0"/>
  </joint>

</robot>
Các loại joint quan trọng:
| Type | Ý nghĩa |
|---|---|
fixed |
Gắn cứng, không cử động (LiDAR, camera) |
continuous |
Quay vô hạn (bánh xe) |
revolute |
Quay có giới hạn góc (khớp cánh tay) |
prismatic |
Trượt thẳng (gripper, thang nâng) |
Xacro — URDF gọn hơn
URDF thật rất dài và lặp. Xacro thêm biến và macro:
<?xml version="1.0"?>
<robot xmlns:xacro="http://www.ros.org/wiki/xacro" name="my_robot">
  <xacro:property name="wheel_radius" value="0.05"/>

  <xacro:macro name="wheel" params="prefix y_pos">
    <link name="${prefix}_wheel">
      <visual><geometry>
        <cylinder radius="${wheel_radius}" length="0.04"/>
      </geometry></visual>
    </link>
    <joint name="${prefix}_wheel_joint" type="continuous">
      <parent link="base_link"/>
      <child link="${prefix}_wheel"/>
      <origin xyz="0 ${y_pos} 0" rpy="${-pi/2} 0 0"/>
      <axis xyz="0 0 1"/>
    </joint>
  </xacro:macro>

  <xacro:wheel prefix="left"  y_pos="0.12"/>
  <xacro:wheel prefix="right" y_pos="-0.12"/>
</robot>
robot_state_publisher — biến URDF thành TF2
Đây là cầu nối quan trọng: robot_state_publisher đọc URDF + trạng thái khớp (/joint_states) rồi tự phát toàn bộ TF2 cho mọi link. Bạn không phải viết broadcaster cho từng frame.
# launch/display.launch.py
import os
from launch import LaunchDescription
from launch_ros.actions import Node
from ament_index_python.packages import get_package_share_directory
import xacro

def generate_launch_description():
    pkg = get_package_share_directory('my_robot_desc')
    urdf = os.path.join(pkg, 'urdf', 'robot.urdf.xacro')
    robot_desc = xacro.process_file(urdf).toxml()

    return LaunchDescription([
        Node(
            package='robot_state_publisher',
            executable='robot_state_publisher',
            parameters=[{'robot_description': robot_desc}],
        ),
        # GUI kéo thanh trượt để quay khớp (chỉ để test)
        Node(
            package='joint_state_publisher_gui',
            executable='joint_state_publisher_gui',
        ),
        Node(package='rviz2', executable='rviz2'),
    ])
3. RViz2 — nhìn thấy robot và dữ liệu
RViz2 là công cụ visualize 3D của ROS 2. Sau khi chạy launch trên:
ros2 launch my_robot_desc display.launch.py
Trong RViz2:
- Đặt Fixed Frame =
base_link(góc trên trái). - Bấm Add → thêm display RobotModel → thấy robot dựng từ URDF.
- Add → TF → thấy các trục toạ độ của mọi frame.
- Kéo thanh trượt trong
joint_state_publisher_gui→ bánh xe quay trong RViz2.
Các display hữu ích khác: LaserScan (/scan từ LiDAR), PointCloud2, Image (camera), Path (đường đi Nav2). Đây là cách bạn "nhìn thấy" robot nghĩ gì — cực kỳ quan trọng khi debug.
Mẹo: Lưu cấu hình RViz2 (
File → Save Config As) thành file.rviz, rồi nạp tự động trong launch:arguments=['-d', rviz_config_path]. Đỡ phải add lại display mỗi lần.
Pitfalls thường gặp
- RobotModel không hiện — Fixed Frame sai, hoặc
robot_state_publisherchưa chạy, hoặc URDF có link không nối vào cây joint. - TF "không liền" — thiếu một transform trong chuỗi (vd thiếu
odom → base_link). Chạyros2 run tf2_tools view_framesđể thấy cây bị đứt ở đâu. - Xacro lỗi parse — quên
xmlns:xacro, hoặc dùng${}mà không khai báo property. - Bánh xe quay sai trục — sai
axishoặcrpytrong joint. Dựng từng link trong RViz2 để kiểm tra trực quan.
Tổng kết
- URDF/Xacro mô tả hình dạng robot bằng links + joints.
- robot_state_publisher biến URDF thành cây TF2 tự động.
- TF2 trả lời mọi câu hỏi "frame A ở đâu so với frame B".
- RViz2 cho bạn nhìn thấy robot, các frame, và dữ liệu sensor.
Có URDF và TF2 rồi, ta sẵn sàng điều khiển phần cứng thật. Phần 5: ros2_control sẽ dùng chính URDF này để khai báo hardware interface và lái motor.
Bài viết liên quan
- ROS 2 từ A đến Z (P3): Parameters, Launch, Lifecycle — Khởi động hệ thống display
- ROS 2 từ A đến Z (P5): ros2_control và Hardware — Dùng URDF để điều khiển motor
- ROS 2 từ A đến Z (P6): Nav2 — Robot tự hành — TF2 là nền tảng của navigation